

Wiping soot off your ceiling with a regular wet rag just spreads a dark, greasy smear that makes everything worse. That’s the mistake most homeowners make when they try DIY cleanup after a candle mishap, furnace puffback, or small kitchen fire. Soot isn’t regular dust. It’s sticky, carbon-loaded residue that embeds fast if you use the wrong technique. The good news? You can remove most ceiling soot safely using a specific dry-to-damp sequence that lifts particles instead of grinding them deeper. Here’s the process that actually works.
Complete Soot Removal Process: Detailed Steps and Techniques
Soot removal needs a systematic approach that goes from gentle to stronger methods. You don’t jump straight to harsh chemicals. Following the complete sequence, including safety prep, prevents spreading soot or pushing it deeper into your ceiling. The whole thing typically takes 2 to 4 hours for an average room, though heavily soiled ceilings might need extra cycles.
1. Safety Preparation and Room Setup
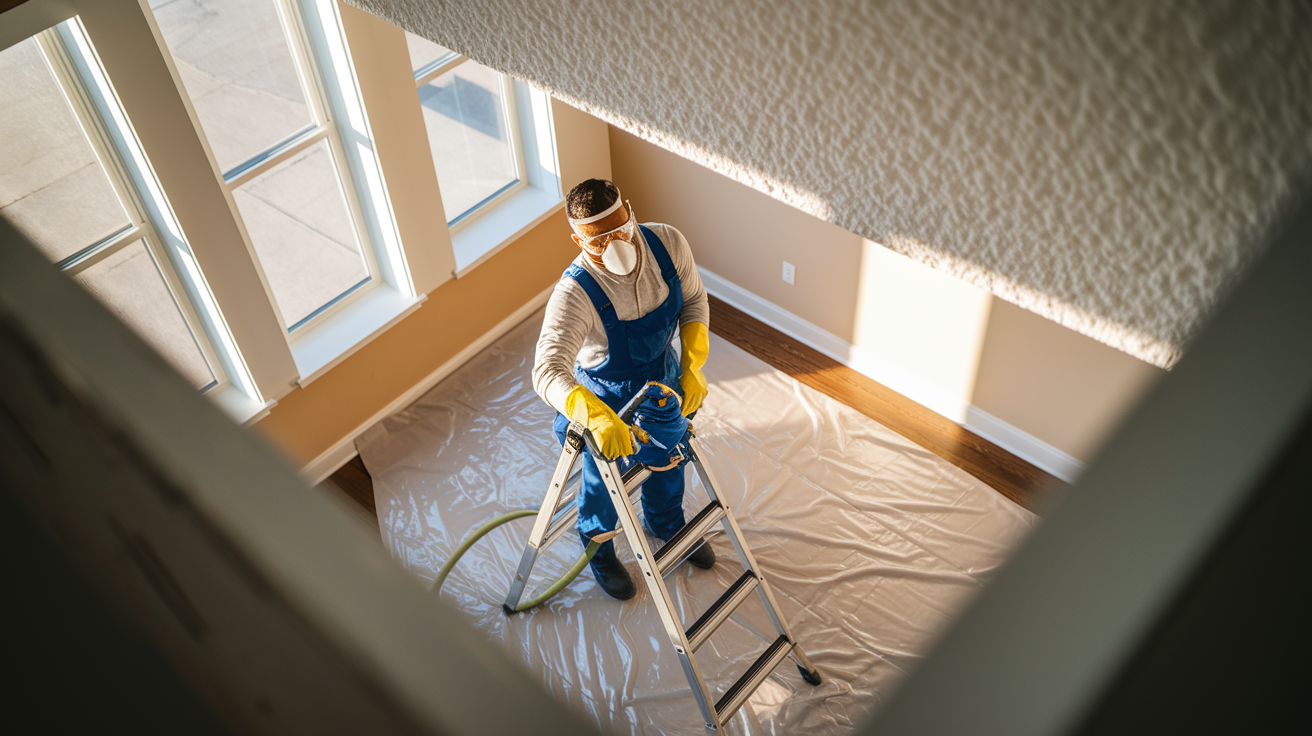
Soot particles contain carbon compounds and chemical residues that irritate your lungs and skin when you’re working directly overhead. Before touching anything, gather your protective gear: N95 or better dust mask, safety goggles (not just glasses because soot falls into your eyes when you’re looking up), rubber gloves, and long sleeves. This isn’t optional.
Inhaling ceiling soot causes respiratory irritation that sticks around for days.
Open windows and position fans to create cross ventilation that pushes air outside, not just around the room. Regular household vacuums without HEPA filters blow soot particles back into the air, making your problem worse.
Remove small items from the room entirely. Cover remaining furniture with drop cloths, tucking the edges underneath so falling soot doesn’t settle on exposed surfaces. Protect floors with plastic sheeting, taping edges to prevent soot from sliding underneath during cleanup. If you’re using a ladder, make sure it’s stable on the protected floor and positioned so you’re not overreaching. Soot cleanup takes longer than you expect, and tired arms lead to falls.
2. Initial Loose Soot Removal with HEPA Vacuum
Attach the soft brush attachment to your HEPA filter vacuum. The soft bristles matter because hard attachments scratch surfaces and grind soot into porous materials. Work in small sections using gentle, overlapping strokes across the ceiling. Hold the vacuum nozzle 1 to 2 inches from the surface for textured ceilings. Direct contact crushes the texture and embeds soot.
Start from the least affected area and work toward the heaviest deposits. This prevents dragging concentrated soot across cleaner sections. Use light touch only. Hard pressure pushes soot deeper into porous materials. If you’re seeing dark smears instead of clean removal, you’re pressing too hard.
The vacuum removes the loose top layer, but don’t expect perfection at this stage. You’re preventing loose particles from smearing during the next steps.
3. Dry Cleaning Sponge Application
Get dry cleaning sponges, also called chemical sponges, made of vulcanized rubber. These look like dense foam blocks and feel slightly tacky. They work without water, lifting soot through gentle contact rather than pushing it around.
Wipe the ceiling surface gently using straight, overlapping strokes. Never circular motions that smear soot across a wider area. Turn the sponge frequently to expose clean surface as it becomes saturated with soot. The sponge darkens fast, sometimes after just a few passes.
Use a light touch and blotting motions that lift soot rather than pushing it into the surface. Think of it as dabbing, not scrubbing. When all sides of the sponge are saturated, slice away the soiled outer layer with a utility knife to expose fresh cleaning surface underneath. One sponge typically cleans 50 to 75 square feet before it’s spent, depending on soot density.
This method handles most light to moderate soot without introducing moisture that can set stains or damage ceiling materials.
4. Mild Cleaning Solution Application for Remaining Residue
Mix your cleaning solution in a bucket: 1 gallon warm water, 1 tablespoon mild dish soap, 1 tablespoon household ammonia. The ammonia cuts through greasy soot residue that dry sponges leave behind. Test this solution on a small inconspicuous area first before applying to larger surfaces, perhaps inside a closet or behind where a door swings open.
Dampen a microfiber cloth or soft sponge with solution, then wring it out until it’s barely damp. Never saturate the ceiling surface. Excess moisture soaks into drywall and textured surfaces, causing swelling, texture damage, and potential mold growth.
Work in 3×3 foot sections using gentle blotting and dabbing motions, not wiping or scrubbing. Press the damp cloth against the soot stain, hold for a moment, then lift straight away. Change to a clean cloth portion frequently. You’re absorbing soot into the cloth, not spreading it around. When your cloth is dark with soot, rinse it thoroughly or switch to a fresh one.
Allow each section to air dry before moving to the next. This lets you see if the stain is actually gone or if it’s just hidden by moisture that’ll reappear when dry.
5. Stubborn Stain Treatment with Stronger Solutions
If basic cleaning leaves persistent dark staining, greasy residue, or discoloration that remains after the section dries, you need stronger solutions. For moderate stubborn stains, create a paste using baking soda and small amount of water until it’s thick like toothpaste. Apply gently with a soft cloth, let sit 5 to 10 minutes, then wipe away with a damp cloth. The mild abrasive action lifts embedded soot without damaging paint.
For heavier carbon buildup that won’t budge, mix TSP (trisodium phosphate) solution following manufacturer instructions, typically 1/4 cup TSP per gallon water. TSP is harsh on skin and eyes, so wear heavy duty rubber gloves and goggles while handling it. TSP isn’t suitable for all surfaces. It can dull certain paint finishes and damage some ceiling materials, so consult manufacturer instructions and test in a hidden spot first.
Apply stronger solutions with dwell time: apply the solution, wait 3 to 5 minutes while it breaks down the soot bonds, then gently blot away. Don’t let it dry on the surface. For oil based soot residue, the kind that feels slightly greasy when you touch it, use a small amount of denatured alcohol or mineral spirits on a cloth for spot treatment only. These solvents cut through oily deposits but evaporate quickly.
Multiple applications may be necessary for deeply penetrated staining. Allow complete drying between attempts so you can accurately assess what’s left.
Never scrub hard. That grinds soot deeper into porous surfaces. Never start with wet cleaning before dry methods. Moisture turns dry soot into muddy paste that sets like dye. Never mix cleaning chemicals beyond these specified combinations. Mixing ammonia with bleach or other cleaners creates dangerous fumes.
6. Rinsing and Neutralizing
After using any cleaning solution, wipe the cleaned areas with a clean cloth dampened with plain warm water. This removes all cleaning solution residue, which attracts dirt and causes faster re-soiling if left behind. For TSP or ammonia use, thorough rinsing is critical. These chemicals continue working and can damage paint or drywall if not removed.
Change your rinse water frequently. If the water in your bucket is gray or brown, you’re redepositing soot instead of removing it. Use the same gentle blotting technique you used for cleaning.
7. Final Drying and Assessment
Allow the ceiling to dry completely, minimum 2 to 4 hours, or overnight for textured surfaces that hold moisture. Increase air circulation with fans pointed at the ceiling to speed drying. Don’t aim fans directly at wet textured ceilings at high speed, though. That can damage loose texture material.
Inspect under good lighting once dry. Natural daylight shows remaining discoloration better than artificial light. Determine if additional cleaning cycles are needed or if permanent staining has penetrated beyond what cleaning can fix. Heavy soot deposits often require 2 to 3 complete cleaning cycles, with full drying time between each round.
Patience and proper technique work better than aggressive scrubbing. Severely penetrated staining may have permanently discolored the ceiling material, requiring stain blocking primer and repainting as the final solution. Extensive damage from fires or major malfunctions requires professional restoration services with specialized equipment. The complete process with drying time typically spans 4 to 8 hours for a standard room when you account for multiple applications and waiting periods.
Understanding Different Ceiling Surfaces and Soot Removal Approaches

Ceiling surface type determines how aggressive you can be with cleaning and which methods work without causing damage. Porous materials absorb soot deeper and require gentler approaches, while smooth surfaces tolerate more direct cleaning. Always test any cleaning solution in a hidden area first, perhaps where a smoke detector covers the surface or in a closet corner.
Smooth Painted Ceilings
Smooth painted ceilings with non porous surfaces offer the most straightforward cleaning approach. The paint creates a barrier that keeps soot on the surface rather than letting it soak in. You can use slightly more pressure with dry sponges and damp cloths without worrying about crushing texture or embedding particles deeper.
Flat paint finishes show staining more than satin or semi gloss but clean about the same. The main concern is avoiding oversaturation that causes paint to soften or peel. Keep your cleaning cloths damp, not wet, and you’ll get good results with the standard cleaning solution method.
Textured and Popcorn Ceilings
Textured and popcorn ceilings present the biggest challenge because soot settles into all the crevices and texture valleys. These porous surfaces absorb soot like a sponge, and aggressive cleaning crushes the delicate texture material. Use extremely light touch with both vacuum and dry sponges. Hold the vacuum nozzle slightly above the surface rather than dragging it across.
Moisture is your enemy with popcorn texture. Too much liquid causes the texture material to soften and fall off in chunks. Keep cleaning cloths barely damp and use blotting motions only, no wiping or scrubbing. Multiple gentle cleaning cycles with complete drying between each round works better than one aggressive attempt.
Accept that heavily soiled textured ceilings may never return to original appearance. Popcorn texture naturally traps dirt, and severe soot staining often requires professional texture repair or removal followed by repainting.
Plaster Ceilings
Plaster ceilings in older homes are more delicate than modern drywall. The plaster surface is harder but more brittle, and moisture can damage the plaster to lath bond underneath. Use the dry cleaning sponge method first and keep wet cleaning minimal.
Test chemical cleaners carefully on plaster. TSP and other alkaline cleaners can react with lime based plaster, causing discoloration or surface degradation. Stick with mild dish soap solutions and short dwell times. If you notice any surface softening or chalking, stop immediately and switch to dry methods only.
Before starting any cleaning on textured or plaster ceilings, assess the overall condition. Cracking, sagging, or loose sections indicate underlying problems that cleaning moisture will make worse. If the ceiling already shows structural issues, professional assessment prevents turning a cleaning project into a ceiling repair emergency.
Addressing Smoke Damage Sources: Fireplaces, Candles, and Appliances
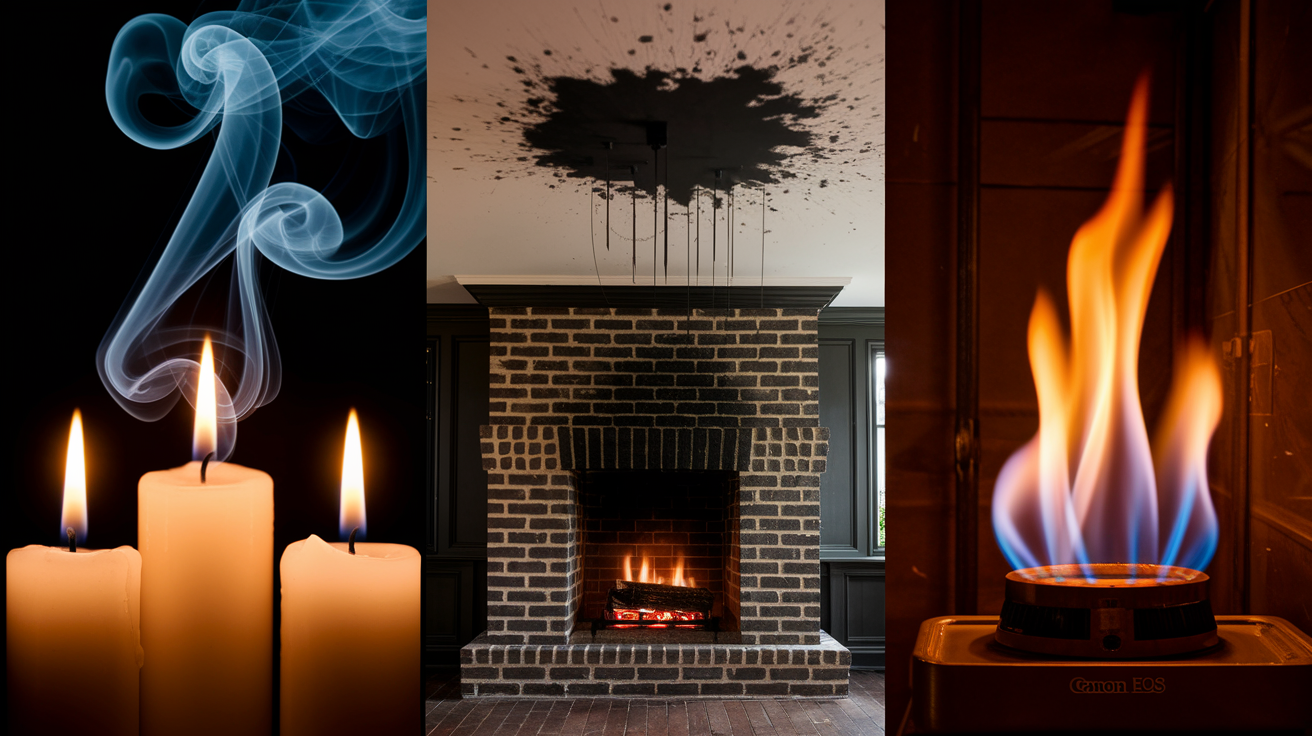
Fireplace and chimney soot leaves heavy, oily residue that spreads across ceilings when draft problems or incomplete combustion send smoke into the room instead of up the flue. Wood burning residue contains creosote, a sticky tar like substance that resists water based cleaning and requires degreasing solutions. If you’re seeing black or brown oily deposits concentrated near your fireplace, address the draft and combustion issues through proper chimney maintenance before cleaning the ceiling. Otherwise, the problem returns immediately.
Candle smoke deposits produce fine, powdery soot that accumulates gradually and often goes unnoticed until you see dark shadows above your favorite candle spots. Scented candles burn less cleanly than unscented versions, and cheap candles with synthetic fragrances create more soot than quality candles with natural wicks. The accumulation pattern follows air currents, so you’ll see staining spreading outward and upward from the candle location. This type responds well to dry sponge cleaning because it hasn’t penetrated deeply.
Gas appliance issues create yellow or orange flames that deposit soot through improper combustion. If you’re seeing soot near gas furnace vents, water heaters, or gas ranges, shut off the appliance immediately and call for professional inspection before cleaning anything. This indicates a serious safety problem. Incomplete combustion means carbon monoxide production. The soot is the visible warning sign of an invisible danger.
Determining your soot origin helps you choose the right cleaning approach and, more importantly, prevents recurrence. Light, powdery deposits suggest candle smoke that responds to gentle dry cleaning. Heavy, greasy stains point to fireplace or heating system problems requiring both cleaning and source repair. Sudden appearance of soot after years without problems indicates equipment malfunction needing immediate professional attention, not just cleanup.
Repainting and Sealing Your Ceiling After Soot Cleaning
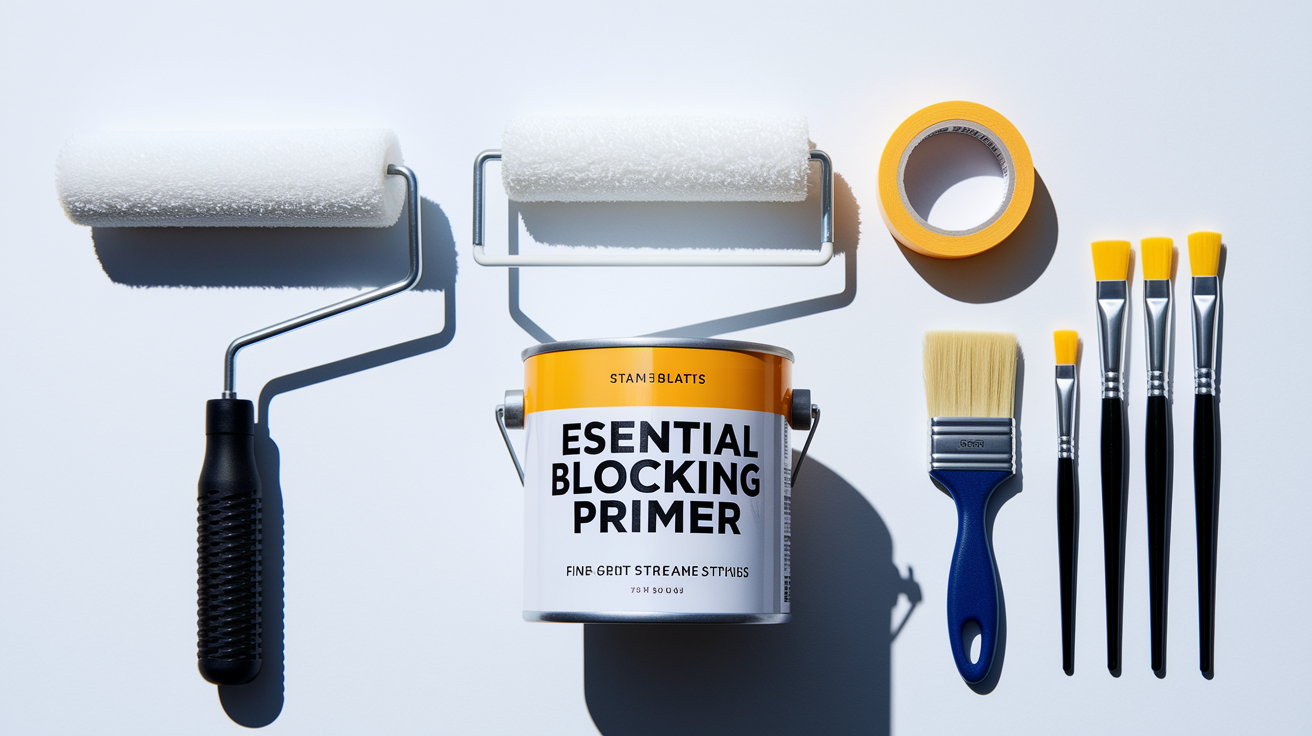
Sometimes cleaning removes the surface soot but leaves permanent discoloration stained into the paint or ceiling material itself. If you’ve completed multiple cleaning cycles and the ceiling still shows obvious dark patches, yellow staining, or uneven discoloration, cleaning alone won’t restore the appearance. Stain blocking primer prevents the discoloration from bleeding through your new paint, which happens with regular primer when covering heavy smoke damage.
Once your ceiling is completely dry (wait at least 24 hours after final cleaning), lightly sand any rough spots or raised texture from the cleaning process using fine grit sandpaper. Wipe away dust with a dry cloth. Apply oil based or shellac based stain blocking primer to the affected areas or the entire ceiling if staining is widespread. Water based primers work for light smoke damage but allow heavier staining to bleed through. Use a roller with appropriate nap for your ceiling texture, shorter nap for smooth surfaces, longer nap for textured ceilings. Allow primer to dry per manufacturer instructions (usually 2 to 4 hours). Then apply your topcoat paint, matching the existing ceiling color and finish. Most ceilings use flat white latex paint, but check your existing finish first.
- Remove all furniture or cover securely with plastic sheeting, not cloth drop cloths that let paint mist through
- Apply stain blocking primer in thin, even coats using a roller, cutting in edges with a brush first
- Allow primer to dry completely, checking that no staining shows through before proceeding
- Apply first topcoat of ceiling paint, working in one direction with overlapping strokes
- Let first coat dry 4 to 6 hours, then inspect coverage under good lighting
- Apply second topcoat if needed for even color and complete coverage of primer
Removing Smoke Odor and Deodorizing After Soot Cleanup

Smoke odor persists even after visible soot removal because microscopic particles embed in porous materials throughout the room and in your ventilation system. The smell isn’t just in your ceiling. It’s in walls, insulation, ductwork, and any fabric or porous surface the smoke touched. Soot particles release odor molecules continuously until they’re sealed or removed completely.
Natural deodorizing methods work for light to moderate smoke odor. Place open containers of baking soda around the room and on top of furniture to absorb odor molecules from the air. Replace every few days until smell dissipates. Set out bowls of white vinegar, which neutralizes smoke odor through mild acidity. Position activated charcoal bags near the formerly soiled ceiling area. These absorb odors more effectively than baking soda and last for months. Increase air circulation with fans and open windows to flush out odor laden air and bring fresh air in. For persistent odor that survives these methods for more than a week, professional ozone treatment becomes necessary. Ozone generators produce O3 molecules that chemically break down odor compounds, but the process requires evacuating the space completely and running the equipment for hours.
- Sprinkle baking soda on carpets and upholstered furniture, let sit overnight, then vacuum thoroughly with HEPA filter
- Wash all removable fabric items (curtains, throw pillows, blankets) that were in the room during smoke exposure
- Wipe down all hard surfaces including walls, trim, and furniture with diluted vinegar solution (1 cup vinegar per gallon water)
- Change HVAC filters immediately and run the system with windows open to flush contaminated air from ductwork
- Place activated charcoal bags in closed spaces like closets where odor concentrates and air circulation is limited
Prevention Methods to Minimize Future Ceiling Soot Accumulation

Prevention is easier than cleanup, and source control reduces the maintenance burden significantly. Most ceiling soot problems develop gradually from repeated exposure to combustion sources that seem harmless individually but accumulate deposits over time.
Maintain proper ventilation during any combustion activities. Run kitchen exhaust fans when cooking, especially when frying or using high heat that produces smoke. Open windows when burning candles to prevent smoke buildup in stagnant air. Have your furnace, water heater, and gas appliances inspected annually to ensure complete combustion with proper venting. Clean or replace HVAC filters every 1 to 3 months to capture airborne particles before they settle on ceilings. If you use a fireplace or wood stove, ensure the damper opens fully and the chimney draws properly before lighting fires. Schedule professional chimney cleaning annually if you burn wood regularly. Creosote buildup restricts airflow and forces smoke into your home. Choose higher quality candles with cotton wicks and natural wax (soy or beeswax) instead of paraffin candles that produce more soot.
- Install and use exhaust fans in kitchen and bathrooms during and for 15 minutes after activities that generate smoke or steam
- Position candles away from air vents and ceiling fans that spread smoke particles across larger areas
- Trim candle wicks to 1/4 inch before each use to reduce smoking and soot production
- Schedule annual professional inspection and cleaning of all fuel burning appliances and venting systems
- Replace furnace filters on schedule and upgrade to higher MERV rated filters that capture smaller particles
- Avoid burning materials indoors that aren’t intended for indoor use (never burn trash, treated wood, or outdoor fire pit materials in fireplace)
When to Call Professional Restoration Services for Soot Damage

Minor soot from occasional candle use or small cooking mishaps stays manageable with DIY approaches, but extensive smoke damage from fires or furnace malfunctions requires professional restoration services with specialized equipment and expertise. The difference comes down to penetration depth, contaminated area size, and health risks from the specific type of soot present.
Professional restoration teams use HEPA air scrubbers that filter the entire room’s air volume multiple times per hour, removing airborne particles that DIY cleaning stirs up. Thermal foggers and ozone generators neutralize odors chemically rather than just covering them. Hydroxyl generators break down odor molecules without requiring building evacuation. They also assess structural damage you might not see, soot that’s penetrated into wall cavities, insulation, or HVAC systems, where it continues releasing odor and particles. Professional work for moderate whole house soot damage typically costs $2,000 to $8,000 depending on severity and home size, with projects taking 3 to 10 days including drying time. That investment prevents ongoing health problems and protects your home’s value.
Insurance documentation requires professional assessment in most cases anyway. If you’re filing a claim for fire or smoke damage, insurance companies expect detailed scope documentation, moisture readings, and restoration protocols that meet industry standards. Even moderate damage benefits from professional evaluation that identifies hidden problems before you invest DIY time in incomplete fixes. Professional fire and smoke damage restoration addresses the complete scope including areas homeowners typically miss, preventing problems from returning months later.
- Heavy soot coverage affecting multiple rooms or entire floors rather than isolated ceiling spots
- Greasy, sticky soot that doesn’t respond to mild cleaning solutions and keeps returning
- Smoke odor that persists more than one week after thorough cleaning and deodorizing attempts
- Any soot from structure fires, even small contained fires that were quickly extinguished
- Soot from furnace or heating system malfunction, which may contain hazardous combustion byproducts
- Visible soot inside air vents or returns, indicating HVAC system contamination throughout the house
- Textured ceiling damage, cracking, or discoloration beyond surface staining that suggests underlying structural problems
Cost and Time Estimates for Ceiling Soot Removal Projects

Typical timeframes vary based on contamination severity and ceiling area. A small spot cleaning project for light soot above a candle location takes 1 to 2 hours including setup and cleanup. Single room ceiling cleaning with moderate soot coverage requires 3 to 5 hours for the initial cleaning cycle, plus drying time before you can assess results. Multiple rooms extend the timeline proportionally, and you’ll often need 1 to 2 additional cleaning cycles spaced a day apart for heavily soiled areas.
DIY costs stay reasonable for most projects when you already own basic supplies. Budget $30 to $60 for specialty items like dry cleaning sponges, TSP, and stain blocking primer if repainting becomes necessary. Professional service pricing reflects the labor intensity and specialized equipment required. Companies charge by square footage for cleaning and restoration, with minimum service charges for small jobs. The cost benefit analysis tips toward DIY for isolated spots or single rooms with light to moderate soot, but extensive contamination costs less professionally when you factor in your time, rental equipment needs, and risk of incomplete results requiring professional redo anyway.
| Project Scope | DIY Time | DIY Cost | Professional Cost |
|---|---|---|---|
| Small area spot cleaning (under 50 sq ft) | 1 to 2 hours | $20 to $40 | $150 to $300 minimum |
| Single room (100 to 200 sq ft ceiling) | 4 to 6 hours over 2 days | $40 to $80 | $300 to $600 |
| Multiple rooms (500 to 800 sq ft ceiling) | 12 to 20 hours over 3 to 4 days | $100 to $200 | $800 to $2,000 |
| Whole house (1,500+ sq ft ceiling) | 30 to 50 hours over 1 to 2 weeks | $300 to $500 | $2,000 to $5,000 |
Cleaning Adjacent Surfaces and Surrounding Areas After Ceiling Work
Ceiling soot rarely stays isolated. Smoke particles settle on walls, light fixtures, ceiling fans, and furnishings throughout the affected area. Cleaning only the ceiling leaves contamination sources that’ll continue releasing odor and may transfer soot back to your freshly cleaned ceiling through air movement. Complete cleanup prevents re-contamination and addresses the full scope of smoke damage.
Light fixtures and ceiling fans collect heavy soot deposits because they’re closest to the ceiling and often generate heat that attracts smoke particles. Remove light globes and fixture covers, then wash them in warm soapy water. Wipe down fixture hardware and fan blades with damp cloths using the same mild cleaning solution you used for ceiling work. Check the area where fixtures mount to the ceiling. Soot often concentrates in these recessed areas. For walls showing soot spread, use the same dry sponge method first, then damp cleaning if needed. Work from top to bottom so falling particles don’t recontaminate cleaned areas. Vacuum soft materials first using HEPA filter and upholstery attachment, then consider professional cleaning services for fabrics, curtains, and upholstery if odor or staining persists.
Dispose of used dry sponges, contaminated cleaning cloths, and soot filled vacuum bags as regular household waste. Soot from typical household sources doesn’t require hazardous waste handling. However, empty liquid cleaning solutions containing TSP or ammonia down a drain with plenty of running water rather than pouring large quantities at once. Don’t dump chemical solutions outside where they can enter storm drains or groundwater. After completing all cleaning, run a final inspection with good lighting: check corners where walls meet ceiling, look inside closets that might have been missed, verify that air vents are clean, and confirm all fixtures are reassembled properly. Make notes if any areas need repainting or additional attention so you can address them before considering the project complete.
Final Words
Cleaning soot off ceiling surfaces takes patience and the right sequence. Start with dry methods, move to gentle cleaning solutions, and save stronger treatments for stubborn stains that don’t lift easily.
Most homeowner-level soot cleanup takes a few hours if you work systematically and let each step dry properly.
If you’re looking at heavy deposits, persistent odor, or damage that spreads beyond the ceiling, that’s when you bring in pros who have the equipment and sealing methods to finish it right. Your home deserves a clean outcome that lasts.
FAQ
Does Dawn dish soap remove soot from ceilings?
Dawn dish soap can remove light soot deposits when mixed properly (1 tablespoon per gallon of warm water with 1 tablespoon ammonia). It works best after you vacuum loose soot first and use dry cleaning sponges, but stubborn carbon buildup may need stronger solutions like TSP.
Are soot stains on ceilings permanent?
Soot stains on ceilings are not always permanent, but heavy deposits can penetrate porous surfaces like textured or popcorn ceilings. Multiple gentle cleaning cycles often lift most staining, though severely penetrated discoloration may require stain-blocking primer and repainting as the final solution.
What will dissolve soot on ceiling surfaces?
Solutions that dissolve soot include mild dish soap with ammonia in warm water for light deposits, TSP (trisodium phosphate) for stubborn carbon buildup, and small amounts of denatured alcohol for oily residue. Always start with gentler solutions and progress to stronger cleaners only when needed.
Does Magic Eraser remove soot from walls and ceilings?
Magic Erasers can remove some soot but aren’t the best choice for ceilings because they require scrubbing pressure that pushes soot deeper into porous materials. Dry cleaning sponges made of vulcanized rubber work better because they lift soot without smearing when used with gentle blotting motions.
How long does it take to clean soot off a ceiling?
Cleaning soot off a ceiling typically takes 2-4 hours for initial work in an average room, but complete drying time extends the process to 4-8 hours total. Heavy deposits may require 2-3 cleaning cycles with drying time between applications for best results.
Can I use a regular vacuum to remove soot from my ceiling?
Regular household vacuums without HEPA filters will blow soot particles back into the air, making the problem worse. Use only vacuums with HEPA filters and soft brush attachments, holding the nozzle 1-2 inches from textured surfaces to avoid embedding particles deeper.
What safety equipment do I need for cleaning ceiling soot?
Safety equipment for cleaning ceiling soot includes an N95 or better dust mask, safety goggles, rubber gloves, and long sleeves to prevent skin contact and inhalation. Open windows and position fans to create cross-ventilation pushing air outside before starting cleanup work.
Why should I use a dry cleaning sponge before wet cleaning soot?
Dry cleaning sponges lift soot without water, preventing smearing that happens when you start with wet methods before removing loose particles. These vulcanized rubber sponges work by blotting and absorbing soot when wiped gently with straight overlapping strokes and turned frequently.
When does ceiling soot damage require professional restoration?
Ceiling soot damage requires professional restoration when it results from fires, furnace malfunctions, or covers large areas with heavy deposits. Professional services use specialized equipment like HEPA air scrubbers and thermal foggers that DIY methods can’t match for extensive contamination.
How do I remove smoke odor after cleaning soot from my ceiling?
Smoke odor removal after soot cleaning requires air circulation, activated charcoal, baking soda placement, or vinegar bowls to absorb embedded smells in porous materials. Severe odor cases that persist after cleaning may need professional ozone treatments to fully neutralize the smell.
What type of primer prevents soot stains from bleeding through paint?
Stain-blocking primer prevents soot stains from bleeding through new paint by sealing discoloration that cleaning couldn’t remove. Apply this primer after the ceiling dries completely, then finish with topcoat paint matched to your existing ceiling color for seamless results.
How do I clean soot from popcorn or textured ceilings?
Cleaning soot from popcorn or textured ceilings requires extra gentleness because the porous surface absorbs moisture and damages easily. Use HEPA vacuum with light touch, dry cleaning sponges with blotting motions, and barely damp cloths, avoiding oversaturation that causes texture collapse.