

Don’t start by climbing on the roof.
It’s often the worst first move.
The fastest way to find a ceiling leak is to watch when it happens, read the stain, and check what’s directly above the wet spot.
Timing and pattern tell you if it’s the roof, a pipe, or the HVAC.
This post gives simple, step-by-step checks you can do in minutes: document when it drips, note stain color and shape, listen for running water, and take a quick attic peek if it’s safe.
You’ll narrow the source fast and know the right next step.
Immediate Steps to Locate the Source of a Ceiling Leak

The fastest way to figure out where a ceiling leak comes from? Watch when it happens, look at what the stain looks like, and check which rooms sit directly above the wet spot. A leak that only shows up during heavy rain points to your roof. Flashing, shingles, valleys. A leak that drips no matter the weather usually means a plumbing pipe, fixture, or HVAC condensate line. Timing and pattern help you narrow things down before you’re climbing into the attic or picking up the phone.
Stain behavior tells a story. A clean, wet ceiling dripping clear water often signals a pipe leak. Dark brown or yellow stains suggest water came in from the roof and picked up dirt or algae on the way down. Peeling paint or bubbling wallpaper can mean moisture’s been hanging around for a while. Mold spots indicate prolonged dampness, either from a slow leak or lousy ventilation.
Before you start moving insulation or pulling down ceiling panels, run through a quick diagnostic checklist. You can often rule out half the possible sources in five minutes just by looking and thinking.
-
Document when the leak appears. Note whether it drips during rain, after someone showers upstairs, or all the time.
-
Look at the stain pattern. A round, isolated stain often means a single drip point. Long trails or streaks mean water traveled along a joist or pipe before it dripped.
-
Check directly above the wet spot. Is there a bathroom, kitchen sink, water heater, or HVAC unit overhead?
-
Make a quick attic glance if you have safe access. Just stick your head up and shine a light. You don’t need to move anything yet. Just look for obvious wet spots, discolored wood, or dripping water.
-
Notice any smells. A musty odor means moisture’s been there longer than a day. A sewage smell could mean a drain line, not a supply pipe.
-
Feel the ceiling around the stain if it’s safe. Soft, sagging drywall means water has saturated the material and it may collapse. Don’t poke or stand under it.
This rapid assessment keeps you from tearing into the wrong area. If you see a steady drip, hear running water, or smell mold, move to the next level of inspection. If you see a bulging ceiling or water near electrical fixtures, turn off the breaker to that room and call a professional right away.
Inspecting Attics and Crawlspaces to Trace Ceiling Leak Sources
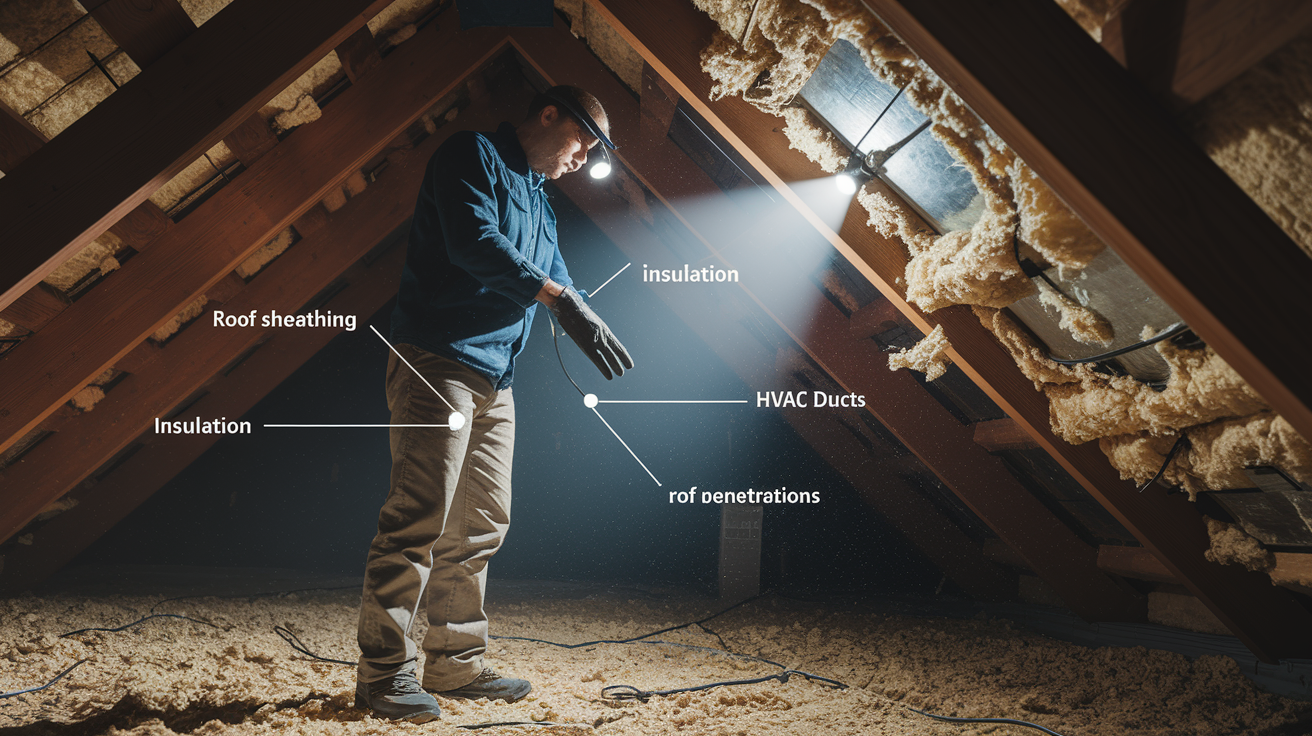
Once you’ve confirmed the general area and ruled out obvious fixture leaks, the attic is where you confirm the source. Grab a bright flashlight or headlamp, wear gloves, and put on a dust mask. Attic insulation releases fibers and dust. Step only on joists or solid boards, never between them. Drywall ceilings won’t hold your weight.
Start by scanning the underside of the roof sheathing directly above the wet ceiling spot. Look for dark stains, water trails, or mold on the wood. Shine your light along rafters and beams. Water can travel several feet before it drips onto insulation or drywall. If you see wet or compressed insulation, gently pull it back to expose the ceiling joists and any pipes running through the area. Wet insulation loses its effectiveness and can hide the real entry point, so move it aside carefully.
Check these five targets methodically:
Roof sheathing and rafters for dark streaks, rot, or soft spots that indicate long term moisture exposure.
Insulation for wetness, discoloration, or a matted down appearance. Dry insulation is fluffy.
Pipes and supply lines running through the attic. Feel along their length for moisture, corrosion, or dripping joints.
HVAC ducts and drain lines for condensation, disconnected fittings, or clogged drains that overflow.
Penetrations in the roof such as vent pipes, electrical conduits, or chimney chases where flashing may have failed.
If you find pooled water on the attic floor or soaked ceiling joists, mark the spot with a piece of tape or take a photo so you can describe the exact location to a roofer or plumber. Water doesn’t always drip straight down. It follows the path of least resistance along wood grain, nail lines, or pipe surfaces.
Roof-Related Causes When Tracking the Ceiling Leak Source

If your leak only shows up during or shortly after rain, the roof is the likely entry point. Roof leaks commonly begin at transitions and penetrations. Places where different materials meet or something punctures the waterproof layer. Skylights, chimneys, plumbing vents, and roof valleys are the usual suspects because flashing around these features can crack, lift, or corrode over time.
From inside the attic, dark stains on the underside of roof sheathing usually align with a breach somewhere above. If you can safely access the attic during a rain event, you may see active dripping or a wet trail forming along a rafter. When you find a hole or crack in the sheathing, one old trick is to push a single plastic straw or a thin wire up through the hole so it pokes out above the roofline. That marker makes it much easier to find the exact spot when you’re standing on the roof or talking to a roofer.
Don’t climb onto a wet, steep, or damaged roof yourself. Instead, look for these clues from the ground or through binoculars after the storm passes:
Missing, cracked, or curled shingles near the area above your ceiling stain.
Gaps or rust around roof flashing at chimneys, vents, or where two roof planes meet.
Clogged or damaged valleys where leaves and debris can dam water and force it under shingles.
Loose or deteriorated caulk around skylight frames or vent boots.
Storm damage often leaves visible debris, lifted shingles, or dented flashing. If you recently had high winds or hail, those are additional reasons to suspect the roof. Mark the suspected area on a simple sketch or take a photo of the exterior so a roofer knows exactly where to start.
Plumbing Sources Above the Ceiling and How to Identify Them

Plumbing leaks drip regardless of weather. They can be slow and steady or sudden and heavy, depending on whether a joint is weeping or a pipe has burst. Common signs include sagging ceilings, persistent musty smells, rising water bills with no obvious cause, and reduced pressure at nearby fixtures. If the room above your stain contains a bathroom, kitchen, laundry area, or water heater, plumbing is the first place to look.
Go upstairs and check every fixture in the room directly above the wet ceiling. Run the sink, flush the toilet, and turn on the shower one at a time while someone watches the stain from below. If the drip starts or gets worse during one of those tests, you’ve found your source. Don’t forget to check under sinks, around toilet bases, behind washing machines, and near dishwasher supply lines. Small leaks there can travel down through the floor.
Use a measuring tape to record the distance from the ceiling stain to the nearest wall, vent, or light fixture. That measurement helps you map the stain’s location to the plumbing layout above. If you hear faint dripping or running water inside the ceiling, press a drinking glass against the drywall and put your ear to the bottom of the glass. It amplifies sound and can help you trace the noise to a specific spot.
Using Sound and Fixtures to Identify Plumbing Leaks
Listening for water movement is surprisingly effective. A stethoscope works even better than a glass, letting you move along walls and ceilings to follow the sound of dripping or flowing water. Mark the loudest point with a pencil dot. If the sound moves when you turn a faucet on or off, that fixture is involved.
Check these typical plumbing related leak sources methodically:
Toilet wax rings and supply lines. Look for water pooling around the base or dampness on the floor near the bowl.
Shower and tub drain connections, especially older installations where caulk has dried out or grout has cracked.
Sink trap joints and supply hoses. Feel along the pipes under sinks for moisture or corrosion. Green patina on copper means long term slow leaks.
Water heater relief valves and drain connections. Check the floor around the tank and any overflow pans.
Washing machine hoses and drain standpipes. Rubber hoses can crack. Standpipes can overflow if clogged.
Water can travel down the outside of a pipe from a leak several feet away, so don’t assume the drip point is the leak point. Trace wet pipes back to their fittings and joints. Intermittent small drips might be fixable with a new washer or tightened joint, but larger leaks, especially from cracked pipes or failed valves, require a plumber and possibly drywall removal to access the damaged section.
HVAC and Condensation Issues That Can Mimic a Ceiling Leak Source

Sometimes what looks like a leak is actually condensation from an air conditioning system. HVAC units produce moisture as they cool air, and that water is supposed to drain through a condensate line into a floor drain or outside. If the drain line clogs with algae or dirt, water backs up into the drip pan. When the pan overflows, it spills onto the attic floor or ceiling below, creating a wet stain that can look identical to a roof or plumbing leak.
HVAC leaks often show up during summer when the system runs frequently, and they tend to form slow, spreading stains rather than sudden drips. You may notice a musty smell but no mold growth yet, and the ceiling may feel damp rather than soaked. Check the air handler or furnace in the attic. Look for a rectangular metal or plastic pan underneath the unit. If it’s full of water or has rust stains, the condensate system isn’t draining properly.
Compare these symptoms to help distinguish condensation from structural leaks:
HVAC condensation usually appears during cooling season, forms gradually, and stops when the system is off for a few days.
Roof leaks appear during or shortly after rain, show dark staining, and often include visible water trails on rafters.
Plumbing leaks occur regardless of season or weather, can happen suddenly, and often produce clear water with no discoloration unless it’s a drain line.
If you find a clogged condensate line or overflowing drip pan, you can often clear the line with a wet/dry vacuum or a small bottle brush. Pour a cup of white vinegar down the drain line every few months to prevent algae buildup. For recurring problems or if the line is inaccessible, call an HVAC technician.
Using Tools to Trace and Confirm the Ceiling Leak Source

Basic tools can turn guesswork into certainty. A moisture meter measures how much water is trapped inside drywall, wood, or insulation. Readings above 15 to 20 percent usually mean active moisture. An infrared or thermal imaging camera shows temperature differences that reveal hidden wet areas. Cooler spots on a ceiling often indicate evaporation from moisture. These tools help you confirm the leak’s exact boundaries and avoid tearing into dry areas by mistake.
For plumbing fixture leaks, a dye test isolates the source. Add food coloring to a toilet tank, sink, or tub drain, then watch the stain below. If colored water appears, you’ve confirmed which fixture is leaking. For roof leaks, a controlled hose test simulates rain. Have one person spray water on a suspected section of roof while another watches the attic or ceiling for new drips. Start low on the roof and work upward to avoid flooding the attic.
Professional leak detection uses advanced equipment when the source remains hidden. Plumbers and restoration companies deploy pipe cameras, electronic acoustic sensors, and gas tracer systems to locate leaks inside walls or under slabs without demolition.
| Tool | Primary Use | Best For |
|---|---|---|
| Moisture Meter | Measures water content in materials | Confirming drywall, insulation, or wood dampness before cutting |
| Infrared Camera | Displays temperature variations | Finding hidden wet zones behind finished surfaces |
| Dye Test Kit | Traces fixture drain leaks | Isolating toilet, sink, or tub leaks by color coding water |
| Hose and Timer | Simulates rainfall on roof sections | Reproducing intermittent roof leaks in dry weather |
| Pipe Camera | Inspects inside drain and supply lines | Locating cracks, blockages, or joint failures without opening walls |
Moisture meters and infrared cameras are available at hardware stores or online for under one hundred dollars. If the leak is elusive or you’re dealing with multiple wet areas, hiring a leak detection specialist with professional grade equipment often saves time and prevents unnecessary demolition.
Safety Procedures to Follow When Tracking a Ceiling Leak Source

Water and electricity are a dangerous combination. Before you touch a wet ceiling, climb into an attic, or inspect plumbing, turn off the circuit breaker to any room with visible moisture. Water can travel along wiring inside walls and ceilings, creating shock hazards even if the wet spot looks far from an outlet or light fixture. If you’re not sure which breaker controls the affected area, shut off the main breaker temporarily while you investigate.
Wet ceilings can sag and collapse without warning, especially drywall that’s absorbed water for hours or days. Don’t stand directly under a bulging ceiling, and don’t poke or press on soft spots. If you need to drain a bulge, puncture the lowest point gently with a screwdriver while holding a bucket underneath, but only if the ceiling is stable enough that it won’t fall on you.
Follow these safety rules during any leak inspection:
Wear gloves, safety glasses, and a dust mask or respirator when handling insulation, cutting drywall, or inspecting moldy areas.
Use a stable ladder with non slip feet and have someone hold it if you’re climbing into an attic or reaching overhead.
Never step between ceiling joists in an attic. Step only on solid framing or lay down plywood to distribute your weight.
Avoid roof work in wet, icy, or windy conditions. If you must inspect the roof, use proper fall protection or hire a professional.
If you smell sewage, see visible mold covering more than a small patch, or encounter structural damage such as cracked beams or sagging floors, stop and call a professional. Some situations aren’t safe for DIY troubleshooting.
When a Ceiling Leak Source Requires a Professional

Not every leak needs a service call, but some do. If you’ve checked the obvious sources (fixtures, attic, and nearby roof areas) and still can’t find where the water is entering, it’s time to bring in a roofer, plumber, or water damage restoration company. Professionals use high definition pipe cameras that travel inside drain lines and supply pipes, electronic listening devices that detect water movement behind walls, and infrared scanners that map moisture through finished surfaces.
Certain situations always warrant expert help. A ceiling that sags or bulges significantly can collapse, especially if drywall is soaked. Any leak near electrical panels, outlets, or light fixtures creates fire and shock risks that require licensed electricians and restoration crews. Persistent leaks that reappear after you think you’ve fixed them often indicate hidden damage or multiple entry points that need systematic diagnosis.
Call a professional when you encounter these scenarios:
You can’t safely access the suspected area. Steep roofs, high ceilings, or confined crawlspaces.
The leak involves structural components like cracked rafters, rotted joists, or compromised load bearing walls.
Mold growth is visible or widespread, or the smell is strong and persistent.
Repair timelines vary. A simple plumbing fixture repair or small roof patch can be completed in a few hours. Complex issues (such as replacing rotted roof sheathing, rerouting corroded pipes inside walls, or drying out saturated framing) can take several days and often require coordination between multiple trades. Professionals will also document the damage with photos and moisture readings, which supports insurance claims and helps prevent disputes over scope.
After Locating the Leak Source: Drying, Repair, and Prevention

Once you’ve stopped the water, the clock starts on drying. Mold can begin to grow within 24 to 48 hours of saturation, so don’t wait. Set up fans to circulate air across wet surfaces, and run a dehumidifier in the affected room and attic if needed. Open windows if outdoor humidity is lower than indoor humidity. Pull back or remove soaked insulation. It won’t dry effectively in place and will stay damp long enough to promote mold and odors.
Cut out any drywall that feels soft, sags, or shows dark staining. Wet drywall loses structural integrity and traps moisture inside the gypsum core even after the surface feels dry. Use a utility knife to score a square or rectangle around the damaged area, then snap it out along ceiling joists so you have solid backing for the patch. If insulation above the ceiling is wet, bag it and dispose of it. Wet fiberglass and cellulose don’t regain their insulating value.
After everything is dry, repair the ceiling and take steps to prevent the next leak:
Patch drywall by cutting a piece to fit the opening, screwing it to the joists, taping the seams, and applying joint compound in three coats.
Prime stains with a stain blocking primer before painting, or the discoloration will bleed through your topcoat.
Replace insulation with new material rated for your climate zone, and make sure it sits evenly without gaps.
Schedule annual roof inspections to catch damaged shingles, loose flashing, and clogged valleys before they leak.
Clean gutters twice a year and check that downspouts direct water away from the foundation. Clogged gutters can force water under roof edges.
Monitor attic ventilation. Poor airflow can cause condensation that mimics a leak, especially in winter. Make sure soffit vents and ridge vents are clear, and consider adding baffles between rafters if insulation blocks airflow. Preventative maintenance is faster and cheaper than emergency repairs, and it keeps small problems from becoming ceiling stains.
Final Words
Start by acting fast: note when the leak happens, how the stain behaves, and any musty smells. That quick info narrows whether it’s roof, plumbing, or HVAC.
Next, take safe, simple steps — a careful attic peek, check nearby fixtures, and use basic tools or a moisture reader if you have one. Stay off joists and turn power off if anything looks risky.
Following those steps is how to find source of ceiling leak. You’ll limit damage, make repairs clearer, and get your home back to normal.
FAQ
Q: How to figure out where a leak in the ceiling is coming from?
A: To figure out where a ceiling leak is coming from, track when it appears, follow stain patterns, check nearby fixtures and the attic; plumbers add moisture meters, dye tests, thermal cameras, and listening tools.
Q: How do plumbers find the source of a leak?
A: Plumbers find the source of a leak by using moisture meters, thermal imaging, pipe cameras, dye or pressure tests, and listening techniques to trace hidden drips back to the exact pipe or fixture.
Q: How to find a water leak that isn’t visible?
A: To find a water leak that isn’t visible, use timing clues, infrared or moisture meters, listen for dripping, inspect adjacent rooms and attic spaces, and run dye or pressure tests on suspect lines.
Q: Can I ignore a small ceiling water leak?
A: You can’t ignore a small ceiling water leak because it can cause mold, sagging, and hidden damage; stop the source, document for insurance, and schedule an inspection before materials worsen.