

Think that small brown spot on your ceiling is just an eyesore?
It often means water is working behind the surface, and acting fast can stop mold, warped drywall, or a sudden collapse.
This post shows the visual clues, sounds, and smells that signal a real leak, not a cosmetic stain, and what to check right away.
You’ll learn when a leak is an emergency, how pros find hidden moisture with meters and cameras, and the steps to document and repair the damage so it doesn’t come back.
Key Visual Signs Of Early And Mid‑Stage Ceiling Leak Damage
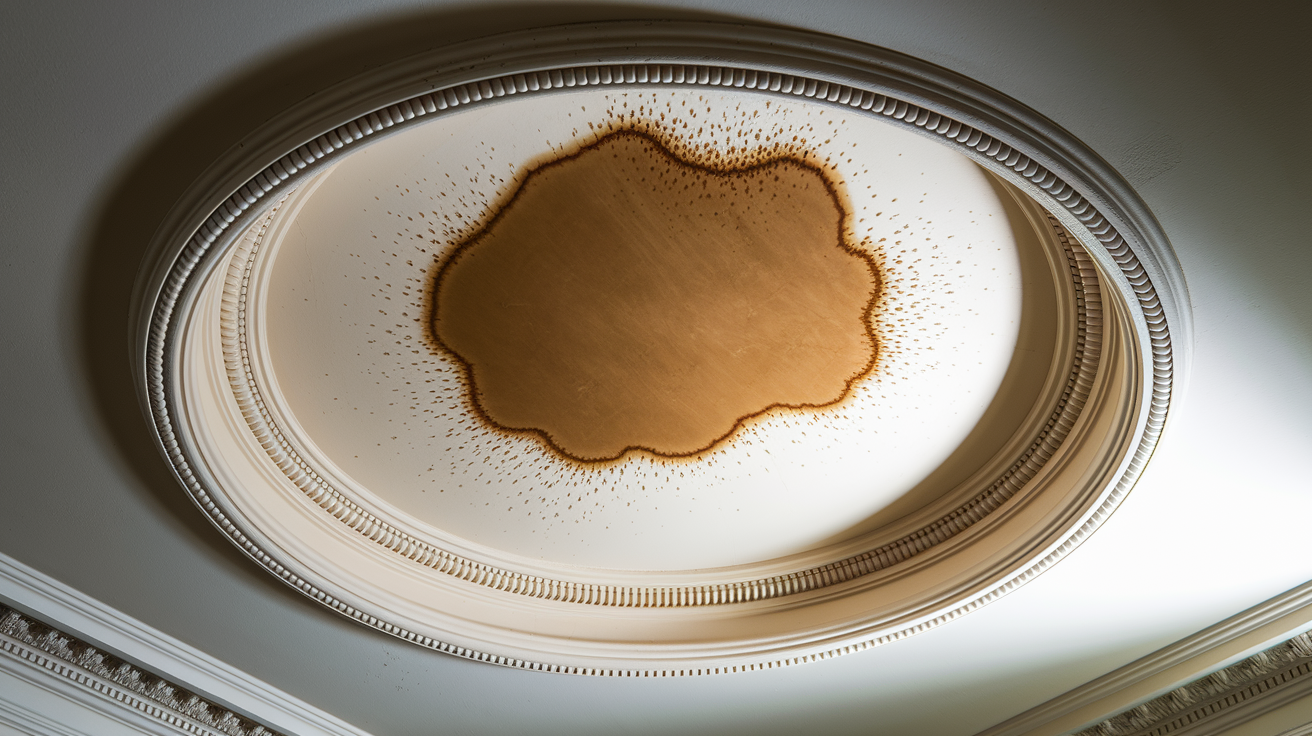
You’ll usually spot the first signs of ceiling leak damage during the day when natural light hits at just the right angle. A faint brown spot about the size of a dinner plate might show up under a bathroom, laundry room, or near a roof valley. Looks harmless, right? But if it gets darker after heavy rain or slowly spreads over the next few weeks, that leak’s still active and moisture is working deeper into your drywall.
Paint changes tell their own story. When water gets trapped behind paint, the surface starts to blister or bubble. You’ll see small raised pockets that feel soft when you press them. Peeling paint comes next, often curling at the edges of the stain. These paint failures mean moisture is breaking the bond between paint and drywall. Simply repainting without fixing the leak? The damage comes right back.
Biological and sensory clues appear as leaks continue. Mold spots show up as small black, green, or gray speckles, usually clustered near stain edges or along seams where moisture collects. A stale, musty odor often develops in the room or attic above, even before you see mold. If you hear dripping sounds from inside the ceiling, notice water pooling on light fixtures or vents, or see active drops forming, that’s an emergency. The ceiling’s saturated enough to release water.
Common early and mid‑stage visual and sensory signs include:
Small brown or yellow water stains that appear under plumbing fixtures, bathrooms, or roof penetrations and may darken or expand after storms.
Ring‑shaped discoloration with a darker center where water drips most heavily and lighter outer edges where moisture spreads horizontally.
Bubbling or blistering paint indicating trapped moisture between the paint layer and drywall surface.
Peeling or cracking paint that curls away from the ceiling, often around stain edges or near seams.
Small dark speckles or fuzzy patches of mold growth appearing black, green, or gray, especially in corners or along joints.
Persistent musty, stale, or earthy odor in the room or attic, sometimes noticeable before visible damage appears.
Dripping sounds, active drops, or water pooling from ceiling vents, light fixtures, or seams, signaling heavy saturation and an active leak.
Ceiling Leak Damage Patterns And What They Mean

The shape, color, and behavior of a ceiling stain tell you where the water’s coming from and how fast it’s spreading. A small, round brown spot with a darker center usually means water’s dripping from a single point. Could be a nail hole in the roof or a pinhole leak in a pipe. The center’s darker because that’s where water repeatedly hits the same area. If the stain stays the same size for weeks, the leak may be slow or intermittent, showing up only during heavy rain or when someone uses a fixture above.
Stains that spread in irregular shapes, streaks, or elongated ovals often follow the path of a joist or rafter. Water runs along framing before dripping through drywall, so the stain shows the trail. If a stain reappears in the exact same spot after you repaint, the source is still wet and moisture’s wicking back through the new paint. A stain that comes back in the same spot three weeks after repainting tells you the leak was never actually fixed. Recurring stains after repainting are a clear sign the repair was cosmetic only.
Stain patterns and their typical causes:
Circular stain with dark center: pinpoint leak from above, such as a roof nail, small pipe crack, or fixture drip.
Ring‑shaped or halo pattern: slower leak where water spreads outward as it soaks into drywall before evaporating at the edges.
Streaked or elongated stain: water running along framing members (joists, rafters) before soaking through drywall.
Recurring stain after repainting: source not repaired. Moisture remains inside drywall or insulation and wicks back to the surface.
Structural Warning Signs Of Serious Ceiling Leak Damage

When drywall absorbs enough water, it starts to lose structural integrity and the ceiling changes shape. Sagging, drooping, or bowed sections mean the drywall’s soaked and the weight of trapped water is pulling it down. You may notice the ceiling looks lower in one area, seams between panels start to separate, or a visible bulge forms. These aren’t cosmetic issues. They mean the material’s saturated and getting heavier. The ceiling could collapse if the weight exceeds what the fasteners and framing can hold.
Soft or spongy textures when you gently press upward on a ceiling (if safe to reach) indicate the drywall’s absorbed water and lost its rigidity. The surface may feel firm but give slightly under pressure, or it may feel wet and cold. Cracks can also appear as panels shift. Straight cracks running parallel to framing often result from drywall expanding as it gets wet, while webbed or branching cracks appear when panels bow or buckle. If you see cracks combined with discoloration or sagging, the damage has gone beyond surface level.
Large stains exceeding two feet in diameter, rapid drooping over hours or days, visible deformation of the ceiling plane, or any section that looks like it’s about to separate from the framing all point to collapse risk. Water saturated drywall can weigh several times more than dry material. When fasteners pull loose or the paper backing tears, sections can fall suddenly. Don’t stand beneath these areas. Treat them as urgent.
Five structural signs that need immediate professional attention:
-
Sagging, drooping, or bowed ceiling sections where the plane is visibly lower or uneven, indicating heavy water saturation and weight overload.
-
Soft, spongy, or pliable texture when gently pressing on the ceiling surface, showing the drywall’s absorbed moisture and lost structural strength.
-
Visible seam separation where drywall panels pull apart at joints, often caused by panel movement, swelling, or fastener failure.
-
Straight or webbed cracks appearing across the ceiling surface, especially near stains, caused by expansion, bowing, or stress from shifting saturated panels.
-
Large stains exceeding 24 inches in diameter, rapid growth over hours, or sections showing visible deformation and imminent separation from framing.
Hidden Signs Of Ceiling Leak Damage Above The Surface

Not all ceiling leaks show obvious stains or dripping. Moisture can sit inside insulation, soak into framing, or pool on top of drywall for weeks before a stain appears on the surface below. Slow leaks from condensation on cold pipes, minor HVAC drain pan overflows, or small roof penetrations may only leave faint, barely visible marks or a slight texture change that doesn’t look alarming. The ceiling may look fine while moisture’s spreading behind it.
Professional detection tools find these hidden leaks before they cause major damage. Moisture meters measure the water content inside drywall and framing without cutting holes. Thermal imaging cameras detect temperature differences caused by wet insulation or evaporating water, showing cool spots where moisture is present even if the surface looks dry. Sounds can also point to hidden leaks. Faint dripping inside a wall cavity, the hiss of a slow spray leak, or the occasional splatter of water hitting insulation are clues you might hear before you see damage. A persistent musty smell in a room or closet often means moisture’s present somewhere above, even if the ceiling looks normal.
| Tool | What It Detects | When It’s Useful |
|---|---|---|
| Moisture Meter | Water content inside drywall, insulation, and framing | Suspected hidden leaks, verifying dryness after repairs, checking areas near faint stains |
| Thermal Imaging Camera | Temperature differences caused by wet materials or evaporation | Locating leaks behind walls/ceilings, finding wet insulation, mapping moisture spread |
| Visual Inspection (Attic/Crawl) | Wet insulation, stains on framing, active drips, condensation | Confirming source after detecting ceiling damage, checking roof/plumbing above affected area |
Common Causes Leading To Ceiling Leak Damage

Roof leaks are one of the most frequent culprits. Missing or damaged shingles, worn flashing around chimneys and vents, or cracked sealant on roof penetrations let rainwater in. In cold climates like Minnesota, ice dams form when snow melts on warm roof sections and refreezes at the eaves, forcing water under shingles and into the attic. Ice dam leaks often show up along exterior walls or near soffits after a heavy snow followed by a thaw. Skylights and roof valleys are also common weak points where water can find a way through compromised seals.
Plumbing leaks inside ceilings cause another large share of damage. Supply lines to upstairs bathrooms, laundry rooms, or water heaters can develop pinhole leaks or burst if they freeze. Overflowing bathtubs, clogged shower drains, or a toilet supply line that fails while you’re away can send gallons of water into the floor and down through the ceiling below. Drain leaks are slower but persistent, often appearing as recurring stains that grow each time the fixture is used.
HVAC systems and condensation issues round out the most common causes. Air handler drain pans can overflow if the condensate line clogs, dripping onto drywall or insulation. Poor attic ventilation traps humid air, which condenses on cold surfaces during winter or summer and soaks into insulation and framing. Bathroom exhaust fans that vent into the attic instead of outside dump moist air directly onto ceiling materials. Appliance failures, like a washing machine hose that splits or a water heater relief valve that drips, can also send water upward if located on an upper floor or in an attic utility closet.
Common causes and how they typically show on a ceiling:
Roof flashing failure or missing shingles: stains near chimneys, vents, valleys, or along exterior walls. Often worse after heavy rain or snowmelt.
Ice dams forcing water under shingles: stains along eaves and exterior walls in winter. May appear after freeze thaw cycles.
Burst or leaking supply pipes: sudden large stains, active dripping, and saturation. Often near bathrooms, laundry rooms, or water heaters.
Overflowing fixtures or clogged drains: recurring stains under tubs, showers, or sinks. Stain grows each time fixture is used.
HVAC condensate overflow: small, slow growing stains near air handlers or ductwork. Often accompanied by musty odor.
Poor attic ventilation and condensation: diffuse moisture or frost on sheathing and framing. Insulation may feel damp. Can cause widespread faint staining on ceilings below.
Mold, Odor And Air Quality Indicators Of Ceiling Leak Damage

Mold starts growing within 24 to 48 hours after materials get wet. It appears as dark speckles, fuzzy patches, or streaks in black, green, or gray. Mold loves drywall paper, insulation, and wood framing because they hold moisture. You’ll often see it clustered around the edges of a water stain, along ceiling seams, or in corners where airflow is poor and dampness lingers. If you spot mold on the ceiling surface, there’s usually more growing inside the drywall, on the back side of the panel, and in the insulation above.
A musty, stale, or earthy odor is often the first clue of hidden mold before you see visible growth. The smell comes from microbial volatile organic compounds (MVOCs) that mold releases as it grows. If a room or attic smells off and you can’t find an obvious source, check for ceiling stains, soft spots, or any signs of past moisture. That smell doesn’t go away with air fresheners. It stays until the mold is removed and the source of moisture is fixed. Ignoring mold lets it spread to larger areas, which increases remediation cost and health risk.
Five biological and air quality indicators:
-
Visible mold spots or fuzzy patches appearing black, green, or gray on ceiling surfaces, seams, or around stains.
-
Persistent musty, earthy, or stale odor in a room, closet, or attic that doesn’t fade and often worsens in humid weather.
-
Dark streaks or discoloration along seams and corners where moisture collects and mold colonizes drywall paper.
-
Increased allergy symptoms or respiratory irritation when spending time in the affected room, especially for sensitive individuals.
-
Mold growth on insulation, framing, or stored items in the attic or crawl space above the ceiling, visible during inspection.
Safety Risks Linked To Ceiling Leak Damage

Water and electricity don’t mix. When a ceiling leak spreads near light fixtures, ceiling fans, or electrical junction boxes, the risk of shock or fire increases. Water can travel along wiring, corrode connections, and cause shorts. If you see water dripping from a light fixture or pooled around an electrical box, turn off power to that circuit at the breaker panel and call a professional. Don’t touch wet fixtures or attempt repairs while power is on.
Sagging or bulging ceilings are collapse hazards. Water saturated drywall can weigh several times its dry weight, and fasteners can pull out of framing or the drywall paper can tear. Collapse can happen suddenly, especially if someone bumps the area or if additional water enters during another storm. Avoid standing, sitting, or placing furniture directly beneath sagging sections. Move valuables and people out of the area until the ceiling is inspected and stabilized.
Four safety steps to follow when you notice ceiling leak damage:
Turn off power to any circuits near the leak if water’s dripping from or pooling around electrical fixtures. Do not touch wet switches, outlets, or fixtures.
Evacuate the area beneath sagging, bulging, or bowed ceiling sections and keep people and pets away until a professional evaluates collapse risk.
Ventilate the space by opening windows and using fans to reduce humidity, but avoid disturbing visible mold or creating airflow that spreads spores.
Do not attempt to support or prop up a sagging ceiling yourself. Heavy saturated drywall can fall unexpectedly and cause injury.
Professional Inspection And Repair Process For Ceiling Leak Damage

The first step in professional ceiling leak restoration is inspection and leak detection. A technician arrives, often within an hour in metro areas for emergency calls, and uses moisture meters to measure water content inside drywall, framing, and insulation. Thermal imaging cameras map temperature differences that reveal wet areas hidden behind surfaces. The priority is stopping the source. If it’s a plumbing leak, the water supply is shut off. If it’s a roof leak, temporary tarping or sealing prevents additional water from entering. The team confirms the leak is stopped before moving to drying and removal.
Next comes drying and water removal. Commercial dehumidifiers and air movers are positioned to pull moisture from materials and push air across wet surfaces to speed evaporation. If drywall or insulation is heavily soaked, it’s often removed instead of dried in place because saturated materials take too long to dry and may harbor mold. Standing water is extracted, and any wet belongings are moved out of the area. This phase can take several days depending on how much water is present and how deep it has soaked.
Mold remediation and prevention follow drying. Any materials showing mold growth, discoloration, or musty odors are removed and disposed of. HEPA filtration and antimicrobial treatments are applied to surfaces to prevent regrowth. Containment barriers keep mold spores from spreading to clean areas during removal. The space is tested to confirm it’s safe before reconstruction begins.
Reconstruction replaces the removed materials. New drywall, insulation, ceiling texture, and paint are installed to match the rest of the room. If framing was damaged, it’s reinforced or replaced. The work is coordinated with insurance allowances or your budget, and the team explains options for upgrades or changes during the rebuild.
The final step is a walkthrough and moisture recheck. The team uses meters to confirm all materials are dry and safe to seal. You walk through the finished work to verify it looks right and the smell is gone. The job isn’t closed until moisture readings are normal and you’re satisfied with the repair.
Five step professional restoration process:
-
Inspection and leak detection using moisture meters and thermal imaging to locate the source and measure saturation. Stopping the leak is the first priority.
-
Drying and water removal with commercial dehumidifiers and air movers. Removal of soaked drywall and insulation that can’t be salvaged or dried quickly.
-
Mold remediation and prevention including removal of contaminated materials, HEPA air scrubbing, and antimicrobial treatments to stop regrowth.
-
Reconstruction and material replacement to reinstall drywall, insulation, texture, and finishes. Coordinate with insurance scope and homeowner preferences.
-
Final moisture check and walkthrough to verify complete dryness, confirm repairs meet quality standards, and ensure the homeowner is satisfied before closing the job.
Insurance And Documentation Tips For Ceiling Leak Damage

Homeowner insurance policies typically cover ceiling leak damage when the cause is sudden and accidental. A burst pipe, a tree branch punching through the roof during a storm, or a washing machine supply line that fails are usually covered events. Long term leaks from deferred maintenance, like a roof that’s been leaking slowly for years or a dripping faucet you ignored, are often excluded. Insurers want to see that the damage happened quickly and wasn’t preventable through normal upkeep.
Documentation speeds your claim and reduces disputes. Take time stamped photos as soon as you notice damage. Capture wide shots showing the room layout and where the stain is located, close ups of the stain center and edges, any sagging or bulging, visible mold, peeling paint, and warped materials. If water’s actively dripping, photograph or video that. Professional restoration companies document moisture readings and take their own photos, which become part of the claim file and help justify the scope of work when hidden damage is uncovered during repairs.
Four documentation steps to take before calling your insurance company:
Photograph all visible damage including wide context shots of the room, close ups of stains, sagging areas, mold growth, peeling paint, and any active dripping.
Record moisture meter readings if a professional provides them during inspection. These readings verify saturation and support the repair scope.
Save receipts and invoices for any emergency mitigation work, temporary repairs, or materials purchased to stop further damage.
Document the timeline with notes on when you first noticed the leak, when it worsened, and any weather events or plumbing use that correlates with the damage.
Final Words
Right now, if you see brown rings, bubbling paint, or dark spots after rain, you’re seeing early signs. Don’t ignore a musty attic smell or a slow drip.
This guide covered what those marks mean, how patterns change, hidden clues found with tools, and when to call for repair. We also touched on mold, safety, and insurance notes.
If you notice these signs of ceiling leak damage, stop the water if safe, take photos, and call a pro to confirm moisture and start repairs. You’ll limit damage and get back to normal.
FAQ
Q: How do you know if a ceiling leak is serious and how do you tell if a ceiling is water damaged?
A: A ceiling leak is serious when you see persistent wet stains, active dripping, darkening after rain, or mold growth, which means water is ongoing and you should stop the source and call a pro.
Q: What does the beginning of a water damage ceiling look like?
A: The beginning of water damage on a ceiling looks like faint pale discoloration, small brown spots, tiny paint bubbles, or a musty attic smell — early signs to monitor and photograph.
Q: Will homeowners insurance cover a ceiling leak?
A: Homeowners insurance will cover a ceiling leak only when the loss is sudden and accidental, while long-term leaks or maintenance issues are usually excluded. Document photos and moisture readings, then contact your insurer promptly.