

Painting over smoke-stained trim is tempting, but it rarely fixes the problem.
Smoke soaks into wood, and the smell can stick even after a fresh coat.
If trim is charred, warped, or soaked by firefighting water, it often needs removal so hidden damage doesn’t spread.
This post lays out the restoration steps that actually work:
how to assess what’s ruined, remove trim safely, clean and dry surfaces, choose materials that hold up, reinstall properly, and document everything for your claim.
Fast action prevents mold and lingering odors.
Assessing Fire‑Damaged Interior Trim

Start by looking at the trim itself. Check baseboards, door casings, and window trim for visible charring, warping, or bubbling in the finish. Smoke can soak into wood fibers even when the surface looks okay, and that smell won’t go away with paint alone. Press gently on any charred sections with a screwdriver or your fingernail. If the wood feels soft, crumbly, or leaves a black residue on your hand, the damage goes deeper than the surface.
Next, confirm the wall structure behind the trim is safe. If studs or drywall show warping, sagging, or water staining from firefighting efforts, you’ll need to address those issues before you worry about trim. Never reattach trim to a wall that isn’t solid. Tap along the wall with your knuckles. A hollow or spongy sound can mean hidden damage or moisture trapped inside.
Some signs mean the trim must come out. No negotiation. Deep charring that goes more than a quarter inch into the wood removes structural integrity and holds smoke residues you can’t clean. Warping that pulls the trim away from the wall won’t flatten out. Persistent smoke odor after thorough cleaning means contaminants have penetrated the material. If trim was soaked by fire hoses and now feels damp or shows dark spots, mold may already be forming inside the wood.
Initial actions to take within 24 to 48 hours:
- Ventilate the space by opening windows and using fans to pull smoky air outside, but don’t disturb loose soot.
- Document all visible damage with photos and short videos from multiple angles before you touch anything.
- Wear an N95 mask, safety glasses, and gloves if you need to enter the room to assess damage.
- Don’t pull on loose or charred trim until you’ve confirmed the wall behind it is stable and dry.
- Contact your insurance company and ask whether they require a professional inspection before you remove damaged materials.
Removing Fire‑Damaged Trim Safely
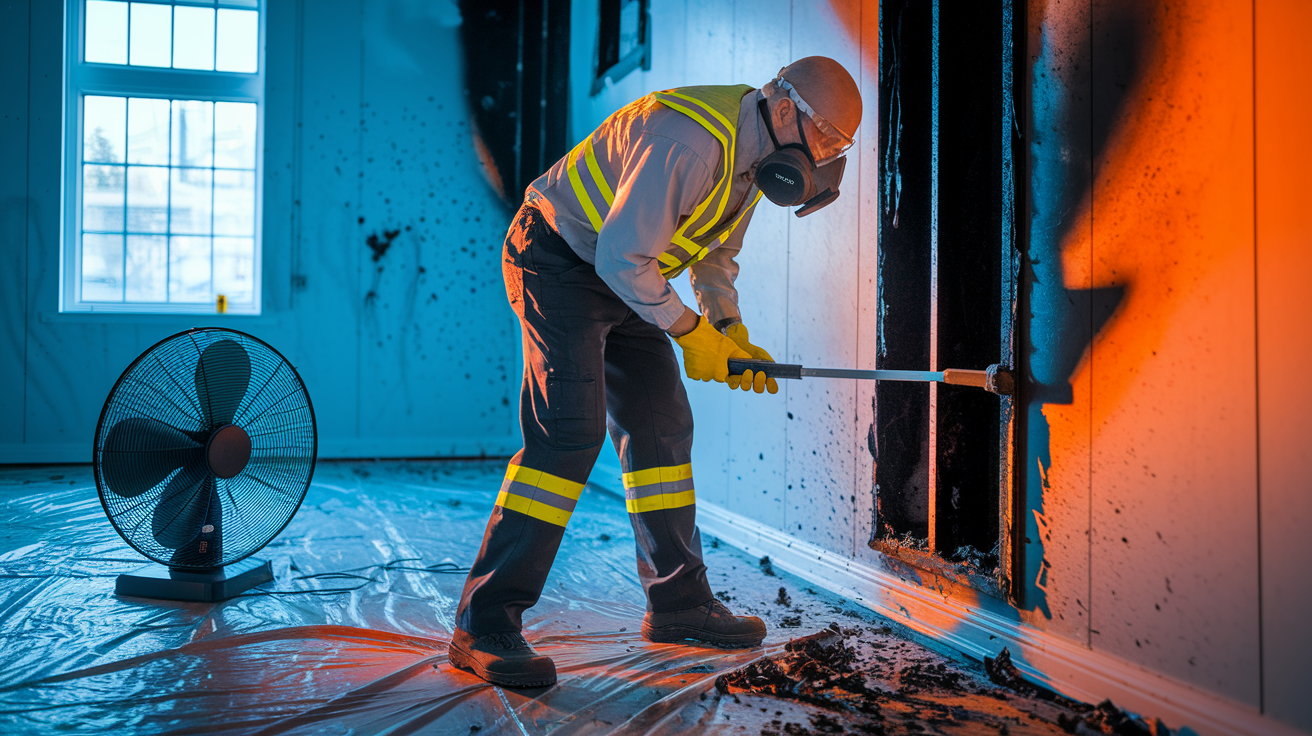
Wear a respirator rated N95 or higher. Not just a dust mask. Soot contains fine particles and chemical residues from burned materials, and disturbing it sends that into the air. Add safety glasses to keep debris out of your eyes, and use nitrile gloves that won’t tear when you handle splintered wood. Lay plastic sheeting on the floor and tape it to the baseboards you’re keeping. That containment keeps soot from spreading to clean areas.
Turn off power to the room at the breaker if you’ll be working near outlets or light switches. Fire can damage wiring hidden behind trim, and a nail through compromised electrical lines is a real risk. Set up a box fan in a window, facing outward, to pull dust and odor outside while you work.
Step by step trim removal:
- Score the caulk line between the trim and the wall with a utility knife to break the seal without tearing drywall paper.
- Slide a thin pry bar behind the trim near a nail, starting at one end, and gently lift to create a small gap.
- Move the pry bar a few inches down and repeat, working slowly to avoid snapping brittle, fire damaged wood.
- Once the piece is loose, pull it away from the wall and check for nails left behind in the studs. Remove those with pliers or a nail puller.
- Inspect the wall surface and framing for charring, soft spots, or moisture. Mark any problem areas with painter’s tape for repair.
- Place removed trim directly into heavy duty trash bags, seal them, and dispose of the material to prevent soot from settling elsewhere in the home.
Preparing Walls and Surfaces for New Trim
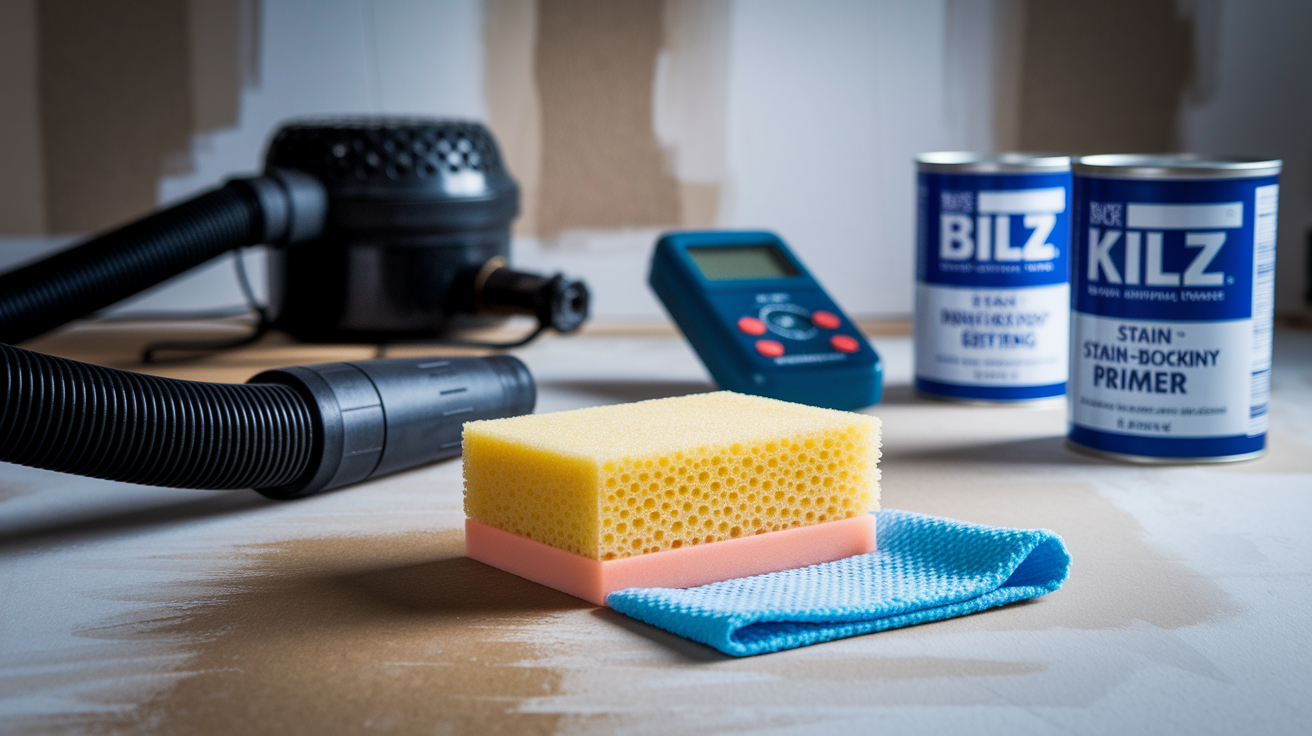
Soot clings to everything. It will bleed through fresh paint if you don’t clean it first. Start with a HEPA vacuum to pull loose particles off the wall without smearing them. Then wipe the surface with a dry chemical sponge, which lifts soot without water. After that, use a damp cloth with a mild detergent solution or a cleaner designed for smoke residue. Work in small sections, rinse the cloth often, and let the wall dry completely. If the smell persists or the wall still looks stained, apply a stain blocking primer like BIN or Kilz before you paint or install new trim.
Check the drywall for damage. Firefighting water can soak into the paper and gypsum core, leaving the surface soft or discolored. Press on the wall near where trim was attached. If it feels spongy or your finger leaves an indent, cut out the damaged section and patch it with new drywall. Use a moisture meter if you have one. Readings above 16 to 20 percent mean the wall is still too wet for new materials. Run a dehumidifier and air movers until the levels drop. Seal any patched or stained areas with odor blocking primer so smells don’t migrate into the new trim.
Choosing Materials for Interior Trim Replacement

MDF is affordable and cuts cleanly, but it swells when wet and scorches easily in a fire. If your house took water damage from fire hoses, MDF won’t hold up. Softwood like pine is common for painted trim and costs less than hardwood, but it chars quickly under heat and can retain smoke odor if the grain absorbs residue. Hardwood species such as oak or maple resist fire better and last longer, but they cost more and require staining or clear finishes that show every imperfection. PVC and composite trim won’t rot or swell from water, and they handle heat better than wood, though they can melt or release fumes in direct flame.
Match the profile and height of your existing trim when possible. Take a sample piece or a photo to the lumberyard so you can compare it to stock profiles. If you’re replacing trim in only one room, mismatched baseboards will stand out. If the fire damaged trim throughout the house, switching to a different style is easier because everything gets replaced at once.
Fire resistant materials don’t eliminate risk, but they slow the spread of flames and reduce smoke absorption. Intumescent coated wood trim is available in some markets and expands when exposed to heat, forming a protective char layer. That’s overkill for most residential applications, but it’s an option if building codes or your insurance company require upgraded materials.
| Material | Durability | Fire Performance | Typical Cost |
|---|---|---|---|
| MDF | Low; swells with moisture | Poor; chars and crumbles quickly | $2–$4 per linear foot |
| Softwood (pine) | Moderate; dents easily | Fair; burns faster than hardwood | $3–$6 per linear foot |
| Hardwood (oak, maple) | High; resists dents and wear | Good; slower ignition, denser char | $5–$12+ per linear foot |
| PVC / Composite | Very high; waterproof, no rot | Good; melts rather than burns, less smoke | $4–$10 per linear foot |
Installing New Interior Trim After Fire Damage
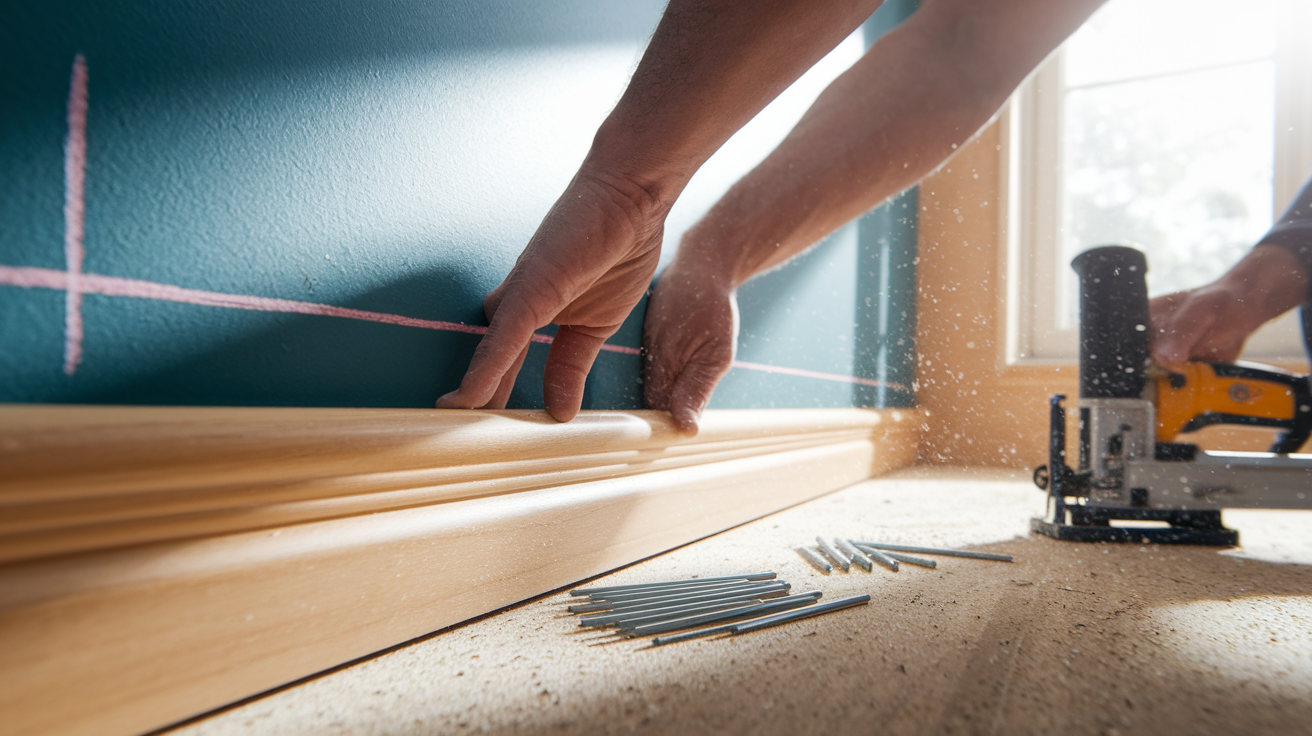
Measure each wall section and window or door opening separately. Walls that look straight can shift after fire damage, so don’t assume all pieces will be the same length. Use a miter saw for clean 45 degree cuts on outside corners and cope inside corners for baseboards so joints fit tight even if walls aren’t perfectly square. A coping saw or oscillating multi tool makes that cut easier.
If smoke odor lingers in the room even after cleaning, paint or prime the back of the trim before you install it. That extra seal keeps residual smells from creeping out through the wood grain later. Once the trim is cut, hold it in place and mark nail locations at studs, which are typically 16 inches apart. Use a finish nailer with 15 or 16 gauge nails long enough to bite into the stud, not just the drywall. Nails that hit only drywall will pull loose over time.
Common mistakes include forcing warped trim flat against the wall, which creates gaps that open up later, and skipping caulk along the top edge where the trim meets the wall. Caulk hides minor irregularities and creates a clean paint line. Don’t caulk the bottom edge of baseboards on hardwood or tile floors. Leave a small gap for expansion. Another mistake is using too much force with the nailer, which dents the trim face. Set the compressor pressure low and test on a scrap piece first.
Simplified installation steps:
- Cut the first piece to length with a 90 degree cut on one end if it meets a wall, or a 45 degree miter if it meets another piece at a corner.
- Hold the trim against the wall and check for gaps. Shim behind it if needed to keep it straight and level.
- Nail the trim at each stud location, angling nails slightly downward to lock the piece in place.
- Fill nail holes with wood filler or caulk that matches the trim finish, then sand smooth once dry.
- Apply a final coat of paint or stain to seal the trim and blend repairs, making sure all seams and edges are covered.
Understanding Costs and Insurance Coverage

Replacing interior trim in a single room typically costs $300 to $800 when you include materials, fasteners, caulk, primer, and paint. If you’re matching custom profiles or using hardwood, expect $1,000 to $2,000 per room. Whole house replacement after a fire can run $3,000 to $10,000 or more depending on square footage, ceiling height, and the number of doors and windows. Professional installation labor adds $4 to $12 per linear foot, so a 1,500 square foot house with 400 linear feet of baseboard could cost $1,600 to $4,800 in labor alone.
Homeowners insurance usually covers trim replacement when fire is the cause of damage, but you’ll need documentation. Take photos of every damaged piece before you remove it, and keep receipts for all materials and contractor work. Your adjuster may require a written estimate or invoice from a licensed contractor even if you plan to do some of the work yourself. Policies vary between replacement cost coverage, which pays for new materials at current prices, and actual cash value, which subtracts depreciation. Ask your agent which type you have before you start buying materials.
Documents to gather for your insurance claim:
- Photos and videos showing the extent of trim damage and any charring or smoke staining on walls.
- Contractor estimates or invoices that list labor, materials, and scope of work in detail.
- Receipts for materials you purchased, including trim, primer, paint, fasteners, and tools if they’re one time purchases related to the fire.
- A copy of your fire department report, which confirms the date, cause, and areas affected by the fire.
DIY vs Professional Trim Replacement After a Fire

DIY is reasonable if the fire was small, the trim damage is limited to one or two rooms, and you’ve already cleaned all smoke residue and confirmed the walls are dry and structurally sound. Removing and replacing baseboards and door casings is straightforward if you have basic carpentry skills, a miter saw, and a finish nailer. Painting or staining the new trim yourself saves labor costs, and the work goes faster when you’re not coordinating schedules with a contractor.
Call a professional restoration company when smoke odor persists after cleaning, when you see water stains or soft spots in the drywall, or when trim was attached to load bearing walls that show charring or warping. Professionals use moisture meters, thermal imaging, and HEPA filtration systems to find hidden damage and prevent mold. They also document the work for insurance in a way that meets adjuster requirements and building code standards. If your trim replacement is part of a larger fire restoration project that includes drywall, electrical, or structural repairs, a licensed contractor ensures all the work is done in the right sequence and inspected properly. Skipping that step can leave you with recurring odors, failed inspections, or claim denials.
Final Words
In the action: first, check the trim for charring, smoke soak, and stability. Confirm the wall behind is safe before you touch anything.
Next, remove unstable pieces with protective gear (gloves, mask), document everything, and clean soot before sealing and repairs. Test for moisture. Dry fully before new trim goes in.
When you’re ready to reinstall, pick materials that resist heat and seal surfaces to stop lingering odors. Keep good records for claims. With steady steps and proper interior trim replacement after fire, your home will feel whole again.
FAQ
Q: How long do toxic fumes last after a fire?
A: Toxic fumes after a fire can linger from hours to weeks, depending on fire size, materials burned, and ventilation. Open windows if safe, use air scrubbers, and get professional testing to confirm air quality.
Q: Does homeowners insurance cover housing after a fire?
A: Homeowners insurance usually covers temporary housing (loss of use) when a fire makes your home unlivable, subject to policy limits and adjuster approval. Save receipts, document damage, and notify your insurer right away.
Q: What needs to be replaced after a fire?
A: What needs replacing after a fire depends on damage: visibly charred trim, wet or collapsed drywall, warped flooring, insulation, cabinets, and HVAC components often require replacement after a professional inspection.
Q: What is salvageable after a house fire?
A: What’s salvageable after a house fire depends on heat, soot, and water exposure: nonporous items like metal tools, some glass, and sealed electronics can often be cleaned; porous fabrics, paper, and some furniture usually need disposal.