

Think a ceiling drip is just a nuisance?
It can get serious in 48 hours, with mold, warped drywall, and soaked insulation.
If you’re searching “ceiling water leak repair near me,” you need a same-day local team that stops the leak, pulls moisture out of framing and insulation, and rebuilds the ceiling so the problem doesn’t return.
This post shows how to get fast local response, what pros check first, and the four simple steps you can take before help arrives.
Immediate Local Help for Fast Ceiling Water Leak Repair

When water starts dripping from your ceiling, you don’t have time to waste. Mold can start showing up after about 48 hours of wetness, and every minute that water keeps flowing, it’s spreading deeper into framing, insulation, and electrical systems. If you’re searching for ceiling water leak repair near me, you need same day ceiling leak response near me or a 24 hour ceiling leak repair service that can stop the damage tonight. Not next week.
Before the truck pulls up, take four quick actions to keep water from spreading. Move electronics, furniture, and anything you care about away from the drip zone. Set buckets or pans under active leaks so you’re not dealing with floor damage too. If the ceiling is bulging with trapped water, carefully poke a small hole at the lowest point to relieve pressure. Otherwise you might end up with a sudden collapse. Shut off your main water supply if you think the leak is plumbing related, and photograph everything for your insurance claim.
When an emergency ceiling leak contractor shows up, the first job is triage. Not guesswork. Pros check whether the source is a broken pipe above, a roof intrusion from the last storm, or condensation from an HVAC unit. Many local services offer free ceiling leak inspection near me visits to confirm the cause, measure moisture inside walls and ceilings, and map out the repair plan. Service areas vary by ZIP code, so confirm your address falls within the contractor’s normal coverage zone before you commit.
Four critical steps while waiting for help:
- Move valuables and electronics away from the leak
- Place buckets to catch dripping water
- Relieve bulging ceiling pressure with a small puncture
- Shut off main water if plumbing is suspected
Common Causes Behind Ceiling Water Leaks in Homes
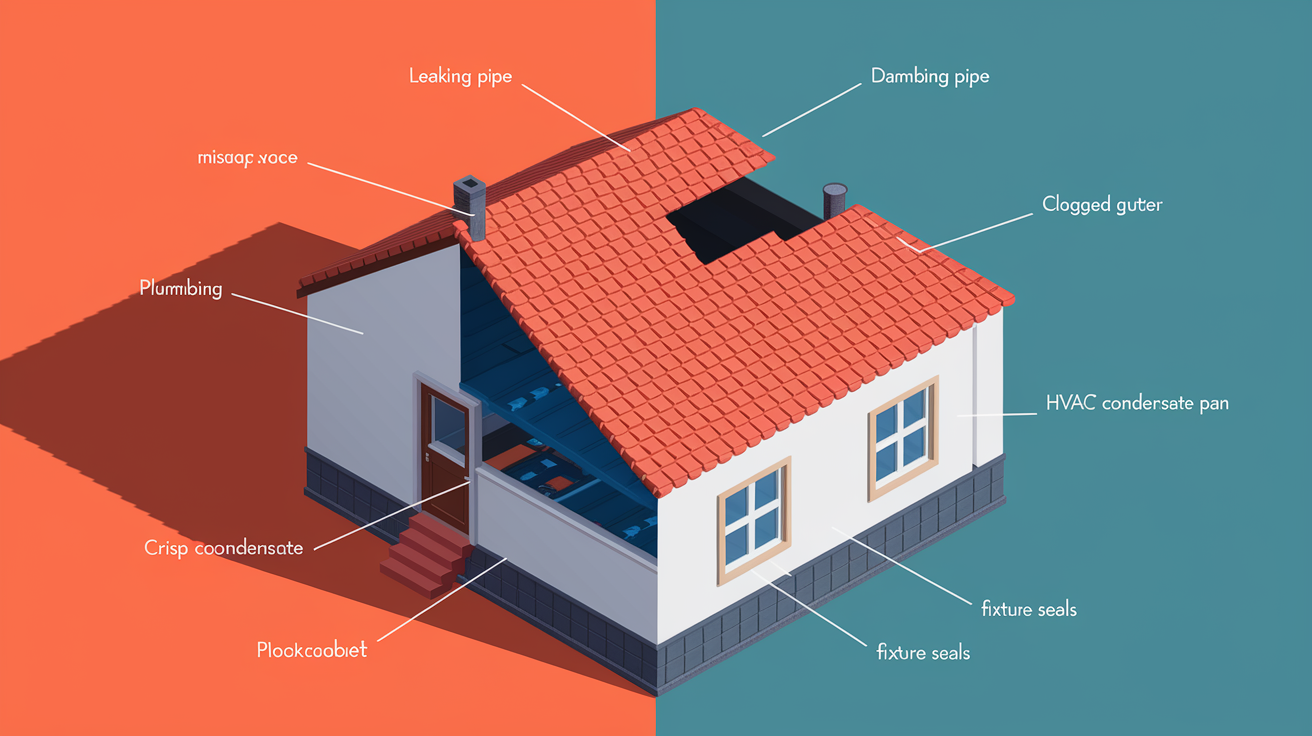
Most ceiling leaks trace back to five common culprits: damaged plumbing pipes, leaking roofs, clogged gutters, HVAC condensation pans, or failed seals around fixtures. Water doesn’t always drip where it enters. A roof intrusion near a chimney can send water sideways along rafters, pooling at a ceiling junction ten feet away. Similarly, a slow pipe drip in an upstairs bathroom can soak insulation and travel to a light fixture below, making the ceiling appear to sweat before it finally gives out.
If the leak is on your top floor or in a room directly under the attic, climb into the attic with a flashlight and look for mildew smells, brown staining on framing lumber, or wet, matted insulation. Those are telltale attic to ceiling leak diagnosis clues pointing to roof or gutter problems. If the ceiling damage is on a lower level, especially under a kitchen or bathroom, the source is usually plumbing. Gutters overflow when leaves and debris clog downspouts, forcing water to back up under shingles or pour over the edge and seep into exterior walls. HVAC condensation causing ceiling leaks is less dramatic but just as real. When the drip pan cracks or the drain line clogs, condensate spills directly onto ceiling drywall.
| Cause | Typical Sign |
|---|---|
| Plumbing Pipe Leak | Drips below bathrooms or kitchens; stains near fixtures |
| Roof Damage | Leaks during or after rain; wet attic insulation; stains near chimneys or skylights |
| Clogged or Damaged Gutters | Water intrusion at exterior wall/ceiling junctions; overflow stains |
| HVAC Condensation | Slow, steady drips near air handler or ductwork; no correlation with rain |
Professional Steps in Ceiling Water Leak Repair and Restoration
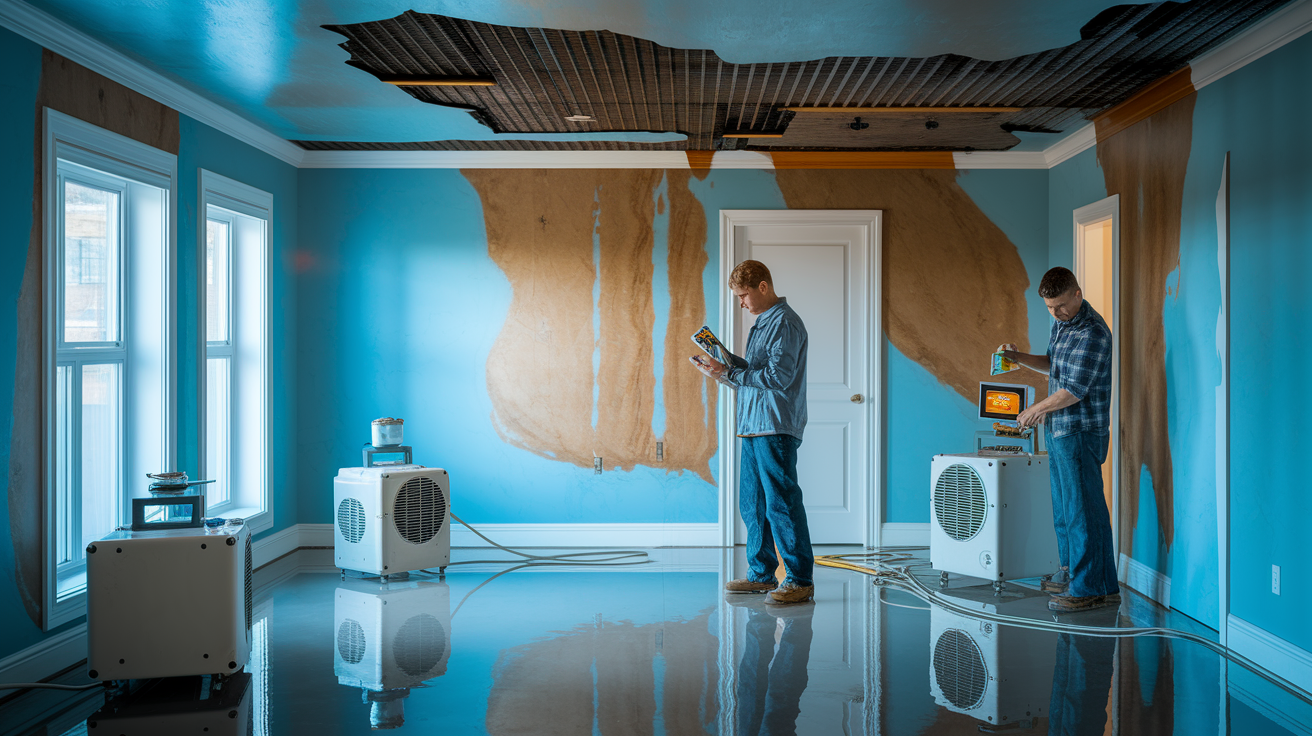
Restoration pros don’t just patch the hole and leave. The workflow starts with stopping the source, moves to controlled drying, then advances to demolition, repair, and refinishing. First, the team confirms the leak is off, whether that means capping a pipe, tarping a roof section, or clearing a gutter. Next comes structural drying with industrial fans, air movers, and dehumidifiers to pull moisture out of framing, insulation, and drywall. Drying can take anywhere from a couple of days to a few weeks depending on how saturated the materials are and how humid the air is outside. Moisture meters and thermal cameras verify that hidden pockets are dry, not just the surface you can see.
Once readings confirm the space is dry, wet drywall and insulation come out. Saturated drywall almost always gets replaced, not patched, because it loses strength and becomes a mold risk. Insulation that stayed wet for more than 48 hours also gets pulled and discarded. After demo, the plumber or roofer repairs the underlying cause, then the restoration crew rebuilds the ceiling with new drywall, tape, mud, texture, and paint matched to the surrounding finish. If the damaged section is large, the entire ceiling may be refinished to avoid a visible patch.
Water weight is a real structural issue. A U.S. gallon of water weighs nearly 8.5 pounds, so even a small puddle trapped above drywall can stress joists and cause sagging or sudden collapse. Restoration teams check framing for warping or rot and reinforce or sister joists if needed. The goal is a ceiling that looks original and performs like new, with no hidden moisture waiting to grow mold or weaken the structure six months later.
Local Contractors Who Fix Ceiling Leaks: Plumber, Roofer, or Restoration Specialist?

Choosing the right pro depends on where the water is coming from. If the leak appears below an upstairs bathroom, under a kitchen sink, near a water heater, or along interior walls with visible pipes, call a licensed ceiling leak plumbers specialist. Plumbers locate hidden leaks with pressure tests and thermal imaging, repair or replace damaged pipe sections, and inspect connections behind walls and above ceilings. They stop the flow, but they typically don’t handle the drying, demolition, or reconstruction that follows.
When the leak happens during or right after rain, or when it shows up near shingles, flashing, chimneys, skylights, or roof valleys, the source is overhead and you need a roofer. Roof to ceiling leak detection service includes inspecting the exterior for damaged or missing shingles, checking metal flashing around penetrations, clearing debris from valleys, and looking for ice dam damage in cold climates. Roofers patch, reseal, or replace the compromised section and may install temporary tarps to stop weather intrusion until permanent repairs are complete.
For comprehensive residential ceiling leak repair companies or commercial property ceiling leak contractors, restoration specialists handle the full cycle. They dry the structure, remove damaged materials, coordinate with plumbers or roofers to fix the source, then rebuild and refinish the ceiling. Many restoration companies are IICRC certified, meaning their teams are trained and tested in water damage mitigation, mold remediation, and structural drying protocols. They also document moisture readings, take before and after photos, and prepare detailed scopes that insurance adjusters need to approve claims.
Five contractor types and their responsibilities:
- Plumber: Locates and repairs pipe leaks, fixture failures, and water heater issues. Typically doesn’t perform drying or drywall work.
- Roofer: Inspects and repairs roof damage, flashing, shingles, gutters, and skylights. Installs tarps for interim weather protection.
- Restoration Specialist: Dries structure, removes wet materials, coordinates source repair, rebuilds ceiling, and documents for insurance.
- Handyman or General Contractor: Handles smaller drywall patches and cosmetic refinishing after the leak source is already fixed.
- Mold Remediation Pro: Removes visible mold growth, uses HEPA air scrubbers, and treats affected areas when growth exceeds safe levels.
Warning Signs Your Ceiling Leak Needs Immediate Professional Attention
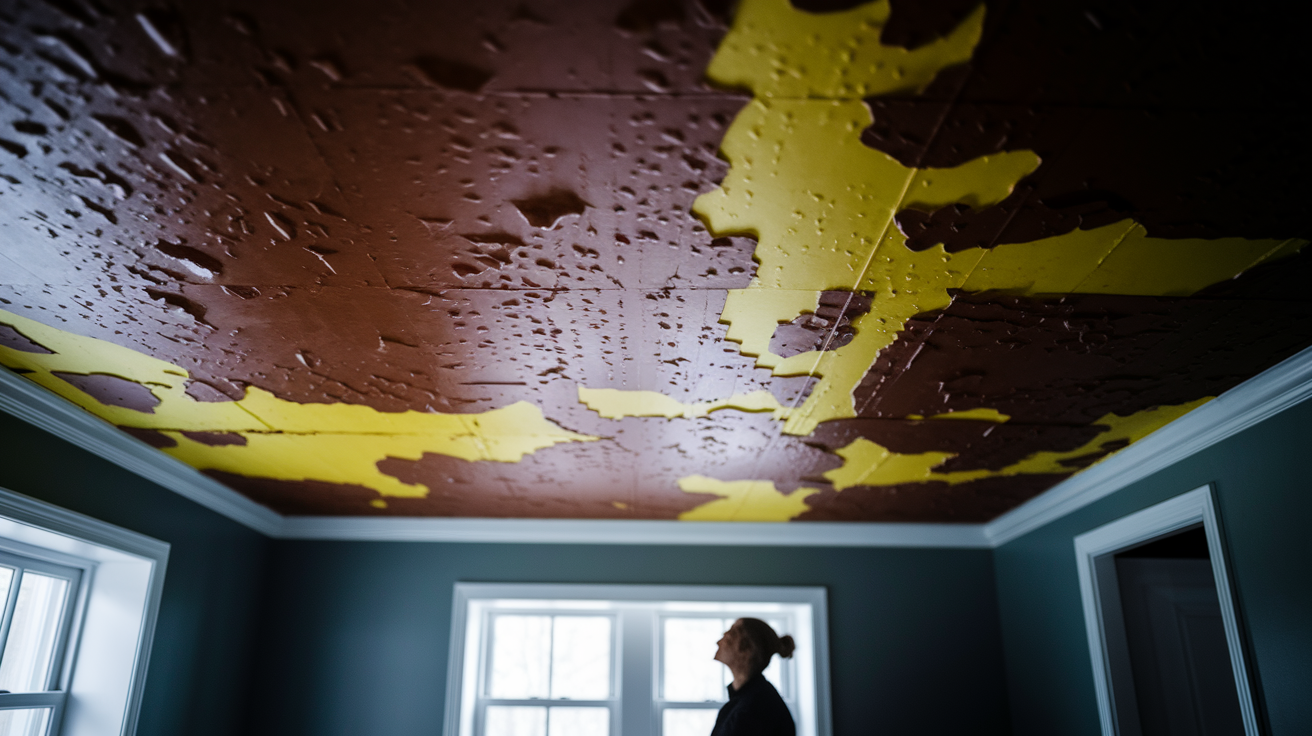
Some ceiling leaks drip slowly and stay small. Others signal urgent structural or health risks that demand same day professional response. Brown or yellow water stains that spread across drywall mean moisture is migrating through the material faster than it can dry. Sagging ceiling panels or drywall that feels soft when you press it gently indicate trapped water that’s exceeded the material’s weight capacity. If you see bubbling paint, peeling texture, or wallpaper pulling away at the seams, water has separated the finish coat from the substrate and mold may already be forming behind it.
Musty odors are a red flag for hidden mold growth. Mold can start forming after 48 hours of wetness, and it often colonizes the back side of drywall, inside wall cavities, or on top of insulation where you can’t see it. Visible mold appears in multiple colors: white, green, black, gray, yellow, orange, or pink. Textures range from slimy and wet to fuzzy, powdery, or wool like. If anyone in the home experiences new allergy symptoms, respiratory irritation, or asthma flare ups after the leak starts, mold spores are likely circulating in the air.
Six major symptoms that require immediate professional help:
- Large or spreading brown, yellow, or rust colored ceiling stains
- Sagging, soft, or bulging drywall panels
- Bubbling paint, peeling texture, or separating wallpaper
- Persistent musty or earthy odors in the affected room
- Visible mold growth in any color or texture
- Continuous dripping even when it’s not raining or no faucets are running
Costs of Ceiling Water Leak Repair and What Factors Affect Pricing

Ceiling water leak repair costs vary widely depending on the damage extent, the leak source, and how long water ran before discovery. The average water damage repair bill in the U.S. runs around $3,600, covering drying, demolition, source repair, and reconstruction. Ceiling specific work typically costs $45 to $55 per square foot when you include cutting out wet drywall, replacing insulation, hanging and finishing new drywall, texture matching, and repainting. Fixing the underlying cause adds another layer. Plumbing repairs range from $200 for a simple valve replacement to $1,550 for repiping a bathroom supply line, while roof repairs span $200 for minor flashing work to $1,550 or more for shingle replacement and valley sealing.
Drying time directly affects labor and equipment rental costs. A small leak caught within hours may dry in two to three days with a few air movers and a dehumidifier. A leak that soaked framing and insulation for a week can require ten days of continuous drying, multiple dehumidifiers, and antimicrobial treatment to prevent mold, pushing costs higher. Saturated drywall almost always requires full replacement rather than surface patching because the paper facing delaminates and the gypsum core loses structural integrity once waterlogged.
Additional cost drivers include the room location (top floor or attic access is harder to reach), ceiling height (cathedral ceilings need scaffolding), finish complexity (popcorn texture or coffered panels cost more to match), and whether flooring, trim, or electrical fixtures also sustained damage. Always request an itemized estimate that separates drying, demolition, source repair, materials, labor, and finishing so you can compare contractor estimates for ceiling reconstruction transparently.
| Service | Typical Price Range |
|---|---|
| Ceiling Drywall Replacement & Refinishing | $45–$55 per square foot |
| Plumbing or Roof Source Repair | $200–$1,550 |
| Complete Water Damage Restoration (Average) | ~$3,600 |
Insurance Claims for Ceiling Leak Damage and Documentation Tips

Homeowners insurance typically covers ceiling water damage when the cause is sudden and accidental, such as a burst pipe, storm damaged roof, or overflow from a clogged condensate line. Policies exclude damage from long term neglect, lack of maintenance, or flood events, which require separate flood insurance. The distinction matters. A pipe that rusted over five years and finally cracked may be denied if the insurer decides routine maintenance would have prevented it, while a freeze and burst event during an unexpected cold snap is usually covered.
Strong documentation is the difference between a smooth claim and a drawn out dispute. As soon as you discover the leak, take photos and videos of the ceiling stain, any visible water pooling, the source if you can access it, and all affected belongings. Photograph the water shut off valve position, the attic or crawl space if accessible, and any mold or swelling. Restoration contractors supply additional evidence: moisture meter readings that map wet zones, thermal images showing hidden saturation, itemized scopes listing every material to be removed and replaced, and daily progress photos during drying. Adjusters use these reports to verify the damage extent and approve line items for drying equipment, demolition labor, materials, and finishing work.
Five essential documentation steps for a ceiling leak insurance claim:
- Photograph and video the ceiling damage, source area, and all affected rooms immediately after discovery.
- Document the leak source with close up images of the failed pipe, roof section, or fixture.
- Capture before and after images of furniture, flooring, and personal property that got wet or moved.
- Request written moisture readings, thermal scans, and a detailed scope of work from your restoration contractor.
- Keep all receipts for emergency mitigation (tarps, buckets, fans) and provide them to your adjuster with your claim.
Preventing Future Ceiling Leaks in Your Home

Prevention starts with routine inspections and fast repairs when small issues appear. Schedule a professional roof inspection at least once a year and again after any major storm, hail event, or high wind. Roofers check shingles for cracks or missing granules, test flashing around chimneys and skylights, clear debris from valleys, and confirm that vents and boot seals are intact. Catching a worn shingle or loose flashing early costs a few hundred dollars. Waiting until water soaks the attic can cost thousands.
Keep gutters and downspouts clear of leaves, pine needles, and debris so water flows away from the house instead of backing up under roof edges or pooling against foundation walls. Insulate exposed pipes in attics, crawl spaces, and exterior walls to prevent freeze and burst failures during cold snaps. Inspect plumbing fixtures and supply lines under sinks, behind toilets, and near water heaters every six months for rust, corrosion, or slow drips. Install water leak detection devices with audible alarms near water heaters, washing machines, sump pumps, and basement floors so you catch leaks in minutes instead of days. Mold can begin forming after 48 hours, so the faster you know about moisture, the smaller the repair.
Six proven prevention tactics to protect your ceiling:
- Schedule annual roof inspections and post storm checks by a licensed roofer
- Clean gutters and downspouts at least twice a year (spring and fall)
- Insulate pipes in unheated spaces to prevent freeze damage
- Inspect plumbing fixtures and supply lines every six months for leaks or corrosion
- Install water leak detection alarms near water heaters, washers, and basements
- Address small roof or plumbing issues immediately before they turn into ceiling damage
Final Words
First, stop the water, move valuables, contain the drip, and document the damage. Fast action keeps mold and structural problems from getting worse.
You saw the likely causes, what pros do to dry and rebuild, who to call, red flags, cost expectations, and how to document for your insurer.
If you need help now, search ceiling water leak repair near me or call a local 24/7 team. Quick response gets repairs started and your home back to normal.
FAQ
Q: How much does it cost to repair a water leak in the ceiling?
A: The cost to repair a water leak in the ceiling typically runs about $45–$55 per square foot for ceiling repair, with full water-damage jobs averaging near $3,600; plumbing or roof fixes add $200–$1,550.
Q: Who fixes water leaks in the ceiling or who do you call for a damp patch on the ceiling?
A: Who fixes ceiling leaks or a damp patch depends on the source: plumbers handle pipes, roofers handle roof-origin leaks, and restoration contractors handle drying, demolition, and rebuilding—call based on where the water’s coming from.
Q: What to do if water leaks through the ceiling?
A: If water leaks through the ceiling, stop the source if safe (shut off the main for plumbing), move valuables, contain water, relieve bulging, photograph damage, and call a 24/7 repair team quickly. Mold can start in 48 hours.