

Think a fresh coat of paint will hide smoke smell? It won’t.
Smoke odor blocking primer actually traps nicotine, tar, soot, and the tiny odor molecules that keep a room smelling like smoke.
In this post I cut through the hype and show which primers really work and why, shellac for heavy smoke and fire soot, oil-based for moderate cigarette staining, and water-based for light cooking or pet odors.
You’ll also get the surface prep and application tips that stop smell from coming back, not just cover it up.
Essential Overview of Smoke Odor Blocking Primer Performance
Smoke odor blocking primers trap smoke particles, nicotine, tar, and volatile odor molecules inside walls, ceilings, and trim. They create a thick barrier that physically locks residue in place so it can’t bleed through your finish paint or evaporate into the air. Without proper sealing, smoke odor keeps off-gassing through fresh paint, and stains show up again as yellowing or brown spots within weeks.
The most reliable product for heavy smoke is a shellac-based primer. Zinsser B-I-N original formula (product #00901) is the industry benchmark. Shellac dries fast, usually tack-free in 20 to 45 minutes, and locks in severe nicotine staining and fire smoke with one or two coats. Oil-based primers like Cover-Stain work well for moderate cigarette smoke but dry slower, taking 6 to 8 hours between coats. Water-based high-hide primers are convenient for light odors. Lower smell, easier cleanup. But they struggle with heavy contamination and often require multiple coats. Plan coverage at around 400 square feet per gallon rather than the 500 stated on some labels, because smoke primers go on thin and solids settle quickly in the can.
One coat of shellac or oil primer is usually sufficient for light cigarette smoke or minor nicotine staining. Two coats are needed for long-term heavy smoking, fire soot, or tar buildup. Surface prep matters as much as primer choice. Dry wipe walls, HEPA-vacuum ceilings, wet-clean with vinegar or a degreaser (not TSP unless the manufacturer allows it), patch holes, and sand smooth with 120-grit paper before you open the primer can.
Six key problems smoke odor blocking primers solve:
- Prevents nicotine and tar from bleeding through topcoats as yellow or brown stains
- Traps volatile odor molecules so rooms stop smelling like smoke after painting
- Seals soot residue on ceilings and walls after fire or heavy burn events
- Stops tannin bleed from knotty wood and raw lumber (bonus benefit beyond smoke)
- Covers protein-based cooking smoke and grease odors on kitchen surfaces
- Eliminates persistent smells from cat urine, pet accidents, and other organic stains
Comparing Top Smoke Odor Blocking Primer Options
Choosing the right product depends on contamination severity and your comfort with solvent odors. Shellac-based primers deliver the strongest odor seal but come with high fumes and require alcohol cleanup. Oil-based options balance performance and drying time, while water-based primers offer low-odor convenience at the cost of sealing power. Pricing also varies. Shellac formulas typically cost $35 to $60 per gallon, oil-based primers run $25 to $45, and water-based high-hide products range from $20 to $35 per gallon. Coverage averages 300 to 400 square feet per gallon across all types, with porous or soot-heavy surfaces reducing that by 20 to 50 percent.
For cigarette smoke with visible nicotine staining, shellac is the default choice. One coat eliminates odor and stain in most cases. Fire smoke with soot or char requires shellac or specialized encapsulants, sometimes labeled “Ultra” or “Recon,” that bond to carbon residue. Light cooking smoke or minor pet odors can often be handled with a quality water-based primer, saving you ventilation headaches. If you’re unsure, start with oil-based for moderate smoke. It’s forgiving, effective, and widely available.
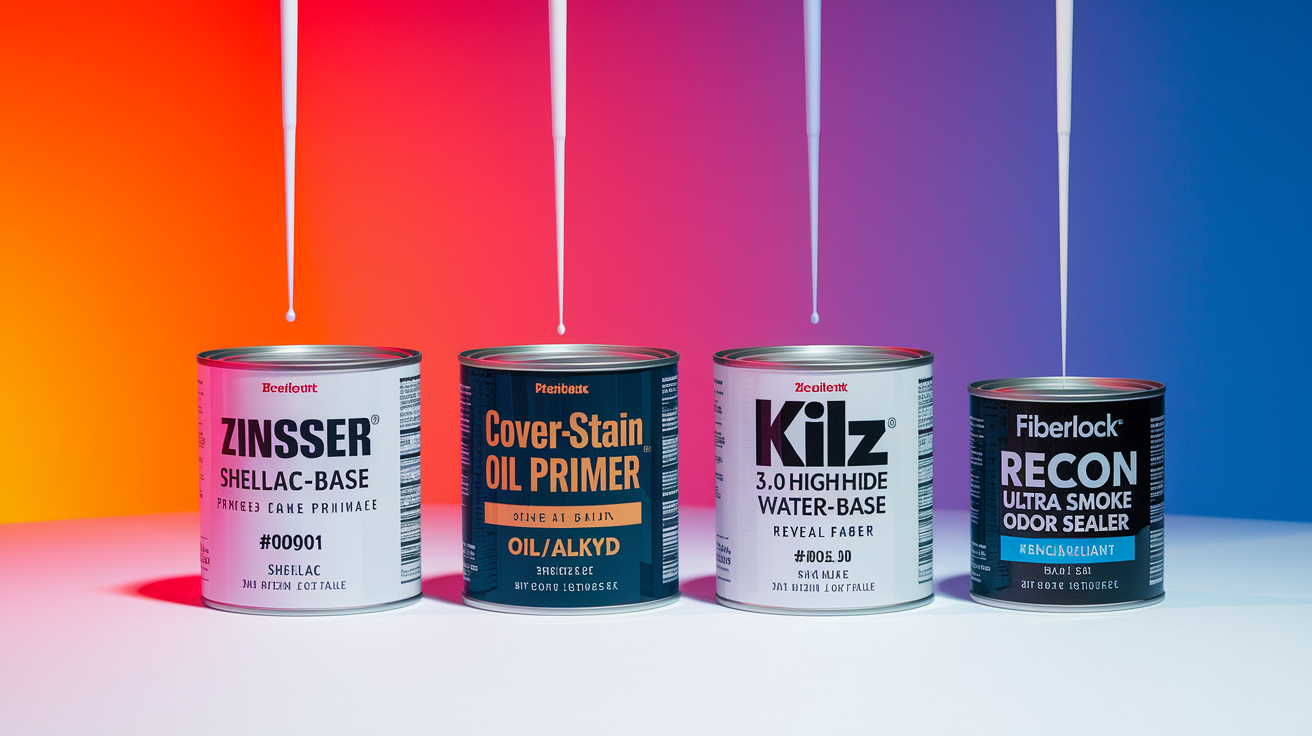
| Product | Type | Best For |
|---|---|---|
| Zinsser B-I-N Shellac-Base Primer (#00901) | Shellac | Heavy nicotine, fire smoke, tar, persistent odors, knotty wood bleed |
| Cover-Stain Oil Primer | Oil/Alkyd | Moderate cigarette smoke, stains, mixed odors, slower drying acceptable |
| Kilz 3.0 High-Hide Water-Base Primer | Water-Base | Light cigarette smoke, cooking odors, low-VOC requirement, easier cleanup |
| Fiberlock Recon Ultra Smoke Odour Sealer | Encapsulant | Post-fire soot, char, extreme contamination, commercial restoration work |
Surface Preparation Before Applying a Smoke Odor Blocking Primer

Primer can’t seal smoke odor if the surface underneath is still contaminated. Loose soot, greasy nicotine film, and moisture all prevent adhesion and let odors bleed through. Start by dry-wiping walls and ceilings with old newspaper or disposable rags to remove surface solids without smearing them deeper into the texture. Follow with HEPA vacuuming. Standard shop vacs just blow fine particles back into the air. For heavy soot or fire residue, use a dry chemical sponge first, then wet-clean with a vinegar solution (one cup per gallon of water) or a standard degreaser. Don’t use TSP unless your primer manufacturer explicitly allows it. Some shellac and oil products react badly to phosphate residue. Let the surface dry completely, at least 24 hours in humid conditions, and confirm substrate moisture is below 12 percent if you have a meter.
Sand patched areas and glossy surfaces with 120-grit paper to give the primer tooth. For trim and smooth woodwork, finish with 220-grit so you don’t telegraph scratches through the topcoat. Feather the edges of spackled holes so they blend into the surrounding wall. Wipe down all sanded surfaces with a tack cloth or damp rag to remove dust. Primer bonds to clean drywall paper, not to a layer of fine powder.
Watch for moisture and temperature limits that cause adhesion failure. Don’t prime if the surface temperature is within 15 degrees Fahrenheit of the dew point. Condensation forms under the primer film and traps moisture, leading to peeling and continued odor problems. If you’re working in a basement or after water cleanup, run dehumidifiers and confirm walls are dry to the touch and cool but not cold. For popcorn ceilings with deep smoke contamination, consider removal rather than sealing. Oil-based and even shellac primers sometimes fail when soot has soaked into the thick texture, and scraping the ceiling is faster than applying three coats of encapsulant and still smelling smoke.
Application Techniques for Smoke Odor Blocking Primers
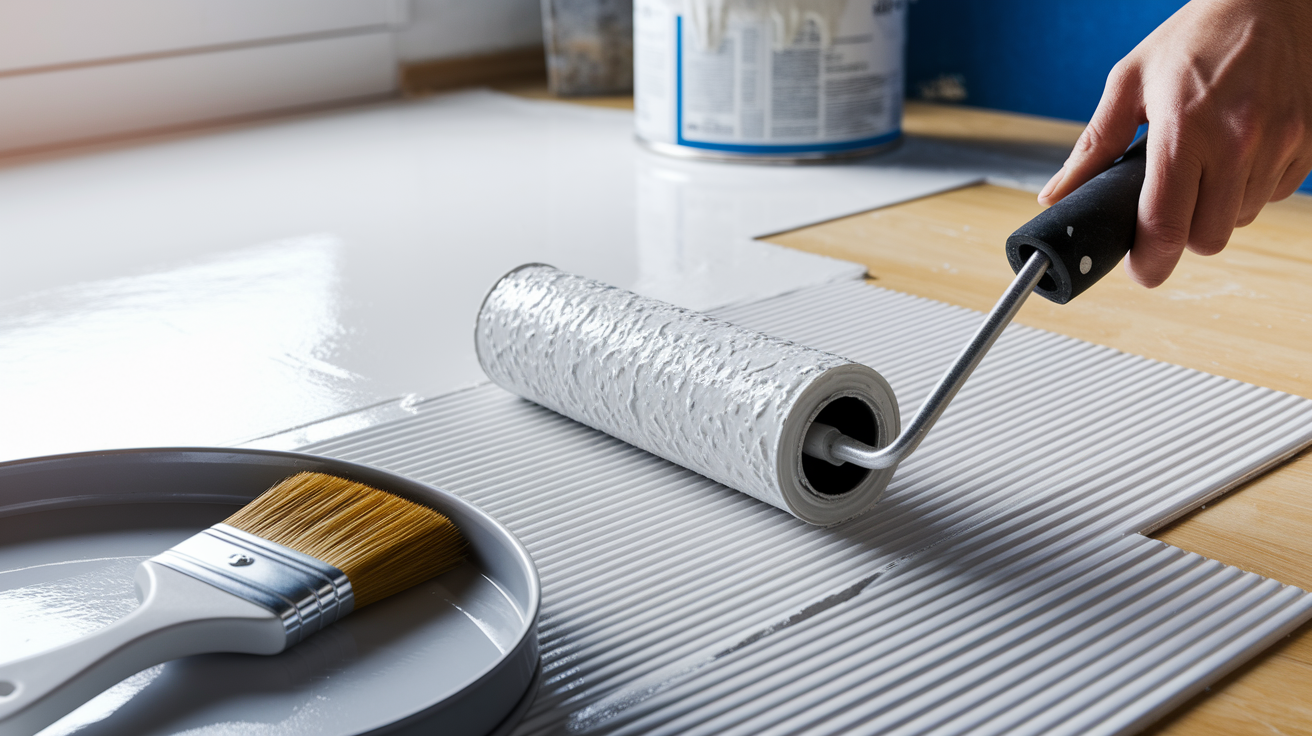
The right tools and timing make the difference between a permanent seal and a primer coat that fails in three months. Use a good-quality brush and roller. Natural or synthetic bristles work for shellac and oil primers, synthetic only for water-based. Plan to throw away your brush and roller cover after using shellac. Cleaning them with alcohol is possible but time-consuming and expensive compared to the cost of a new foam cover. Save the roller handle by wiping it down immediately with 99 percent isopropyl alcohol or denatured alcohol.
Pour only what you can use in about ten minutes into a small cut bucket or roller pan, then cover the pan between applications. Shellac primer’s solids settle fast, and the top of the can dries into a skin if you leave it open. Stir thoroughly before you start and every 15 minutes during the job. For small touch-up spots, keep the primer wet on your brush with a few drops of 99 percent alcohol while you move from one area to the next.
Five key application mistakes to avoid:
- Recoating shellac too early (under 20 minutes) or too late (over 60 minutes). Adhesion suffers at both ends of the window
- Attempting to spray shellac primer through an airless sprayer. It clogs hoses and tips almost immediately
- Skipping respiratory protection when using shellac or oil primers. Organic vapor cartridges are required, not optional
- Thinning shellac or encapsulant primers without manufacturer permission. Most are engineered not to be thinned
- Applying primer over damp or greasy surfaces. The film won’t bond and odor molecules pass right through
Shellac becomes tack-free in 15 to 45 minutes depending on temperature and airflow. You can apply a second coat or start topcoating as soon as it’s dry to light touch. Oil-based primers need 6 to 8 hours between coats, sometimes longer in cold or humid rooms. Water-based high-hide primers recoat in 1 to 4 hours. Always follow the product data sheet recoat window. Early recoating lifts the first layer, and late recoating causes delamination because the film has cured too hard to bond chemically with the next coat. Wear gloves, eye protection, and an organic vapor respirator when working with shellac or oil products. The fumes are strong, and prolonged exposure causes headaches and respiratory irritation even in ventilated spaces.
Understanding Smoke Types and Choosing the Right Odor Blocking Primer

Not all smoke damage is the same. Cigarette smoke leaves a sticky, yellowish nicotine film that clings to walls, ceilings, and trim but usually stays on the surface. One coat of shellac or oil primer locks it down in most homes. Heavy, long-term smoking (think decades of chain-smoking in a closed house) creates thick tar deposits that can bleed through one coat, especially on ceilings where heat rises and concentrates the residue. In those cases, two coats of shellac primer are standard before you apply any finish paint.
Cooking smoke, especially from frying or grilling indoors, deposits grease and protein residue that smells different from tobacco. Water-based primers often handle light cooking odors after proper degreasing, but if the smell is strong or the surfaces feel tacky, switch to oil or shellac. Fireplace smoke and wood-burning stove residue contain soot and creosote that penetrate deeper into drywall texture and raw wood. Shellac works, but clean the soot first with a dry sponge and degreaser or the primer just seals dirt to the wall without stopping the smell.
Structure fire smoke is the most aggressive contamination. Soot from burned synthetics, plastics, and household materials includes tar, acids, and carbon particles that etch into painted surfaces and porous substrates. Standard latex primers fail completely here. You need either a heavy-duty encapsulant product designed for post-fire work or multiple coats of shellac primer after HEPA vacuuming and wet cleaning with a commercial degreaser. Even then, if insulation, ducting, or framing is saturated with smoke, surface priming alone won’t eliminate the odor. Hidden sources continue to off-gas through walls and vents.
Choosing Primers for Fire/Structure Smoke
Fire and heavy soot situations require specialized encapsulants that go beyond standard shellac or oil primers. Products labeled “smoke and odor encapsulant sealer” or “Recon Ultra” are formulated with higher solids and antimicrobial additives to bond with carbon residue and prevent microbial growth in the damp conditions that sometimes follow firefighting efforts. These products are often sold in 5-gallon contractor buckets and cost $120 to $300, but they deliver permanent odor control that retail primers can’t match. Expect to apply one heavy coat, allow full cure (24 to 72 hours), then assess whether a second coat is needed. If odor persists after two coats of a commercial encapsulant, the contamination has likely penetrated insulation, HVAC ducts, or structural framing, and material replacement is the only reliable fix.
Coverage, Cost, and Quantity Planning for Smoke Odor Blocking Primers

Accurate quantity planning prevents mid-job store runs and wasted primer. Most smoke odor blocking primers cover 300 to 400 square feet per gallon on smooth, sealed drywall. Porous surfaces like raw drywall, textured ceilings, or soot-covered plaster reduce effective coverage by 20 to 50 percent because the substrate absorbs more liquid. A typical 12-by-12-foot room with 8-foot ceilings has roughly 448 square feet of wall and ceiling surface. Plan on 1 to 2 gallons per coat depending on texture and contamination level. Buy two gallons if you’re priming ceilings or applying two coats for heavy smoke.
Pricing varies by primer type and package size. Shellac-based primers cost $35 to $60 per gallon, with quart sizes running $15 to $30 for small patch jobs. Oil-based primers are slightly cheaper at $25 to $45 per gallon. Water-based high-hide primers cost $20 to $35 per gallon and are the most economical choice for light smoke. Professional encapsulants sold in 5-gallon buckets range from $120 to $300, averaging about $25 to $60 per gallon when purchased in bulk. For a whole-house smoke remediation, calculate total wall and ceiling square footage, add 20 to 50 percent for waste and porosity, and multiply by the number of coats you expect to apply. A 1,500-square-foot home with moderate cigarette smoke might need 8 to 12 gallons of primer for a two-coat system, costing $200 to $600 depending on product choice.
Four cost-calculation tips:
- Measure room perimeter and ceiling area separately. Ceilings often need an extra coat
- Add 30 percent to your coverage estimate for textured or porous surfaces
- Buy primer in gallon sizes for anything larger than a single room. Quarts are convenient but expensive per square foot
- Plan for disposal costs if using shellac. Brushes, rollers, and drop cloths soaked with solvent-based primer require proper disposal or curbside hazardous waste pickup
Safety, Ventilation, and VOC Considerations When Using Smoke Odor Blocking Primers
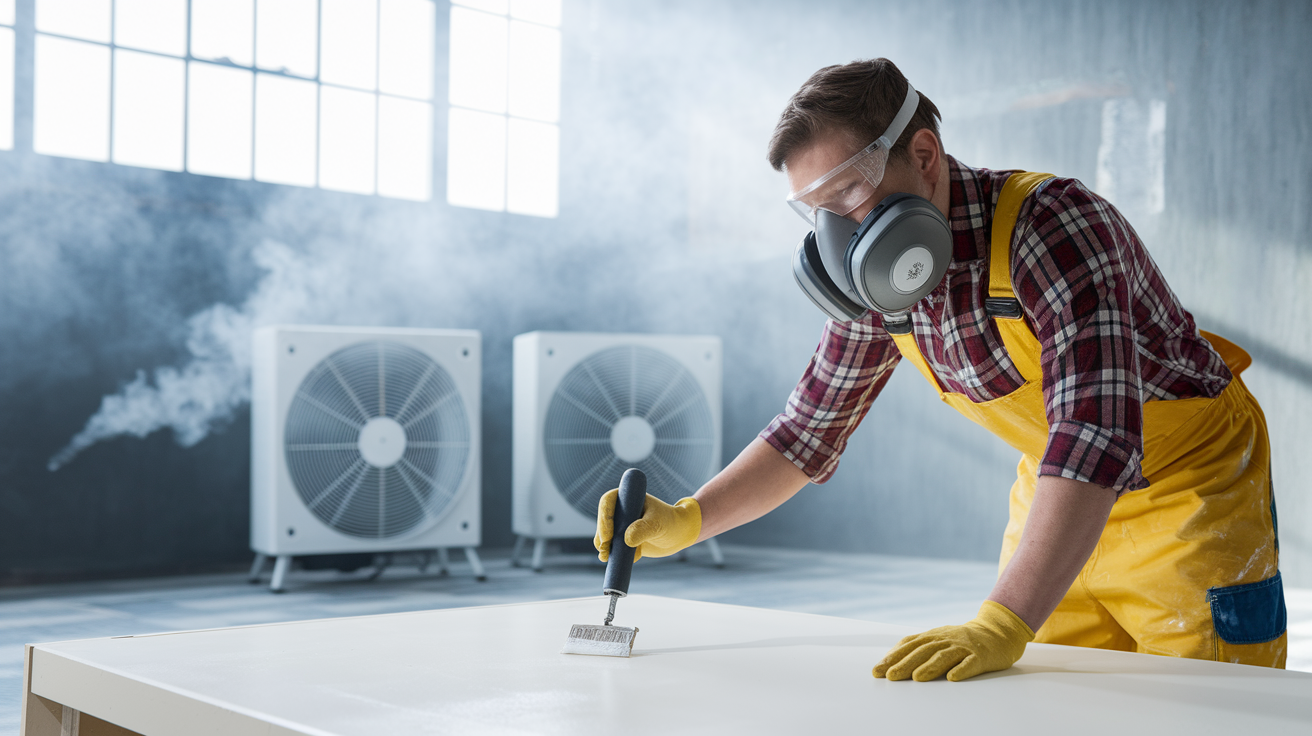
Shellac and oil-based primers release high levels of volatile organic compounds during application and drying. The strong solvent smell lingers for 24 to 72 hours even with windows open and fans running. These fumes cause headaches, dizziness, and respiratory irritation if you work without protection. Always wear a respirator rated for organic vapors. Paper dust masks don’t filter solvent fumes. Wear nitrile or solvent-resistant gloves to protect your skin, and use safety glasses to keep drips and splatter out of your eyes. Never apply shellac or oil primers near open flames, pilot lights, or sparking tools. The fumes are flammable.
Ventilation isn’t optional. Open all windows in the work area and use box fans to push fumes outside. Set up cross-ventilation with one fan pulling fresh air in and another exhausting fumes out. Keep the room ventilated for at least 24 hours after you finish priming, longer in cold or humid weather when drying slows. If you’re priming multiple rooms, work on one at a time and close doors to contain fumes.
Water-based odor-blocking primers have lower VOC levels and much less smell, which makes them easier to use in occupied homes or spaces with limited ventilation. The trade-off is reduced effectiveness on heavy smoke. Water-based products rely on encapsulation polymers rather than solvent penetration, so they don’t lock down tar and nicotine as aggressively as shellac. If odor control is the priority and you can tolerate the fumes and drying time, stick with shellac or oil. If you need low-VOC compliance for health reasons, regulations, or tenant sensitivity, use a water-based high-hide primer and plan for a second coat and longer ventilation after finish painting.
When Primers Aren’t Enough: Additional Smoke Odor Remediation Methods

Primers seal smoke residue on painted surfaces, but they can’t eliminate odors embedded in insulation, ductwork, carpet padding, or structural framing. If rooms still smell like smoke after priming and painting, the contamination is hidden behind walls or inside the HVAC system. Thermal fogging uses heated deodorizing chemicals that penetrate porous materials the same way smoke did, neutralizing odor molecules at the source. Ozone treatment generates ozone gas that oxidizes odor compounds, but it requires the building to be unoccupied during treatment and thoroughly aired out afterward. Ozone is harmful to breathe and degrades rubber, plastics, and fabrics if exposure is prolonged.
HVAC duct cleaning removes soot and smoke particles that settle inside supply and return lines. Every time the furnace or air conditioner runs, contaminated ducts blow odor back into the living space even if walls and ceilings are sealed. Professional duct cleaning combined with HEPA filter replacement addresses this hidden source. In severe fire or long-term smoking cases, insulation replacement is often the only permanent fix. Fiberglass batts and blown cellulose absorb smoke and tar deeply, and no surface primer can seal odors coming from inside wall cavities.
| Method | Purpose | When Needed |
|---|---|---|
| Thermal Fogging | Neutralizes odors in porous substrates (wood, insulation, fabric) | Persistent smell after priming walls and ceilings; odor in hidden cavities |
| Ozone Treatment | Oxidizes smoke odor molecules throughout enclosed spaces | Whole-house smoke smell; unoccupied building; combined with material replacement |
| HVAC Duct Cleaning + Filter Replacement | Removes soot and odor particles circulated by heating/cooling system | Odor returns when HVAC runs; visible soot on vents or registers |
Professional-Grade Solutions and When to Hire a Smoke Odor Specialist
Some smoke damage is beyond DIY repair. If you open a wall and see black staining on the back of the drywall, smell smoke inside electrical boxes, or find insulation that crumbles and releases odor when touched, the contamination has penetrated structural cavities. At that point, surface priming is a temporary cover that will fail within months as hidden smoke continues to off-gas. Fire restoration contractors use commercial encapsulants in 5-gallon buckets. Products like Sentinel 539 with antimicrobial additives or Fiberlock Recon Ultra designed for post-fire soot. These formulations have higher solids content, better penetration, and chemical resistance that retail primers can’t match.
Professional remediation also includes documentation for insurance claims. Adjusters require before-and-after photos, moisture readings, material disposal logs, and detailed scopes of work to approve smoke damage repairs. Contractors trained in IICRC fire and smoke restoration standards know how to write supplements when hidden damage appears after the initial estimate, and they understand the claims process in ways that speed approval and reimbursement. If your smoke damage involves structure fire, long-term heavy smoking with visible tar buildup, or failed DIY attempts where odor returned after painting, hiring a certified specialist saves time, money, and repeated failures.
Watch for signs you need professional help: odor that returns within weeks of priming and painting, visible staining that bleeds through two coats of shellac, smoke smell concentrated near HVAC vents or electrical outlets, or drywall that feels damp or soft in areas with no visible water damage. Certified contractors carry specialty equipment. Thermal foggers, hydroxyl generators, HEPA air scrubbers, moisture meters, and infrared cameras that identify and treat contamination you can’t see or reach. The cost is higher than DIY priming, but the results are permanent and often covered by homeowner’s insurance when fire or catastrophic smoke damage is documented. For heavy smoke restoration, read more about integrated solutions at Smoke Odor Removal & Fire Repair.
Final Words
Choose the right product: shellac for heavy smoke, oil for moderate, and water-based for light jobs. Prep first—HEPA vacuum, dry wipe, sand, and patch—so the coating seals instead of failing.
Apply with the right tools, respect drying and recoat windows, and wear a respirator while ventilating the space. If odor or soot runs deep, add HVAC cleaning, insulation replacement, or bring in a specialist.
A quality smoke odor blocking primer often stops the smell and keeps stains from coming back. With careful prep and the right product, the room will be ready for repairs and daily life again.
FAQ
Q: What primer gets rid of smoke smell?
A: The primer that gets rid of smoke smell is a shellac-based odor-blocking primer like Zinsser B‑I‑N. Shellac seals nicotine, soot, and odor; oil primers work for light cigarette smoke while water-based may fail on heavy residue.
Q: What is the best primer to hide smoke?
A: The best primer to hide smoke is a shellac-based primer for heavy staining and odor; oil-based primers work for moderate smoke. Use one coat for light nicotine, one to two coats for heavy or long-term smoke.
Q: Does odor blocking primer work against smoked in house?
A: An odor-blocking primer can stop smoke smell on surfaces, but it only works after thorough cleaning. Severe, long-term, or structural smoke often needs extra cleaning, multiple coats, or additional remediation like HVAC or insulation work.
Q: Is there a paint that covers smoke smell?
A: Paint alone won’t reliably cover smoke smell; an odor-blocking primer must be used first. After priming, standard paint hides appearance but won’t seal odor without that primer layer.