

You’ve heard black mold removal costs “a few thousand dollars,” but what does that actually mean when you’re staring at dark patches spreading across your bathroom wall? The gap between national averages and your real invoice comes down to variables most homeowners don’t discover until the work starts. Here’s what drives the price, what your location changes, and where hidden damage turns a $1,500 estimate into something closer to $5,000.
What You’ll Pay for Black Mold Removal in 2026
Professional black mold remediation typically costs between $1,200 and $3,750 nationally. Most homeowners end up paying around $2,300 for a complete job. Per square foot, you’re looking at $10 to $25 for removal, though where you live changes that number. The Northern Virginia and DC metro area runs $15 to $30 per square foot because of higher labor costs and stricter containment requirements.
| Project Size/Location | Square Footage | Typical Cost Range | Key Variables |
|---|---|---|---|
| Small surface areas | Under 10 sq ft | $500–$1,500 | Surface type, accessibility, testing needs |
| Medium infestations | 10–100 sq ft | $1,200–$3,000 | Containment requirements, material disposal |
| Large projects | 100–300 sq ft | $3,000–$7,000 | Structural damage, HVAC involvement |
| Whole-house remediation | 300+ sq ft | $10,000–$30,000+ | Flood damage, multiple systems affected |
| Attic | Varies | $1,000–$4,000 | Insulation replacement, ventilation issues |
| Basement | Varies | $800–$4,000 | Contamination level, moisture source complexity |
| Crawl space | Varies | $500–$2,000 | Accessibility, vapor barrier needs |
| Bathroom | Varies | $500–$3,000+ | Hidden plumbing leaks, fixture removal |
| HVAC system | Varies | $1,500–$10,000 | System type, ductwork extent, airflow contamination |
| Emergency catastrophic damage | Whole property | $10,000–$30,000+ | Flood category, structural compromise, timeline urgency |
Project size and location interact in ways that can dramatically shift your final bill. A small bathroom mold problem, maybe 8 square feet around a tub, might cost $500 to $800 because it’s easy to access and contains the work area. That same 8 square feet in an attic crawl space could run $1,200 to $1,800. Why? Technicians need specialized equipment to reach tight spaces, insulation has to come out and get replaced, and contaminated materials are harder to haul out.
These numbers represent starting points. What you’ll actually pay depends on how deep the contamination goes, what materials got damaged, and how complex the moisture source turns out to be.
Comprehensive Cost Factors and Location-Specific Pricing
Labor typically represents half or more of your total remediation cost. This isn’t a paint and patch job. It’s a controlled demolition and sanitization process that protects your family from exposure while preventing spore spread throughout the house. The work requires strict containment protocols, protective measures for workers, specialized cleaning procedures, and careful disposal of contaminated materials.
What affects the price:
- Extent and severity of contamination. Surface mold costs less than growth penetrating structural materials.
- Square footage affected. More area means more containment barriers, longer work hours, and higher material disposal costs.
- Location within the home and accessibility challenges. Attics, crawl spaces, and HVAC systems require specialized access equipment and confined space safety measures.
- Type of materials involved. Porous materials require removal and disposal. Non-porous surfaces can be treated and saved.
- Structural damage requiring repairs. Rotted framing, compromised subfloors, and damaged joists add thousands in carpentry costs.
- Moisture source complexity and repair needs. Simple pipe leaks cost less to fix than foundation seepage or roof penetrations.
- Contamination of HVAC or ventilation systems. Spore infiltration in ductwork can require whole system cleaning or replacement.
- Specialized equipment requirements. Negative air machines, industrial dehumidifiers, and HEPA filtration systems add daily rental costs.
- Testing and verification needs. Lab analysis of spore types and post-remediation clearance testing.
- Removal method intensity. Dry ice blasting and abrading cost more than antimicrobial wiping.
The distinction between porous and non-porous materials determines whether you’re looking at a $1,500 cleaning job or a $5,000 demolition and reconstruction project. Porous materials like drywall, carpeting, ceiling tiles, insulation, fabric, cardboard, and unsealed wood absorb moisture and provide a growth medium that penetrates deep into the material structure. These can’t be saved. They must be cut out, bagged in sealed containers, and disposed of properly. Non-porous surfaces like metal ductwork, glass, plastic, sealed wood, and ceramic tile can be treated with antifungal and antimicrobial cleaners, HEPA vacuumed, and returned to service. If your bathroom has mold on tile grout and painted drywall, you’ll pay to clean the tile and replace the drywall. That difference adds hundreds to thousands in material and labor costs.
Specific locations command different pricing because of access challenges and contamination risks. Attics and HVAC systems run $2,000 to $6,000 for attics and $1,500 to $10,000 for HVAC systems. Technicians need specialized scaffolding or lifts, insulation removal creates massive disposal volumes, and spores in ductwork can recirculate throughout your entire home every time the system runs. You’ve turned a contained problem into whole house contamination. Basements and crawl spaces vary widely from $500 to $3,000 based on whether the moisture source is a simple pipe drip or complex groundwater seepage requiring French drain installation, sump pump repairs, or foundation waterproofing. Bathrooms start lower at $500 or more for visible surface mold on tile and caulk, but costs escalate fast when testing reveals hidden plumbing leaks behind walls. Suddenly you’re removing tile, cutting into walls, replacing valve assemblies, and reconstructing the entire shower enclosure.
Discovering hidden damage during remediation changes the scope and the bill. Contractors remove a section of moldy drywall and find rotted floor joists underneath. They pull up contaminated carpet and discover the subfloor has turned spongy from months of slow moisture infiltration. The initial $2,000 quote becomes $4,500 because structural repairs can’t wait. Compromised framing is a safety issue. This isn’t a bait and switch. The full scope only becomes visible once contaminated materials come out and inspectors can see what’s been growing in the dark.
Professional Mold Removal vs DIY Cost Comparison

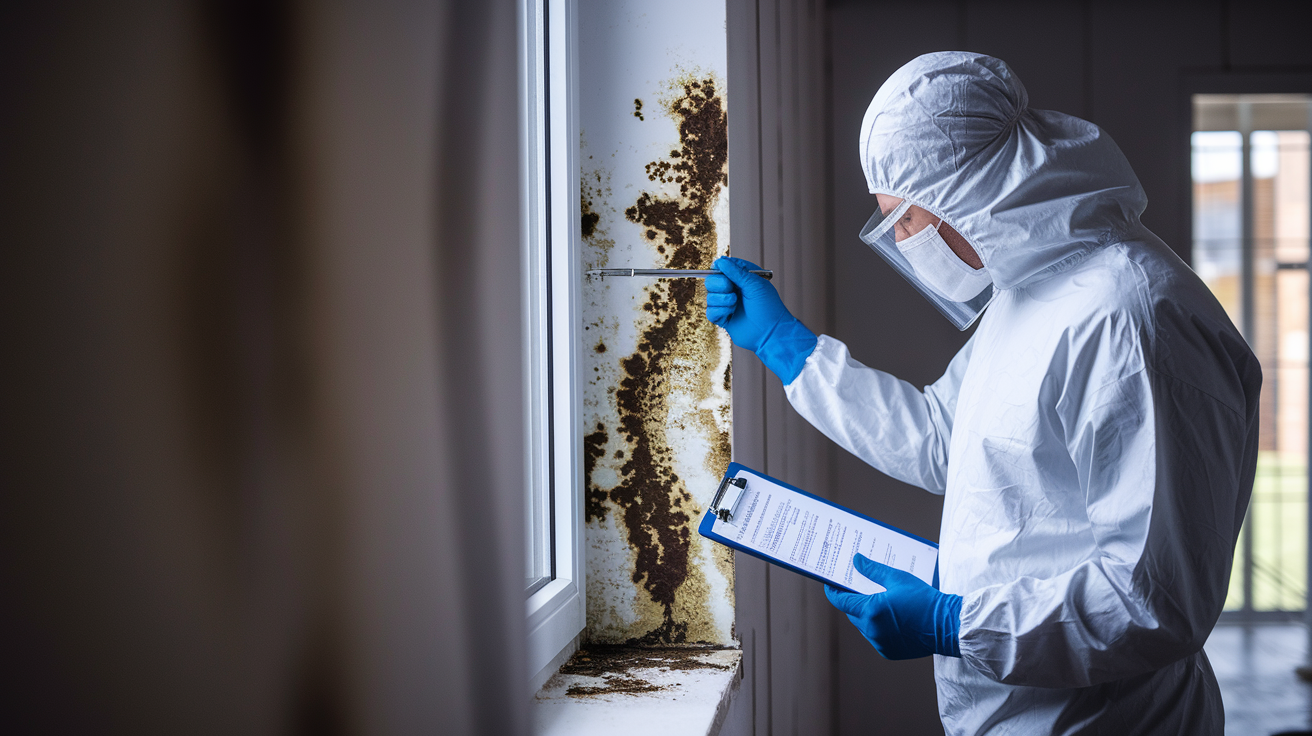
The EPA recommends DIY removal only for areas smaller than 10 square feet on non-porous surfaces, and only if you don’t have asthma or respiratory sensitivities. That 10 square foot threshold, roughly a 3 foot by 3 foot area, represents the point where disturbing mold without proper containment creates serious health risks and cross contamination problems throughout your home.
DIY Black Mold Removal Costs and Limitations
You’ll spend $50 to $200 on protective gear and supplies. N95 respirator masks, not the cloth kind. Waterproof gloves, safety goggles, cleaning agents like diluted bleach at 1 cup per gallon of water, plastic sheeting, and heavy duty disposal bags. Add your time, which for a small project might be 3 to 6 hours of careful work.
The limitations matter more than the cost savings. DIY lacks proper containment, which means every time you scrub or wipe, you’re launching microscopic spores into the air where they travel through your HVAC system, settle in other rooms, and start new colonies. You can’t address mold in porous materials like drywall or insulation because those require removal, not cleaning. You can’t tackle hidden mold behind walls, under flooring, or in ductwork. You’re limited to visible surface growth on hard materials like tile, glass, or sealed wood.
What Professional Remediation Investment Includes
Professional pricing covers plastic sheeting containment barriers that create sealed work zones with taped seams and zippered entry points. Negative air pressure systems, $500 to $1,500 per room, use specialized fans to pull air from the contaminated space, filter it through HEPA systems, and exhaust it outside. This prevents spores from escaping the work area even when contractors open walls or disturb materials.
HEPA filtration equipment captures particles down to 0.3 microns, small enough to trap individual mold spores that are invisible to the naked eye. Antimicrobial fogging treatments penetrate porous surfaces and kill residual growth. Proper disposal protocols mean contaminated materials go into sealed bags, get transported in enclosed containers, and end up at facilities equipped to handle biological waste. Not your neighborhood dumpster where spores can spread.
Specialized removal methods match the situation. Hard surfaces get antimicrobial cleaning with commercial grade products stronger than household bleach. Abrading uses mechanical friction to remove embedded growth from concrete or wood framing. Dry ice blasting uses compressed CO2 pellets to clean without moisture, ideal for areas where adding water would worsen the problem.
Proper containment is non-negotiable for projects over 10 square feet because it prevents the most expensive scenario. Spore circulation through your HVAC system. Once mold spores enter your ductwork, every room serviced by that system becomes a potential growth site. You’ve turned a $1,500 bathroom problem into a $10,000 whole house remediation because spores settled in bedrooms, living areas, and other bathrooms. Professional containment with negative air pressure keeps this from happening.
Homeowners can typically stay in the house during professional work because proper containment isolates affected areas. Contractors seal doorways with plastic barriers, route exhaust hoses to exterior windows, and maintain negative pressure so air flows into the work zone but not out. You hear the equipment running. You see the sealed off area. But spores stay contained.
The value proposition breaks down like this. Spend $100 to $200 on DIY supplies and risk incomplete removal, cross contamination, and recurrence within months. Or invest $500 to $1,500 for professional small area remediation that includes containment, prevents HVAC infiltration, ensures complete removal to outdoor ambient spore levels, and provides documentation and warranties. For anything beyond a small patch of surface mold on tile, professional work isn’t optional. It’s the only approach that actually solves the problem instead of spreading it around.
Inspection, Testing, and Additional Service Costs

Quoted removal prices usually cover labor and materials for the actual removal work, but testing, inspection, and verification services often appear as separate line items. Understanding what’s included versus what costs extra helps you budget accurately and avoid surprise charges.
What might cost extra:
- Initial mold inspection ($300 to $600). Visual assessment, moisture mapping, and sample collection to identify mold types and contamination extent.
- Laboratory testing and spore count analysis ($250 to $700). Lab identification of specific mold species and airborne spore concentration levels.
- Post-remediation clearance testing ($250 to $350). Air quality verification that spore levels match or fall below outdoor ambient levels.
- Permit and inspection fees (varies by municipality). Local building department requirements for structural work or containment procedures.
- Moisture meter testing and thermal imaging ($150 to $400). Electronic detection of hidden moisture in walls, ceilings, and subfloors.
- Air quality verification ($200 to $500). Third party testing to confirm work meets industry standards and your home is safe for occupancy.
Post-remediation clearance testing is critical because it verifies that spore levels are at or below outdoor ambient concentrations, the industry standard for “clean.” Without this verification, you’re trusting that the work was done right rather than having independent proof. This testing also provides documentation for insurance claims, real estate transactions, or future buyers who want confirmation the problem was handled properly.
Some contractors include basic visual inspection in their quotes but charge separately for lab testing. Others bundle everything into a comprehensive package. Ask upfront. “Is testing included in your quote or charged separately?” Get it in writing so there’s no confusion when the final invoice arrives.
Insurance Coverage for Mold Remediation Costs

Insurance typically covers mold removal when it results from a sudden, covered event. A burst pipe, a storm that tears off shingles and allows rain penetration, or a washing machine supply line that ruptures and floods the laundry room. The key word is “sudden.” If water damage happens fast and you report it quickly, coverage is likely.
Scenarios usually covered: sudden pipe bursts, storm damage to roof or siding, appliance malfunctions that cause immediate water release, and firefighting water damage.
Scenarios typically excluded: long term leaks from poor maintenance, gradual seepage from neglected gutters, flooding without separate flood insurance, and mold from humidity or condensation issues.
Typical deductibles run $500 to $2,000, with mold coverage often capped at $5,000 to $10,000 unless you purchased additional coverage. Documentation requirements for claims include photos of damage, remediation estimates, moisture readings, and timeline documentation showing you responded quickly after discovering the problem. Filing promptly matters. Delays between water damage and remediation can be used to deny claims based on “failure to mitigate.”
Most policies cap mold coverage at $5,000 to $10,000 even when the underlying water damage is covered. If your whole house remediation after a pipe burst costs $18,000, insurance might cover $10,000 and leave you responsible for the remaining $8,000. Read your policy’s mold endorsement carefully. Some insurers offer higher limits or full coverage for an additional premium, worth considering if you live in a humid climate or have an older home with aging plumbing.
Working with adjusters goes smoother when you document everything and get pre-approval before starting work. Take photos of the water source, the affected areas, and moisture readings. Get written estimates from licensed contractors. Submit everything to your adjuster and ask for written approval to proceed. Starting work before approval can lead to coverage disputes, though emergency water extraction and initial drying to prevent further damage are usually acceptable.
Getting Accurate Quotes from Mold Removal Specialists

Getting three or more written estimates helps ensure you’re paying competitive rates and comparing apples to apples rather than different scopes of work. A $1,800 quote that includes post-remediation testing is a better value than a $1,400 quote that excludes it and charges an additional $400 later.
What to verify:
- Specialty mold remediation certification. Verify certifications from organizations like the IICRC (Institute of Inspection, Cleaning and Restoration Certification) or NORMI (National Organization of Remediators and Mold Inspectors).
- Proof of liability and mold-specific insurance. General liability doesn’t cover mold remediation work. Contractors need pollution liability or environmental coverage.
- Licensed contractor status. Check state contractor licensing boards for active licenses, complaint history, and disciplinary actions.
- References and customer reviews. Ask for recent references from similar projects and check online reviews across multiple platforms.
- Detailed written scope of work. Quotes should specify square footage, containment methods, disposal procedures, materials to be removed, and cleanup protocols.
- Inclusion of post-remediation testing. Verify whether air quality testing is included or quoted separately.
- Warranty or guarantee terms. Understand what’s covered if mold returns (usually excludes new moisture sources but should cover incomplete removal).
Red flags include quotes significantly lower than competitors, often a sign that essential containment steps will be skipped or cheaper materials substituted. Contractors who refuse to provide proof of insurance or certification, who can’t produce references, or who pressure you for immediate payment before work starts should be avoided. Vague scope descriptions like “remove mold in basement” without specifying containment procedures, square footage, or materials to be addressed leave too much room for disputes and change orders later. Learn more about contractor vetting at How to Vet Home Repair Contractors.
Questions to ask during consultations: “Is testing included in this quote or charged separately?” “What’s your containment protocol, negative air machines, plastic barriers, and sealed work zones?” “How do you handle unexpected damage discovered during removal?” “What’s the estimated timeline from start to final clearance testing?” “What warranties or guarantees do you provide?” “Can I see proof of your mold-specific insurance and certifications?”
Ways to Reduce Your Mold Removal Expenses

Cutting corners on containment or removal creates health risks and often costs more in the long run when incomplete work allows mold to return or spread. But legitimate savings exist without compromising safety or effectiveness.
Smart ways to save:
- Catching mold early before it spreads. Small surface patches cost $500 to $1,500. Waiting until it penetrates walls costs $3,000 to $7,000.
- Handling cosmetic repairs yourself after professional removal. Paint, replace trim, retile, or install new baseboards once remediation is complete.
- Getting multiple competitive quotes. Three estimates from licensed contractors reveal fair market pricing and prevent overpaying.
- Scheduling during off-peak seasons. Late fall and winter may offer lower rates when contractors have more availability.
- Addressing moisture sources yourself if safe and simple. Fix dripping faucets, repair loose roof shingles, or clean clogged gutters before they cause bigger problems.
- Bundling remediation with other needed repairs. Coordinate mold removal with planned bathroom renovations or basement finishing to reduce total costs.
- Asking about payment plans or financing. Many restoration companies offer 12 to 24 month financing with approved credit.
- Filing insurance claims when applicable. Don’t leave coverage on the table when mold results from a covered event.
The biggest money saver is prevention. Maintaining 30 to 50 percent humidity with dehumidifiers, responding to leaks within 24 to 48 hours before mold establishes colonies, ensuring proper ventilation in bathrooms and kitchens, and conducting seasonal inspections of moisture prone areas. A $200 dehumidifier and $100 in gutter cleaning prevents a $3,000 remediation project.
Realistic DIY contributions after professional removal save hundreds. Once contractors finish containment, removal, and antimicrobial treatment, you’re left with bare walls, exposed framing, and removed flooring. You can handle the cosmetic restoration. Painting treated surfaces, installing new baseboards and trim, replacing tiles, or laying new flooring. That might represent $800 to $1,500 in labor costs you keep in your pocket. What you can’t DIY safely: containment, removal of contaminated materials, structural repairs to framing or subfloors, HVAC system cleaning, or any work that disturbs mold. Those tasks require professional equipment, training, and safety protocols.
Health Risks and Why Proper Removal Matters

Black mold exposure causes respiratory issues ranging from chronic coughing and wheezing to serious infections in vulnerable individuals. Allergic reactions include sneezing, skin rashes, eye irritation, and sinus congestion. Chronic exposure can lead to persistent fatigue, difficulty concentrating, and in severe cases, neurological problems. Particularly dangerous for children, elderly residents, and anyone with compromised immune systems.
Common types and their risks:
- Stachybotrys chartarum. The classic “black mold,” causes respiratory distress, chronic coughing, nosebleeds, and produces mycotoxins that can trigger severe reactions in sensitive individuals.
- Aspergillus fumigatus. Can cause pneumonia and aspergillosis in immunocompromised people, leading to serious lung infections requiring hospitalization.
- Chaetomium atrobrunneum. Attacks the central nervous system in people with compromised immune systems, causing cognitive issues and coordination problems.
- Penicillium. Spreads rapidly even in lower humidity conditions, triggers allergic reactions and respiratory inflammation.
- General mycotoxin exposure. Prolonged contact with mold toxins can cause headaches, memory issues, mood changes, and immune system suppression.
Improper removal, scrubbing or wiping mold without containment, releases millions of microscopic spores into your home’s air. Those spores travel through doorways, settle on furniture and bedding, infiltrate your HVAC system, and establish new colonies anywhere conditions are favorable. You’ve actually worsened your family’s exposure rather than solving the problem. A well intentioned DIY effort can turn a contained bathroom issue into a whole house contamination event that costs five times more to remediate properly.
Professional containment and HEPA filtration protect your family during and after remediation by creating sealed work zones that prevent spore escape, filtering air before it leaves the work area, and maintaining negative pressure so spores can’t travel to occupied spaces. It’s the difference between spreading the problem throughout your home and actually solving it.
Timeline and What Happens During Professional Mold Removal
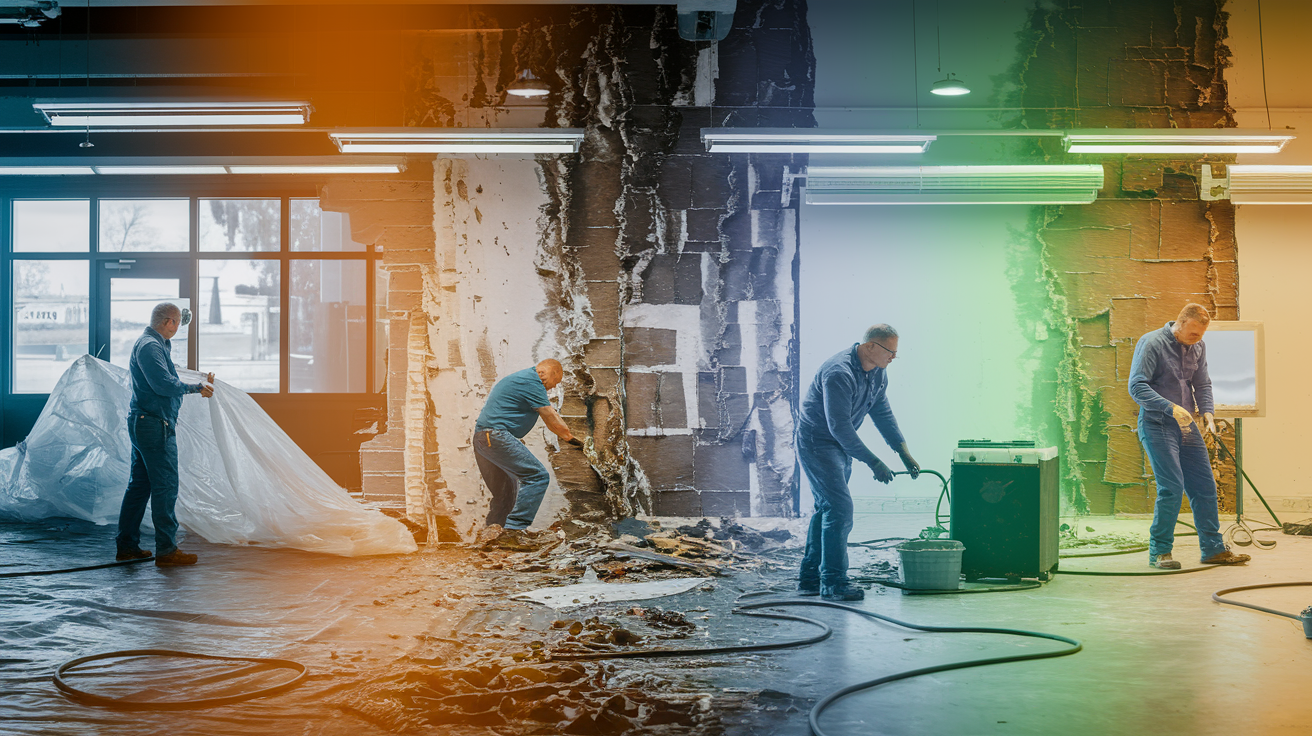
Small projects affecting a single room under 100 square feet typically take 1 to 3 days from initial containment setup through final clearance testing. Medium projects covering 100 to 300 square feet might require 3 to 5 days. Whole house remediation after flooding or extensive water damage can take 5 to 10 days or longer depending on the extent of structural repairs needed.
Here’s what happens:
-
Initial inspection and testing to map contamination. Technicians use moisture meters and thermal imaging to identify all affected areas, including hidden growth behind walls or under flooring. Air samples and surface swabs go to labs for species identification and spore count analysis. This step takes 2 to 4 hours and determines the full scope of work.
-
Containment setup with plastic barriers and negative air pressure. Crews seal doorways, vents, and openings with 6 mil plastic sheeting secured with tape. Negative air machines create lower pressure inside the work zone so air flows in from surrounding spaces but doesn’t flow out. HEPA filtration systems process contaminated air before exhausting it outside.
-
Removal of contaminated porous materials. Workers wearing respirators, protective suits, and gloves remove drywall, insulation, carpeting, ceiling tiles, and any other porous materials showing contamination. Materials go into sealed plastic bags for proper disposal. This demolition phase generates the most debris and noise.
-
HEPA vacuuming and antimicrobial treatment of salvageable surfaces. Non-porous materials like framing lumber, concrete, metal ductwork, and sealed wood get HEPA vacuumed to remove surface spores, then treated with commercial antimicrobial solutions that kill remaining growth and prevent recurrence. Surfaces must remain wet with treatment solution for specified contact time, usually 10 to 20 minutes.
-
Drying and dehumidification of affected areas. Industrial dehumidifiers and air movers run continuously for 24 to 72 hours to bring moisture levels below 15 percent, the threshold where mold can’t grow. Technicians monitor moisture readings with meters until all materials reach acceptable levels.
-
Post-remediation testing and clearance verification. Independent testing confirms airborne spore levels match or fall below outdoor ambient levels and the space is safe for occupancy. This typically happens 24 to 48 hours after final cleaning to allow any disturbed spores to settle.
Homeowners can usually remain in the house during work because proper containment isolates affected areas. You’ll hear equipment running. Negative air machines and dehumidifiers generate steady noise similar to a window air conditioner. You’ll see the plastic barriers sealing off work zones. But spores stay contained, and you can use unaffected areas of your home normally. Severe cases involving multiple rooms or HVAC contamination may require temporary relocation for 2 to 7 days while the most intensive work happens.
After removal, the space must dry completely, moisture sources need permanent fixes, and removed materials require replacement before the area is ready for normal use. That reconstruction phase, hanging new drywall, installing insulation, painting, replacing flooring, and restoring trim, adds another 3 to 7 days depending on complexity. Understanding the full timeline helps you plan around the disruption and set realistic expectations for when your space will be fully functional again. To better understand how water damage categories affect the remediation approach, see Understanding Water Damage Categories.
Preventing Mold Growth After Remediation

Remediation without moisture control is a temporary fix. Mold will return in weeks or months if the conditions that allowed it to grow in the first place, excess moisture, poor ventilation, ongoing leaks, remain unaddressed. You’ve spent thousands removing the symptom without treating the cause.
Prevention steps that actually work:
- Maintain 30 to 50 percent humidity with dehumidifiers. Install basement dehumidifiers set to 40 percent, empty collection buckets daily or run continuous drain lines.
- Fix leaks immediately. Repair plumbing leaks, roof penetrations, and foundation cracks within 24 to 48 hours before moisture saturates materials.
- Improve ventilation in bathrooms and kitchens. Run exhaust fans during and for 20 minutes after showers, install fans vented to exterior if none exist.
- Remove carpet from basements and moisture prone areas. Replace with tile, vinyl, or sealed concrete that doesn’t absorb moisture and provide growth medium.
- Clean gutters and ensure proper drainage away from foundation. Keep gutters clear, extend downspouts 6 feet from foundation, grade soil to slope away from the house.
- Insulate pipes to prevent condensation. Wrap cold water pipes in unheated spaces with foam insulation to prevent condensation drips.
- Address HVAC condensation issues. Ensure drain pans empty properly, drain lines stay clear, and evaporator coils don’t develop standing water.
- Conduct regular inspections of moisture prone areas. Check under sinks, behind toilets, around water heaters, in attic corners, and basement perimeters quarterly.
The moisture source identification performed during professional remediation should guide your prevention efforts. If mold grew because a roof leak allowed rain penetration, that roof repair must be permanent, not a temporary patch that fails next storm season. If bathroom mold resulted from poor ventilation and no exhaust fan, installing a properly vented fan prevents recurrence. If basement contamination came from foundation seepage, exterior waterproofing or interior drainage systems address the root cause.
Monitor humidity with an inexpensive hygrometer. Digital models cost $10 to $30 and provide accurate readings in real time. If humidity creeps above 50 percent regularly, increase dehumidifier capacity or improve ventilation. Watch for early warning signs that moisture problems are developing: musty odors that appear suddenly, condensation on windows during cold weather, water stains on ceilings or walls, or peeling paint and wallpaper. Catching these issues early, before visible mold growth appears, prevents the need for another expensive remediation project.
Final Words
Black mold removal cost depends on how far the contamination has spread, where it’s growing, and what materials are involved.
Small surface areas might run $500 to $1,500, while whole-house remediation after flooding can reach $10,000 to $30,000.
The key is catching it early, getting clear written quotes from certified specialists, and making sure the moisture source gets fixed so it doesn’t come back.
Professional removal with proper containment protects your family and prevents spores from spreading through your HVAC system.
Once the work is done and verified with post-remediation testing, you’ll have a safe, clean space again.
FAQ
How expensive is it to fix black mold?
Professional black mold removal typically costs between $1,200 and $3,750, with most homeowners paying around $2,300 for remediation. Small areas under 10 square feet may cost $500 to $1,500, while whole-house projects can reach $10,000 to $30,000 depending on contamination extent and structural damage.
Can you ever fully get rid of black mold?
Yes, professional remediation can fully eliminate black mold by removing contaminated materials and treating salvageable surfaces to bring spore levels at or below outdoor ambient levels. Complete removal requires proper containment, HEPA filtration, antimicrobial treatment, and fixing the moisture source to prevent regrowth.
Can a house recover from mold?
A house can fully recover from mold through professional remediation that removes contaminated porous materials, treats salvageable surfaces, and addresses underlying moisture problems. After proper removal and moisture control, the home returns to safe, livable condition with spore levels matching outdoor air quality.
Is professional mold removal worth it?
Professional mold removal is worth the investment because it includes containment barriers, negative air pressure systems, and HEPA filtration that prevent spore spread throughout your home. Proper removal protects your family’s health, prevents costly HVAC contamination, and ensures complete elimination verified through post-remediation testing.
What’s included in professional mold remediation costs?
Professional mold remediation costs include plastic sheeting containment, negative air pressure equipment, HEPA filtration systems, antimicrobial treatment, contaminated material disposal, and specialized removal methods. Labor represents over half the total cost, covering containment protocols, protective measures, surface cleaning, and verification that spore levels return to safe levels.
How much does mold testing cost separately from removal?
Mold testing costs range from $250 to $700 for laboratory analysis and spore count testing, with post-remediation clearance testing costing $250 to $350 additional. Initial mold inspections typically run $300 to $600, and these testing fees are often separate from the base remediation quote.
When does homeowners insurance cover mold removal?
Homeowners insurance typically covers mold removal resulting from sudden, covered events like burst pipes or storm damage, but excludes mold from long-term leaks or maintenance neglect. Coverage limits often cap at $5,000 to $10,000, requiring prompt filing and proper documentation after water events.
What makes attic mold removal more expensive?
Attic mold removal costs $2,000 to $6,000 due to specialized access requirements, contaminated insulation removal, and spore distribution risks. Limited workspace, extreme temperatures, and the need to protect HVAC systems from contamination add complexity and labor costs compared to accessible locations.
How long does professional mold removal take?
Professional mold removal for small projects under 100 square feet typically takes 1 to 3 days, while whole-house remediation may require 5 to 10 days or longer. Timeline depends on contamination extent, structural repairs needed, drying time, and post-remediation testing verification.
What prevents mold from returning after professional removal?
Preventing mold recurrence requires maintaining 30 to 50 percent humidity with dehumidifiers, fixing all moisture sources immediately, and improving ventilation in bathrooms and kitchens. Regular monitoring with hygrometers and addressing early warning signs like musty odors or condensation prevents new growth.