

You saw the ceiling stain weeks ago, figured it was nothing, and now that brown spot’s twice the size with paint peeling at the edges. Water damage doesn’t pause while you debate calling someone. It spreads through drywall, weakens joists, and creates conditions for growth you definitely don’t want breathing in your home. This guide walks you through stopping active leaks fast, finding the real source, and making solid repairs that actually last, whether you’re handling small stains yourself or need to know when it’s time to bring in a team that coordinates the whole fix from first drip to final paint match.
Emergency Steps to Stop a Ceiling Water Leak Right Now
If water’s dripping from your ceiling, you’ve got maybe a few minutes to act.
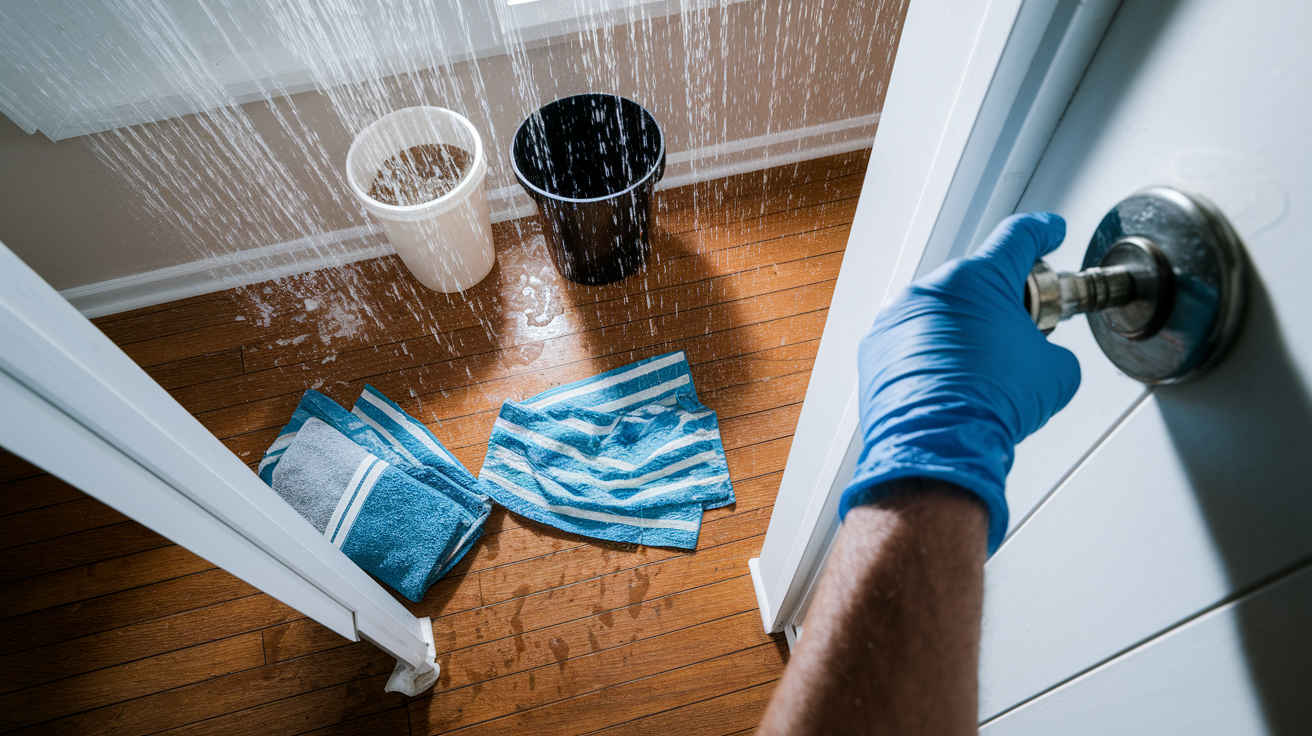
First thing, shut off your main water supply at the shutoff valve if you think the leak’s from plumbing. A burst pipe or bad connection. Then get to your breaker panel and kill electricity to that room. Don’t touch light switches or outlets anywhere near wet ceiling areas. Water and electricity together create serious shock hazards.
Grab buckets, big containers, whatever holds water and put them right under the drip. Throw down towels in a wide circle around the leak to catch splashing and protect your floors. If water’s pooling on furniture, move it away from the drip zone now.
For roof leaks happening during active rain, throw a tarp over the suspected roof area if you can get up there safely. Weight it down with boards or bricks. If your ceiling’s bulging with trapped water, carefully puncture the lowest point of that bulge with a small screwdriver to release water in a controlled way into your bucket. This prevents a sudden collapse that dumps gallons at once. Wear safety glasses and waterproof gloves whenever you’re working near damaged ceiling areas. Wet drywall can contain contaminants and sharp edges when it starts breaking apart.
Keep people and pets out of the room until you’ve figured out where the water’s entering and the ceiling stops actively dripping. Open windows if weather permits to start air circulation and reduce humidity buildup.
Identifying the Source of Your Ceiling Leak

Visible water damage on your ceiling rarely sits directly below the actual entry point. Water travels along joists, pipes, and insulation before it finally soaks through and stains your drywall.
Plumbing-Related Ceiling Leaks
Check directly above the damaged ceiling for bathrooms, kitchens, laundry rooms, or water heater locations. Burst pipes release water fast, flooding through ceiling openings around light fixtures and creating large wet patches within minutes. Faulty pipe joints drip slowly behind walls and ceilings, showing up as small brown stains that grow over weeks. Walk into your attic or crawl space with a flashlight and inspect visible supply lines, drain pipes, and connections near where you see ceiling damage below. Look for active dripping, wet insulation, or water stains on the underside of your subfloor above. Toilet wax ring failures, shower pan leaks, and sink drain problems all send water straight down into ceiling cavities.
Roof and Weather-Related Leaks
Missing shingles after windstorms let rain and melting snow seep through roof decking. Old flashing around chimneys, vent pipes, and skylights cracks and separates, creating gaps where water enters during every storm. Ice dams form along roof edges in winter when heat escapes through your attic. Melting snow refreezes at the cold eave, trapping water that backs up under shingles. Clogged gutters overflow and send water running along fascia boards and into soffit vents, eventually reaching your ceiling. Check your attic during or right after rain to trace wet spots on the underside of roof sheathing back to their entry point. Nail holes from old roof repairs and lifted shingle edges also channel water inside.
HVAC and Condensation Problems
Air conditioning units produce condensation that drains into a pan and then through a drain line to the outside. When that drain pan cracks, rusts through, or its drain line clogs with algae and debris, water spills directly onto drywall below the unit. HVAC ducts running through hot attics sweat heavily during humid summer days, and that condensation drips along duct seams and onto ceiling drywall at connection points. Poorly insulated ducts make the problem worse. Bathroom exhaust fans that vent into attics instead of outside dump moist air that condenses on cold surfaces and eventually saturates insulation and ceiling material.
Structural and Other Sources
Water heaters in attic spaces or second floor utility closets can develop tank leaks or supply line failures that flood downward. Crawl space moisture from groundwater or plumbing leaks can wick up through floor joists and affect first floor ceilings in humid conditions. Less common causes include ice maker supply lines, washing machine hoses, and even aquarium leaks on upper floors.
If the leak pattern doesn’t match weather events, runs constantly, or appears in multiple ceiling areas, call a professional plumber to perform leak detection. Hidden pipe failures behind walls require specialized listening equipment and thermal imaging to locate without tearing open every ceiling.
Assessing Ceiling Water Damage Severity

Press your fingertips gently against stained or discolored ceiling areas. Firm drywall that resists pressure with only surface discoloration means minor damage. Soft spots that compress under light touch, spongy texture, or areas that flex when pushed signal compromised drywall structure that won’t hold paint or support its own weight much longer.
Look for sagging sections where the ceiling dips below its normal plane, dark stains spreading around nail or screw heads, and peeling paint or texture that lifts away in sheets. These signs mean water’s saturated the drywall core and weakened the paper facing. Check corners and edges where ceiling meets walls for separation gaps.
| Damage Level | Visual Signs | DIY or Professional |
|---|---|---|
| Minor stains only | Surface discoloration, paint bubbling, no softness | DIY suitable |
| Moderate damage | Soft spots, small sagging areas, peeling texture | DIY possible with care |
| Severe damage | Large soft sections, visible sagging, persistent dripping | Professional recommended |
| Structural compromise | Joist damage, widespread rot, major sagging | Professional required |
Go into the attic above the damaged ceiling if you can access it safely. Pull back insulation to inspect ceiling joists for dark water stains, soft wood that crumbles when you press it with a screwdriver, or white fuzzy growth on wood surfaces. Wet insulation loses its effectiveness and needs replacement. It won’t dry properly once soaked and compressed. Widespread dark staining, musty odors, or visible growth from moisture across multiple joists means the problem’s existed longer than the ceiling stain suggests and requires professional assessment and possible air quality testing.
Check moisture levels and drying progress using an inexpensive moisture meter pressed against the ceiling surface and surrounding areas. Readings below 16% indicate dry material ready for repair. Minor stains with firm drywall may air dry naturally over 2 to 3 days with open windows and normal air circulation. Severe damage requires cutting out the wet ceiling section to expose the cavity, removing soaked insulation, and running fans pointed at the opening with a dehumidifier in the room. Monitor moisture readings daily until they drop to safe levels, typically taking 24 to 72 hours for moderate damage and up to a week for severe saturation. Hidden moisture trapped between ceiling layers or inside wall cavities extends drying time significantly and may require professional extraction equipment to prevent growth from starting in spaces you can’t see or reach.
Tools and Materials for Ceiling Leak Repair

Gathering everything before you start prevents trips to the hardware store with a half finished ceiling and keeps your repair moving forward without delays.
Essential tools:
- Utility knife or keyhole saw for cutting drywall cleanly
- Measuring tape to size replacement pieces accurately
- Drill or screwdriver for securing new drywall
- Drywall saw for cutting straight lines and curves
- Sanding block or pole sander for smoothing joint compound
- Putty knife in 4 inch and 8 inch widths for spreading mud
- Paint roller with extension pole and angled brush for edges
- Moisture meter to confirm areas are completely dry before sealing
Required materials:
- Replacement drywall pieces cut to size (standard 1/2 inch thickness for most ceilings)
- Joint compound (premixed mud in 1 gallon or 5 gallon buckets)
- Mesh tape or paper seam tape for covering joints
- Stain blocking primer (oil based formula prevents bleed through)
- Matching ceiling paint in flat or matte finish
- Protective equipment including disposable gloves, safety glasses, and N95 dust mask
- Drop cloths or plastic sheeting to protect floors and furniture
For textured or acoustic ceilings, you’ll need ceiling texture spray cans or hopper guns with texture compound to match existing patterns. Some patterns like popcorn texture require specific restoration products. Most paint stores offer computerized color matching services if you bring a paint chip scraped from an undamaged ceiling area.
Step by Step: Repairing Minor Ceiling Water Damage
Minor damage means the drywall stays firm when you press it and only the surface shows stains, bubbled paint, or damaged texture. The structural layer underneath remains solid.
Step 1: Scraping and Surface Preparation
Slide a wide putty knife under loose or bubbling paint and scrape it away using steady pressure. Work from the edges toward the center of damaged areas. Peel off any texture that lifts easily. Wipe the entire repair area with a barely damp cloth to remove dust and let the surface dry completely for at least 2 hours before moving to primer. The ceiling needs to feel bone dry to the touch.
Step 2: Applying Stain Blocking Primer
Water stains contain tannins and minerals that bleed through regular paint every time, showing brown marks no matter how many coats you roll on. Use oil based stain blocking primer (not water based) and brush or roll it across the entire stained area plus 2 inches beyond the visible edges. Before learning this, I painted over water stains three times and they kept bleeding through the next morning. Let the primer dry for the time listed on the can, usually 1 to 2 hours, and check that brown marks don’t show through the white primer surface.
Step 3: Texture Matching (If Needed)
Smooth ceilings skip this step. For textured patterns, practice your technique on cardboard first. Light orange peel texture comes from thinned joint compound rolled with a thick nap roller. Knockdown texture requires spraying texture compound and then lightly smoothing raised areas with a trowel after 10 minutes. Popcorn texture needs spray cans designed for ceiling repair, applied in multiple light coats from 2 feet away. Match the surrounding texture depth and pattern before it dries.
Step 4: Painting the Repaired Area
Take a paint chip from an undamaged ceiling spot to your paint store for color matching if you don’t have leftover paint. Use a short nap roller cover designed for smooth or lightly textured ceilings. Roll paint in steady overlapping passes without pressing hard. Heavy pressure creates roller marks that show up as shiny streaks. Feather the paint edges by rolling 6 inches past your repair area into the existing ceiling so the patch blends invisibly. Apply two coats, waiting 2 to 4 hours between coats for proper drying.
Step 5: Final Inspection
Check your repair under different lighting. Turn on room lights, open blinds, and look at the ceiling from multiple angles. Color matching looks different in natural daylight versus artificial light. The repaired area should disappear into the surrounding ceiling with no visible edges, texture differences, or sheen variation. Keep windows open or run a fan while primer and paint dry to move solvent fumes outside and speed curing time.
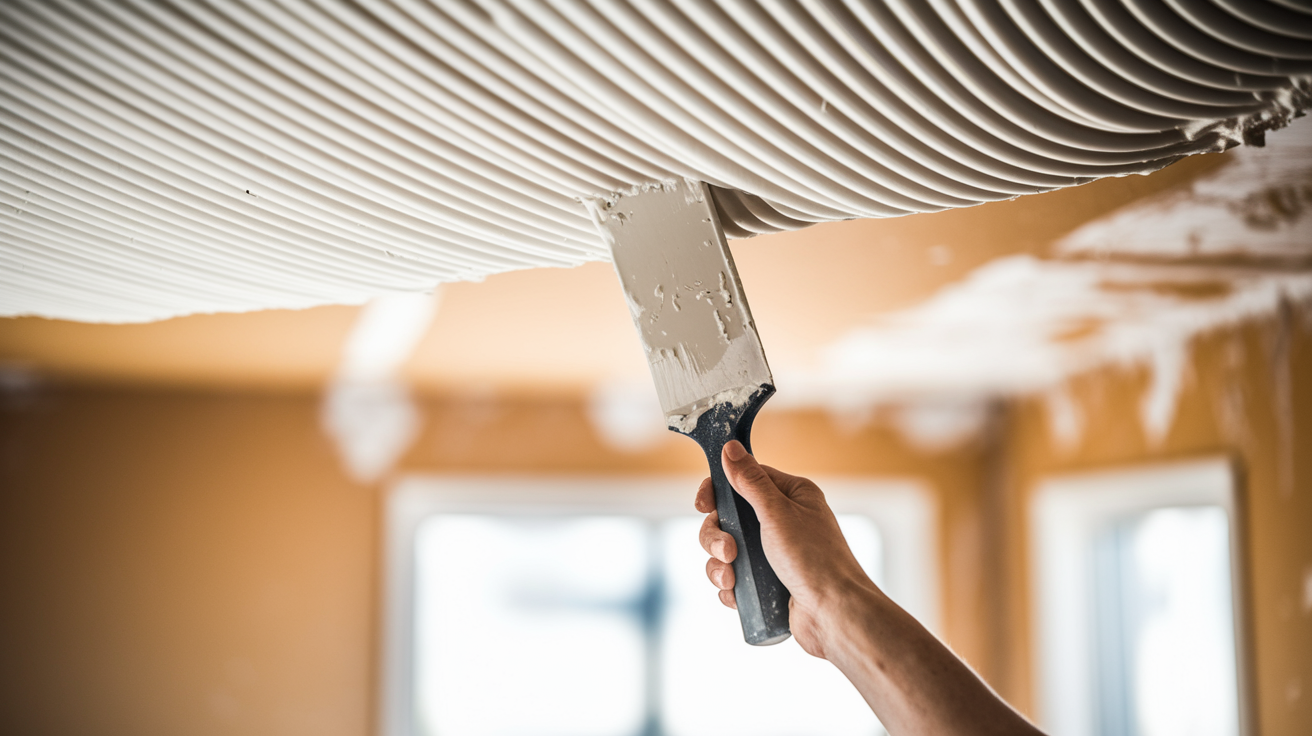
Complete Ceiling Drywall Replacement for Major Leaks
When ceiling drywall feels soft, sags below the surrounding surface, or shows widespread dark staining, you need to cut out the damaged section completely. Paint and primer won’t fix compromised structural layers.
Marking and Cutting Out Damaged Sections
Draw straight chalk lines from your damaged area outward until you reach solid ceiling joists on both sides. Joists typically run 16 or 24 inches apart. Use a stud finder to locate them or knock on the ceiling and listen for a solid thud instead of a hollow sound. Extend your cutting lines at least 6 inches past visible damage into firm drywall. Before cutting, turn off electricity and check the attic above for electrical wires, pipes, or ductwork running through that ceiling area. Put on safety glasses, gloves, and a dust mask. Score your chalk lines repeatedly with a sharp utility knife, cutting deeper each pass until you slice through the drywall. For speed, use a keyhole saw after scoring to punch through and cut along lines.
Inspecting and Repairing Structural Elements
Pull out the damaged drywall section and remove any wet insulation sitting on the back side of the ceiling. Inspect ceiling joists for dark water staining, soft spots that indent when you press a screwdriver against the wood, or white or black growth on the wood surface. Solid joists with only surface staining are fine. Joists that show soft rot, cracks, or sagging need sistered reinforcement (a new board fastened alongside the damaged one) or full replacement before you install new drywall. Replace wet insulation with new batts or blown material once the cavity is completely dry. Moisture meter readings below 16% confirm dryness.
Installing Backing and Support
Your new drywall patch needs solid attachment edges. Cut 1×3 or 2×4 wood cleats at least 6 inches longer than your ceiling opening. Slide them horizontally behind the existing drywall edges and screw them to the joists from below so half the cleat sits behind the old ceiling and half provides a nailing surface for your patch. Install cleats on all four sides of the opening.
Cutting and Securing Replacement Drywall
Measure your ceiling opening and cut a new drywall patch that fits the opening with edges landing on the wood cleats you just installed. Lift the patch into place and screw it to the cleats and joists using drywall screws spaced every 6 inches around the perimeter. Sink screws just below the surface without breaking the paper facing. The new drywall should sit flush with the surrounding ceiling. Not raised, not recessed.
Taping and Applying Joint Compound
Press mesh tape or paper tape along all four seams where new drywall meets old ceiling. Load a 4 inch putty knife with joint compound and spread it over the tape using firm, smooth strokes that press compound through the mesh. Feather the edges by angling your knife and spreading compound 4 to 6 inches beyond the tape onto the existing ceiling. This hides the transition line. Cover screw heads with small dabs of compound. Let everything dry overnight.
Sanding and Multiple Coats
Once the first coat dries hard, sand it smooth with 120 grit sandpaper on a sanding block. Dust masks are necessary here. Apply a second coat of compound with a wider 8 inch knife, feathering edges even farther out, maybe 8 to 10 inches. Let it dry and sand again. Most repairs need three coats of compound to hide seams completely. Check your work by shining a work light at an angle across the ceiling. Shadows reveal bumps and ridges you can’t see under regular lighting. Prime and paint the patched area following the same steps from the minor repair section above.
Wear your dust mask and safety glasses through the entire process, keep the room ventilated with open windows or a fan exhausting outside, and double check for hidden electrical wires or plumbing before cutting into any ceiling section.
Preventing Future Ceiling Water Leaks

Prevention costs far less than water damage repairs and mostly requires building simple inspection habits into your home maintenance routine.
Multiple systems in your home can cause ceiling leaks. Your roof, plumbing, HVAC equipment, and ventilation all need periodic monitoring to catch small problems before water reaches your ceiling drywall.
Preventive maintenance schedule and actions:
- Conduct yearly roof inspections in spring and fall, looking for missing or cracked shingles, lifted edges, and damaged flashing around vents and chimneys. Replace broken materials and renew flashing sealant after major storms.
- Clean gutters and downspouts at least twice yearly in spring and fall to prevent ice dam formation in winter and overflow during heavy rain that runs back under roof edges.
- Inspect your attic every 3 to 4 months for dark staining on roof sheathing, condensation problems, adequate ventilation through soffit and ridge vents, and proper insulation coverage.
- Add foam pipe insulation sleeves to water supply lines in unheated spaces like attics, crawl spaces, and exterior walls, and monitor those areas during hard freezes.
- Run bathroom exhaust fans during showers and for 20 minutes after to move humid air outside instead of letting it condense on cold surfaces.
- Check HVAC drain pans under air handlers quarterly for standing water, rust, or cracks, and flush condensate drain lines with a vinegar solution to prevent algae clogs.
- Test shut off valves on washing machines, water heaters, and under sinks annually to confirm they work. Frozen valves won’t stop leaks when you need them.
- Apply mold resistant primer to bathroom and kitchen ceilings during repainting, and choose paint formulated to resist moisture and growth in high humidity areas.
- Use dehumidifiers in basements and other damp spaces to keep indoor humidity between 30 and 50% and reduce condensation on pipes, ducts, and ceiling surfaces.
- Schedule annual inspections with a professional plumber to check hidden pipe connections behind walls, under floors, and in ceiling cavities where you can’t see slow leaks developing.
Understanding Repair Costs, Timelines, and When to Hire Professionals

Repair costs depend on how much ceiling area needs work, whether you’re fixing drywall or plaster or acoustic tile, your local labor rates, and whether structural damage extends beyond surface repair into joists and framing.
DIY repairs save significant money because you’re only buying materials. Typically $50 to $150 for minor stain coverage with primer and paint, up to $300 for moderate drywall patching including new drywall, compound, tape, primer, and paint. Professional services charge for expertise, specialized moisture detection equipment, faster completion times, and warranties on completed work. They also handle the messy demolition and disposal.
Insurance claims for water damage often require professional restoration company involvement for documentation photos before demolition, detailed scope of work reports for adjusters, and certified completion statements. Take your own photos of the damage before starting any repairs if you’re considering filing a claim. Restoration companies coordinate directly with insurance adjusters and handle the paperwork process homeowners find confusing.
| Repair Type | DIY Cost Range | Professional Cost Range | Typical Timeline |
|---|---|---|---|
| Minor stain repair | $50-$150 | $200-$500 | 1-2 days DIY, same day professional |
| Small drywall patch | $100-$250 | $300-$800 | 2-3 days DIY, 1-2 days professional |
| Large section replacement | $200-$500 | $800-$2,000 | 3-5 days DIY, 2-3 days professional |
| Structural repair needed | Not recommended | $1,500-$5,000+ | N/A DIY, 3-7 days professional |
| Full ceiling replacement | Not recommended | $2,000-$8,000+ | N/A DIY, 5-10 days professional |
Some ceiling leak situations exceed DIY capability and attempting repairs yourself risks your safety, creates building code violations, or produces inadequate repairs that fail within months. Professional assessment often reveals hidden problems you can’t see. Moisture meters detect wet areas that look dry, thermal imaging cameras find temperature differences from hidden leaks, and borescopes inspect inside wall and ceiling cavities without tearing everything open.
Critical situations requiring professional help:
- Widespread growth or suspected problems behind ceiling surfaces requiring air quality testing, containment procedures during removal, and HVAC system decontamination to prevent health risks
- Structural damage to ceiling joists, wall studs, or load bearing elements that need engineered reinforcement or replacement to maintain your home’s structural integrity
- Hidden plumbing leaks requiring pipe location equipment, access through multiple ceiling layers or walls, and soldering or replacement of supply lines or drain pipes
- Electrical hazards with wiring running through water damaged ceiling areas that need inspection and possible rewiring to prevent fire risks from corroded connections
- Large scale damage covering multiple rooms or entire ceiling sections where repair complexity, material costs, and time requirements make professional service more practical
- Situations requiring building permits or compliance with local building codes for structural work, plumbing modifications, or electrical repairs
- Persistent leaks where you’ve tried locating the source but water keeps appearing and professional leak detection equipment is needed
- Properties with second floor leaks affecting occupied living spaces below where fast professional response prevents damage escalation to flooring, walls, and first floor ceilings
- When insurance claim documentation requires professional restoration services coordination with adjusters, scope verification, and certified completion statements
Professional plumbers and restoration services provide solutions with work warranties, specialized moisture detection tools that find hidden problems, and completion times that often justify the cost difference. Complex repairs involving structural elements like damaged joists, widespread rot, or situations with potential health risks particularly benefit from professional expertise, proper equipment, and liability insurance coverage.
Final Words
Knowing how to repair a water leak in the ceiling starts with fast emergency response and careful assessment.
Stop the water first. Identify where it’s coming from. Check if the damage needs patching or full replacement.
Minor stains and surface fixes work for DIY if you have the right materials and patience. Larger damage, structural problems, or mold growth means calling professionals who can handle it safely and completely.
Regular roof checks, gutter cleaning, and humidity control prevent most ceiling leaks before they start. That’s worth more than any repair.
FAQ
What to do when the ceiling is leaking water?
When the ceiling is leaking water, immediately shut off the main water supply if it’s plumbing-related, turn off electricity to affected rooms, place buckets to catch dripping water, and never touch wet electrical fixtures or switches.
Can a water damaged ceiling be fixed?
A water damaged ceiling can be fixed depending on the extent of damage. Minor stains and surface damage can be patched with joint compound and primer, while soft spots and sagging areas require cutting out damaged sections and installing replacement drywall.
Does homeowners insurance cover water leak from ceiling?
Homeowners insurance typically covers water leaks from ceiling when caused by sudden, accidental events like burst pipes, but may not cover gradual damage from neglected maintenance. Take documentation photos before repairs and contact your insurance adjuster to verify coverage for your specific situation.
What paint to use on a water damaged ceiling?
For a water damaged ceiling, always use oil-based stain-blocking primer first to prevent brown marks from bleeding through, then apply two coats of ceiling paint that matches your existing shade using a short-nap roller with steady strokes.
How long does it take to repair a ceiling water leak?
Ceiling water leak repairs take 1-2 days for minor stain fixes, 2-3 days for small drywall patches, and 3-5 days for large section replacements when doing DIY work. Professional services typically complete the same repairs in half the time using specialized tools.
When should I call a professional for ceiling water damage?
Call a professional for ceiling water damage when you see widespread mold growth, structural damage to joists, hidden plumbing issues, electrical hazards in wet areas, or large-scale damage covering multiple rooms that exceeds safe DIY capability.
How do I prevent ceiling water leaks from happening again?
Prevent ceiling water leaks by conducting yearly roof inspections, cleaning gutters seasonally, checking attic ventilation regularly, adding pipe insulation in unheated areas, running bathroom vent fans during use, and testing plumbing fixtures quarterly for early leak detection.
How much does ceiling water damage repair cost?
Ceiling water damage repair costs range from $50-$150 for DIY minor stain repairs to $200-$500 with professional help. Large section replacements cost $200-$500 DIY or $800-$2,000 professionally, while structural repairs requiring professionals run $1,500-$5,000 or more.
How do I identify where my ceiling leak is coming from?
Identify where your ceiling leak comes from by checking bathroom and kitchen plumbing above, inspecting the attic for roof damage or missing shingles, examining AC drip pans and HVAC condensation, and looking for water heater leaks. The water source may be located far from visible damage.
How do I know if ceiling water damage is serious?
Ceiling water damage is serious when you find soft spots by pressing gently, see sagging areas, notice persistent dripping, or discover joist damage and widespread wood rot. These warning signs indicate structural compromise requiring professional assessment rather than DIY repair.