

When your roof gets torn open by a storm, waiting days for repairs isn’t an option. Water keeps pouring in, damaging ceilings, insulation, and everything below. A properly installed emergency tarp stops the bleeding right now. But most homeowners skip critical steps, secure edges too loosely, or leave gaps that turn their tarp into a useless flapping sheet. This guide walks you through the exact sequence professionals use to create waterproof protection that holds until permanent repairs can start.
Complete Step-by-Step Installation Guide for Emergency Roof Tarping

Proper installation follows a specific sequence. You need to combine measurement, preparation, and securing techniques to create effective protection. Each step builds on the last one to prevent water intrusion, wind uplift, and further damage until you can get permanent repairs done.
-
Assess and photograph damage from ground level before accessing roof. Use your smartphone or camera to capture multiple angles showing how bad the damage is, missing shingles, visible holes, and any debris. Take close ups and wide shots that show the damaged area compared to roof features like chimneys, vents, and edges. Document what’s happening inside too. Water stains, ceiling damage, or active leaks all need photos. These serve as insurance documentation and help you plan your approach before you climb onto the roof.
-
Measure damaged area length and width, adding minimum 4 feet to each dimension for overlap. From ground level or using binoculars, estimate the damaged zone. Use this formula: Tarp length equals damaged area length plus 8 feet, tarp width equals damaged area width plus 8 feet or extend to ridge line. For a hole that’s 6 feet by 4 feet, you’ll need a tarp at least 14 feet by 12 feet. Extending coverage over the ridge line gives you optimal water runoff, allowing rain to roll down both sides without getting beneath the tarp edges.
-
Gather all materials and verify weather conditions are safe. Check that you have your tarp, 2×4 boards (enough to cover the entire perimeter), deck screws or galvanized nails, drill with bits, ladder, safety harness, gloves, and debris removal tools. Confirm the roof surface is completely dry, winds are below 20 mph, and no precipitation is forecast for the next 24 hours. Wet shingles are slippery. Even light winds can turn a large tarp into a sail that pulls you off balance.
-
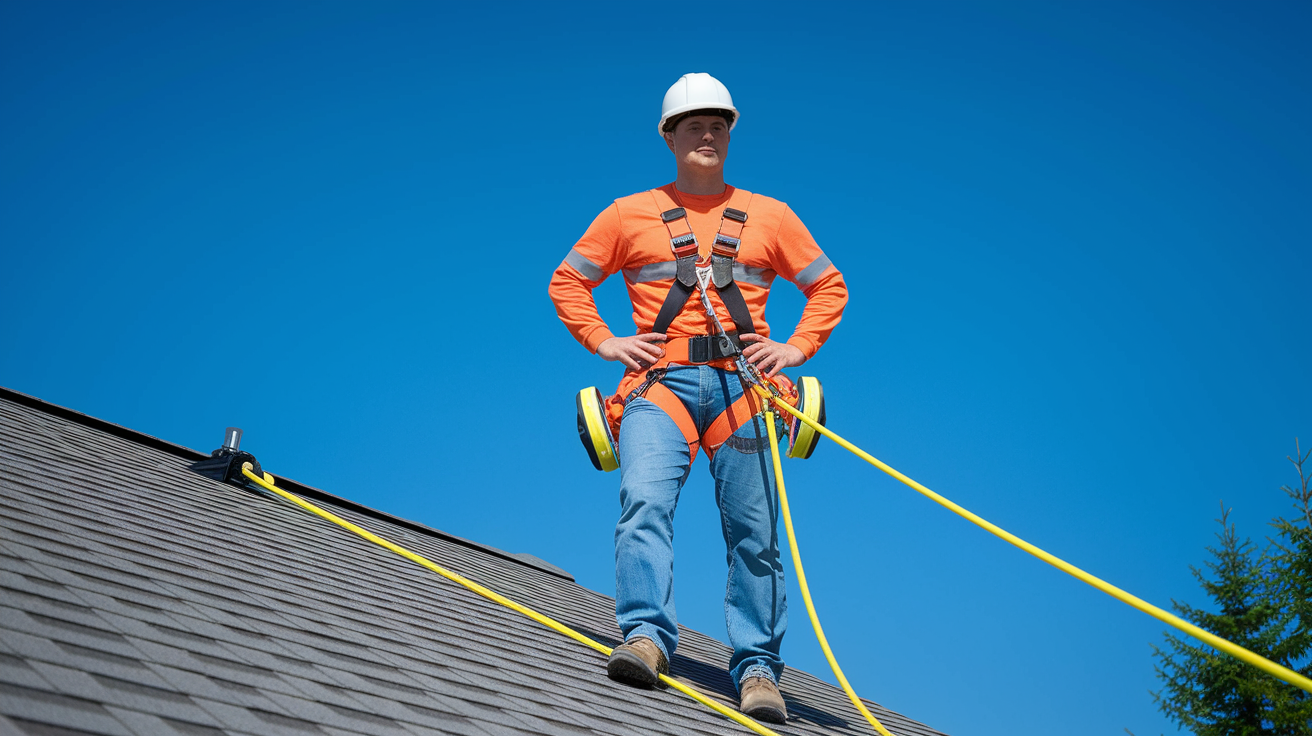
Implement safety protocols including fall protection harness, ladder stability check at 4:1 angle ratio, non-slip footwear, and ground-level spotter. Position your ladder so that for every 4 feet of height, the base sits 1 foot away from the wall. Secure the top of the ladder and have someone hold it steady while you climb. Wear your fall protection harness attached to a secure anchor point, put on work gloves for grip, and make sure your shoes have good tread. Your ground level spotter should stay positioned to steady the ladder and hand up tools as needed.
-
Remove all loose debris including shingles, nails, branches, leaves using soft bristle broom or leaf blower. Start at the center of the damaged area and work outward, sweeping everything toward the roof edge where your spotter can collect it below. Pull out any protruding nails that could puncture the tarp. If there’s standing water, use towels to dry the surface as much as possible. Avoid installation over wet surfaces when temperatures are below 40°F, as moisture can freeze and mess up the seal.
-
Unfold and position tarp over damaged area ensuring equal overlap on all sides. With your helper, carry the folded tarp onto the roof and position it so the damaged section sits roughly in the center. Unfold it carefully, keeping tension on the material so wind doesn’t catch it. If possible, extend the tarp over the ridge line so water can run off both sides. Check that you have at least 4 feet of overlap extending past the damaged area on all edges. Walk around the tarp and smooth out any wrinkles, folds, or bunched sections that could trap water or catch wind.
-
Secure edges using sandwich board method or direct board attachment. For the sandwich method, position the tarp edge between two 2×4 boards, drill pilot holes every 12 to 18 inches through both boards and the tarp, then fasten with 3 inch deck screws or galvanized nails. This prevents tearing and increases wind resistance. For direct attachment, lay a single 2×4 along the perimeter, then fasten through the board and tarp at 12 inch intervals. Start fastening from the center of each edge and work toward the corners to maintain even tension across the entire tarp.
-
Pull tarp taut before placing each fastener. Before you drill or nail, use your gloved hands to pull the tarp tight, working outward from the center toward the edges. Smooth any wrinkles as you go. Position your boards at a slight angle with one end lower to create drainage paths that prevent water from pooling. At corners, double up your boards or add extra fasteners at 6 inch spacing since corners take the most stress from wind. Drive fasteners straight down through the shingles. These shingles will need replacement during permanent repairs anyway.
-
Perform final inspection checking all edges are secured, no lifted corners, no water collecting pockets. Walk the entire perimeter and tug gently on edges to verify they’re held firmly. Look across the tarp surface for any low spots where water might collect. If you’re in a high wind area, place sandbags on the tarp surface every 6 to 8 feet to add weight and reduce billowing. Check that the tarp lies flat against the roof without gaps where wind could get underneath.
This approach prevents common installation failures including inadequate coverage, water intrusion at edges, and wind uplift. When executed properly, the entire process takes 2 to 4 hours depending on damage extent and roof accessibility. But rushing through steps means you won’t get the protection your roof needs until permanent repairs can be completed.
Essential Materials and Tools for Roof Tarp Installation

Having the right materials before you start prevents mid installation delays and keeps you from making multiple dangerous trips up and down the ladder.
Required Tools:
Extension ladder (reaching at least 3 feet above roof edge), OSHA rated fall protection harness with roof anchor, work gloves with grip texture, 25 foot measuring tape, utility knife with extra blades, cordless drill with screwdriver bits, hammer or pneumatic nail gun, chalk line for marking straight edges, rope or heavy duty bungee cords (for additional securing in high wind areas), soft bristle broom or leaf blower (for debris removal).
Required Materials:
Heavy duty polyethylene tarp (minimum 6 mil thickness for emergency use, 12 mil for extended coverage lasting over 30 days), 2×4 lumber boards (calculate linear feet needed to cover entire tarp perimeter, plus extra for corner reinforcement), 3 inch galvanized deck screws or roofing nails (approximately 50 to 100 depending on perimeter size), butyl tape or specialized roof tape (for sealing around penetrations), sandbags or weight bags (6 to 10 bags for roofs with high wind exposure), plastic sheeting or drop cloths (to protect interior spaces if active leaks exist).
Tarp material selection matters based on weather conditions and coverage duration. Polyethylene tarps are the most common choice for emergency protection, lightweight enough to handle but thick enough to resist tears. Canvas tarps offer better breathability if you’re concerned about moisture being trapped against the roof surface, though they’re heavier and more difficult to position. Vinyl tarps provide the strongest protection in severe weather conditions but cost more and require careful handling to avoid creasing that creates weak points.
Safety Protocols and Fall Protection During Tarp Installation
Fall risks are the primary danger when working on damaged roofs. Professional installation is strongly recommended for steep pitches above 6:12 or any roof where structural damage is visible. If you decide to proceed with DIY installation, safety protocols are non negotiable.
Critical Safety Measures:
Wear an OSHA rated fall protection harness connected to a secure anchor point (never trust a damaged roof structure as your anchor). Position ladder at proper 4:1 angle ratio (4 feet of height for every 1 foot of distance from wall), extending at least 3 feet above roof edge. Maintain three points of contact (two hands and one foot, or two feet and one hand) when climbing ladder. Wear non slip footwear with ankle support and aggressive tread patterns designed for roof work. Use work gloves that provide grip without being bulky enough to interfere with tool handling. Work only in dry conditions with wind speeds confirmed below 20 mph (not just calm at ground level). Check for power line proximity and maintain at least 10 feet of clearance from any electrical lines. Require a ground level spotter who stays present throughout the entire installation to steady ladder and assist with material handling.
Weather limitations determine when you absolutely can’t access your roof. Never attempt installation during rain, even light drizzle, as wet shingles become as slippery as ice. Lightning within 10 miles means immediate evacuation. High winds above 25 mph can knock you off balance or turn your tarp into a sail that pulls you toward the edge. Ice or frost must melt completely before you climb. If you’re checking conditions and feel any hesitation about safety, trust that instinct and wait for better weather or call professionals.
Special Installation Scenarios Around Roof Penetrations

Roof penetrations like chimneys, vents, and skylights require modified techniques to maintain a waterproof seal without leaving gaps where water can enter.
Tarping Around Chimneys
Measure and mark the chimney location on your tarp before you position it on the roof. Cut an opening that’s 2 inches smaller than the chimney base perimeter. Position the tarp over the chimney, letting the opening settle around it. Cut relief slits at each corner of the opening so the tarp material can lay flat against the roof surface rather than bunching up. Seal the edges to the chimney flashing using butyl tape or specialized roof tape, pressing firmly to create a watertight bond. Never attach tape directly to brick or masonry because it won’t stick properly and will peel off during the first rain. Instead, tape to the metal flashing that surrounds the chimney base.
Covering Vents and Skylights
For active vents like plumbing stacks or exhaust vents, cut precise openings in your tarp and seal edges with flexible boot flashings that allow the vent to function while keeping water out. For damaged skylights that need complete coverage, don’t cut openings. Instead, cover the entire skylight and ensure you have at least 12 inches of tarp overlap on all sides, secured with your board and fastener method to prevent water from running underneath.
Complex roof geometries with multiple penetrations positioned close together make it difficult to get proper coverage without creating weak points where seams overlap. If your roof has several chimneys, multiple vent pipes, or a combination of features in the damaged area, professional installation ensures proper flashing integration and reduces the risk of leaks developing at transition points.
Common Installation Mistakes and How to Avoid Them

Most tarp failures happen within the first 48 hours and result from predictable mistakes that hurt the installation’s effectiveness.
Frequent Errors That Cause Failure:
Using undersized tarp that doesn’t extend at least 4 feet past the damage zone on all sides. Installing during wet conditions or when wind speeds exceed 15 mph. Overdriving fasteners so they tear through tarp material instead of gripping it. Spacing fasteners more than 18 inches apart, allowing wind to lift edges between attachment points. Failing to remove debris before installation, leaving branches or shingles that puncture the tarp from below. Choosing lightweight tarps under 6 mil thickness that can’t withstand normal weather exposure. Working alone on pitched roofs where you need one person to hold tension while the other fastens. Skipping corner reinforcement where wind stress concentrates. Leaving wrinkles or folds that collect water and create heavy sagging pockets.
The consequences of these mistakes create cascading problems. Undersized tarps allow water to run underneath at the edges and continue damaging your interior. Overdriven fasteners create new leak points through your roof deck. Not enough fastener spacing lets wind get under the edges and peel back sections, sometimes pulling the entire tarp loose during storms. Working alone means you can’t maintain proper tension, resulting in a loose, billowing installation that fails quickly.
Taking time to do the installation correctly the first time prevents you from having to climb back onto a wet, damaged roof during the next storm to redo everything under emergency conditions. Spend the extra 30 minutes to add more fasteners, reinforce corners properly, and ensure every edge lies flat and tight against the roof surface.
Insurance Documentation and Emergency Response Requirements

Most homeowners insurance policies include a “duty to mitigate” clause requiring you to take reasonable steps to prevent additional damage after a covered event. Failing to tarp a damaged roof promptly can result in denial of subsequent water damage claims for interior damage that occurs after the initial storm.
Documentation starts before you touch anything on the roof. Photograph the damage from multiple angles, capturing wide shots that show the overall roof and close ups that detail missing shingles, holes, or structural damage. Document the debris field around your home, including any roofing materials, tree branches, or other materials that caused the damage. During installation, take photos showing your tarp size in relation to the damaged area and your securing method with boards and fasteners. After completion, photograph the finished installation from ground level, showing that the entire damaged area is covered with adequate overlap.
Documentation Best Practices:
Install tarp within 24 to 48 hours of damage occurring (delays may indicate you didn’t consider the situation urgent). Notify your insurance company immediately with preliminary photos before installation. Save all damaged materials removed from the roof (broken shingles, torn flashing, etc.) until the adjuster completes their inspection. Maintain a written log recording installation date, time, weather conditions, and materials used. Keep receipts for all materials purchased and any professional services hired for emergency work.
Emergency response coverage in most policies reimburses reasonable costs for temporary protective measures, including tarp materials and professional installation fees. This coverage typically applies even if you haven’t met your deductible yet, though you’ll need to confirm your specific policy terms. Professional installation costs are more likely to be covered than DIY material expenses, so keep detailed receipts and contractor invoices.
Duration Expectations and Maintenance of Temporary Roof Tarps

Roof tarps are emergency measures designed to protect your home for weeks or months while you arrange permanent repairs, not permanent solutions that can stay in place indefinitely.
Duration depends on tarp quality and weather exposure. High quality 12 mil polyethylene tarps typically last 90 to 120 days in moderate weather conditions with temperatures between 40 to 80°F and normal rain patterns. UV exposure from direct sunlight degrades the material, causing brittleness and cracking after 3 to 4 months even if the tarp looks intact. Wind and temperature cycling stress the fastening points, gradually loosening screws and enlarging holes in the tarp material. Accumulated debris like leaves, branches, and dirt holds moisture against the tarp surface, speeding up deterioration.
Maintenance requirements increase as the tarp ages. Inspect after every significant weather event, including heavy rainstorms, wind over 30 mph, or hail. Check for lifted corners where wind may have gotten underneath, loose fasteners that need tightening, and any tears or holes that developed. Monthly inspections during calm weather help you catch problems before they become failures. Remove accumulated leaves and branches that hold moisture and add weight. Look for separated seams where tarp sections were overlapped or taped together.
Replacement Indicators:
Visible tears larger than 2 inches that can’t be effectively patched. Water stains appearing on interior ceilings directly below tarped area. Fasteners pulling through tarp material instead of holding firm. Significant color fading from dark blue or silver to pale white, indicating UV breakdown. Flapping or billowing during moderate winds under 20 mph, showing the tarp has lost structural integrity.
Schedule permanent repairs immediately after tarp installation. Don’t wait for the tarp to fail before you start getting estimates and planning the work. Most roofing contractors are booked weeks in advance, so early scheduling ensures you can complete permanent repairs before the temporary protection deteriorates.
Seasonal Weather Considerations for Roof Tarp Installation

Weather conditions affect both installation safety and how long your tarp will effectively protect your home.
| Season | Primary Challenge | Installation Modification | Tarp Lifespan |
|---|---|---|---|
| Winter | Freezing temperatures, ice formation, brittle tarp material | Use cold rated tarps rated to -20°F, warm tarps indoors before installation, avoid installing over ice or frost | Reduced to 60 to 90 days due to freeze thaw cycles |
| Spring | Frequent storms, high winds, rapid weather changes | Increase fastening intervals to every 10 inches, add extra corner reinforcement, use sandbags | Moderate 90 to 120 days with regular maintenance |
| Summer | UV degradation, thermal expansion, intense heat | Apply slightly looser initial tension to allow for expansion, consider UV resistant tarps | Shortest at 60 to 90 days due to sun exposure |
| Fall | Debris accumulation from falling leaves, temperature swings | Plan for weekly debris removal, check fasteners after each cold front | Moderate 90 to 120 days with frequent inspection |
Wind limitations are critical for safe installation. Avoid accessing your roof when sustained winds exceed 20 mph, even if gusts are intermittent. Delay work if gusts above 30 mph are forecasted within the next 24 hours. If you’re already on the roof and wind picks up, secure what you’ve completed and evacuate immediately. Use additional fastening intervals, placing screws or nails every 8 to 10 inches instead of the standard 12 inches, when you’re installing before predicted high wind events like approaching storm systems.
Temperature affects tarp handling and performance. Cold weather below 40°F makes tarps stiff and difficult to unfold or position smoothly. The material won’t conform to roof contours as easily, leaving gaps and wrinkles. Hot weather above 85°F causes expansion that may create slack as temperatures drop overnight, requiring you to check tension the next morning. Rapid temperature cycling between day and night speeds up fastener loosening, making inspection more critical during spring and fall when temperature swings are greatest.
When to Call Professionals vs. DIY Tarp Installation

The decision to hire professionals or attempt DIY installation depends on your roof characteristics, personal capability, and safety considerations.
Situations Requiring Professional Installation:
Roof pitch steeper than 6:12 (26.5 degrees) where footing becomes unstable. Damage extending over 200 square feet, requiring multiple tarp sections and complex overlapping. Structural damage visible in roof decking or framing that may not support your weight. Multi story homes where roof height exceeds single story accessibility. Damaged areas near roof edges without proper fall protection anchor points. No experience working on roofs or lack of proper safety equipment. Installation needed during active weather threats when conditions are marginal.
Appropriate DIY scenarios include single story homes with accessible low slope roofs at 4:12 pitch or less, where you can work safely without extreme fall risk. Small damaged areas under 100 square feet are manageable for homeowners who have an assistant available for two person safety. You’ll need a proper ladder that reaches at least 3 feet above the roof edge and fall protection equipment including harness and anchor. Calm weather with a 48 hour clear forecast gives you time to work carefully without rushing before the next storm.
Cost comparison helps with the decision. DIY materials typically cost $100 to $300 for a quality tarp, lumber boards, fasteners, and basic supplies. Professional emergency tarping services range from $300 to $1,500 depending on roof size, accessibility, urgency, and regional labor rates. The price difference narrows when you factor in equipment rental costs for ladders, harnesses, and tools you don’t own.
Professional installation includes insurance liability coverage if the roofer is injured during the work, guaranteed installation quality with warranty on labor, and proper safety equipment and training that reduces risk. Most emergency roofing companies can complete tarp installation in 1 to 2 hours compared to 4 to 6 hours for DIY first timers.
Transitioning from Temporary Tarp to Permanent Roof Repair

Tarps buy you time to plan permanent repairs carefully, but that doesn’t mean you should delay starting the repair process.
Contact licensed roofing contractors within 48 hours of installing your tarp. Schedule inspections while the tarp is still protecting your interior so contractors can assess damage without causing additional water intrusion. Obtain estimates from at least three different contractors for complete repair scope, not just replacing the damaged section. Understand that the area where you drove tarp fasteners now has additional holes that will need new shingles even if the underlying shingles weren’t originally damaged. Coordinate with your insurance adjuster to complete their damage assessment before you remove the tarp and begin permanent work.
Timing considerations affect both repair quality and long term roof performance. Most permanent repairs should begin within 30 to 60 days of the damage occurring. Extended tarp coverage beyond 90 days risks additional deterioration where the fasteners penetrated your roof deck, and moisture can accumulate under aging tarps even when they appear intact. Schedule repairs during dry seasons when possible, typically late spring through early fall, to ensure proper installation conditions and allow roofing materials like shingles and adhesives to bond correctly.
Tarp removal and disposal is typically included in permanent repair contracts, so you don’t need to climb back onto the roof to take it down yourself. Save all damaged materials that were removed during tarp installation until your insurance claim is completely finalized and the adjuster confirms they don’t need to inspect the physical evidence.
Final Words
Getting the roof tarp installation steps right means stopping water damage fast and protecting what matters until permanent repairs can happen.
Measure accurately, secure properly, and check your work after every storm.
A well-installed tarp keeps your home dry and prevents small problems from turning into expensive ones. Take your time with the sandwich board method and eliminate those wrinkles.
If the roof is steep or the damage is widespread, call in professionals who have the gear and experience to do it safely. Either way, you’re buying valuable time to plan the right permanent fix without panicking through another rainstorm.
FAQ
Q: What is the best way to put a tarp on a roof?
A: The best way to put a tarp on a roof involves measuring the damaged area and adding 4 feet to each dimension, removing all loose debris, positioning the tarp with equal overlap on all sides, and securing edges using the sandwich board method (placing the tarp between two 2×4 boards fastened every 12-18 inches). Pull the tarp taut while working from center to edges to eliminate wrinkles and prevent water pooling.
Q: What is the 25% rule in roofing?
A: The 25% rule in roofing states that if more than 25% of your roof’s total area is damaged or needs replacement, many building codes and insurance policies require replacing the entire roof rather than patching sections. This ensures structural integrity and uniform material aging. Always check your local building codes and insurance policy requirements when assessing storm damage extent.
Q: How much do roofers charge to tarp a roof?
A: Roofers typically charge $300-1,500 to tarp a roof, depending on damage extent, roof size, accessibility, and urgency of the situation. DIY materials including tarp, boards, and fasteners cost $100-300, but professional installation includes liability coverage, proper safety equipment, and guaranteed work quality. Emergency tarping during active storms or after-hours may cost more.
Q: How should roof underlayment be installed?
A: Roof underlayment should be installed starting at the eaves and working upward toward the ridge, overlapping each row by 6 inches horizontally and 4 inches at vertical seams, with all seams running down-slope to direct water flow. For emergency tarp installation, extend coverage over the ridge line when possible to allow water runoff to both sides. Permanent underlayment installation requires professional roofing contractors to ensure proper integration with flashing and ventilation.
Q: How long can a roof tarp stay in place?
A: A roof tarp can stay in place for 90-120 days in moderate weather conditions when using high-quality 12-mil polyethylene material, though UV exposure and temperature cycling begin degrading materials after 3-4 months. Inspect the tarp after every significant weather event and schedule permanent repairs within 30-60 days of installation. Tarps are emergency measures designed for weeks or months, not permanent solutions.
Q: Can I install a roof tarp by myself?
A: You should not install a roof tarp by yourself because roof tarping is a two-person job for safety and efficiency, requiring one person on the roof and a ground-level spotter. DIY installation is appropriate only for single-story homes with low-slope roofs (4:12 or less), small damaged areas under 100 square feet, and when you have proper safety equipment. Steep roofs, multi-story homes, or damaged areas near edges require professional installation.
Q: What size tarp do I need for roof damage?
A: You need a tarp that extends at least 4 feet beyond the damaged area on all sides, calculated using this formula: Tarp length equals damaged area length plus 8 feet, and tarp width equals damaged area width plus 8 feet or extends to the ridge line. Undersized tarps that don’t extend past the damage zone allow water intrusion at edges. Consider extending coverage over the ridge line for optimal water runoff to both sides.
Q: How do I secure a roof tarp in high winds?
A: To secure a roof tarp in high winds, use the sandwich board method by placing the tarp edge between two 2×4 boards and fastening with 3-inch deck screws every 8-10 inches instead of the standard 12-18 inches. Reinforce corners with doubled boards or additional fasteners at 6-inch spacing, and distribute sandbags every 6-8 feet for extra weight. Avoid installation when sustained winds exceed 20 mph or gusts above 30 mph are forecasted.
Q: When should I not attempt roof tarp installation?
A: You should not attempt roof tarp installation during rain, lightning, strong winds above 20 mph, on wet or icy surfaces, within 10 feet of power lines, or on roofs steeper than 6:12 pitch (26.5 degrees) without fall protection. Wait until bad weather clears completely and surfaces are dry. Professional installation is required for structural damage, multi-story homes, or when you lack proper safety equipment and training.
Q: Does homeowners insurance cover emergency roof tarping?
A: Homeowners insurance typically covers emergency roof tarping as part of emergency mitigation requirements, which obligate policyholders to take “reasonable steps” to prevent additional damage after a covered event. Install the tarp within 24-48 hours of damage, photograph the damage before and after installation, keep all receipts, and notify your insurance company immediately. Failing to tarp a damaged roof promptly may result in denial of subsequent water damage claims.