

Think a roof tarp can hold you over for months? Think again.
A tarp stops water right after storm damage, but it’s only a short-term fix.
Aim to schedule permanent repairs within 30 days after tarping when you can, and treat 90 days as the outer limit only with documented delays and insurer approval.
Fast repairs stop decking rot, mold, and costly interior damage, and they keep your claim from getting messy.
Here’s a practical timeline and the documentation you should gather so you move from emergency tarp to a finished roof with less stress.
Understanding the Safe Roof Tarp Replacement Timeline

A roof tarp stops water intrusion right after storm damage, fallen trees, or sudden failures. It’s an emergency measure, not a long term fix. The maximum safe duration is commonly accepted as 90 days, but that’s an outer limit, not something you should aim for. The recommended target is permanent repair within 30 days after tarping when you can make it happen.
Insurance carriers expect you to act fast. Most require you to install mitigation measures like tarps immediately and move toward permanent repairs within 60 to 90 days. Some policies permit up to 180 days depending on circumstances and documented delays, but you need to verify your policy’s exact language. That 30 day target helps you avoid decking rot, mold growth, and secondary interior damage that drive repair costs higher and complicate your claim.
The practical replacement timeline from the moment you discover roof damage to the day permanent repairs finish typically follows this pattern:
- Emergency tarping: Ideally within 24 to 48 hours after damage occurs
- Initial roof inspection and contractor estimate: 7 to 14 days after tarping
- Insurance notification and adjuster inspection: Within 24 to 72 hours of discovery; adjuster visit typically 1 to 2 weeks out
- Material selection and ordering, plus permit applications: 1 to 3 weeks combined
- Permanent roof installation: 1 to 10 days once started (most asphalt shingle roofs complete in 1 to 3 days)
- Total elapsed time from tarp to finished roof: Aim for 30 days; maximum 90 days without documented insurer approval
Contractor scheduling often adds 2 to 12 weeks depending on season and local demand. Permit processing can add another 1 to 3 weeks in many jurisdictions. These overlapping timelines mean the total calendar days from tarping to completed repairs can stretch to several weeks even when every step moves quickly. Weather delays, material shortages, and hidden structural damage discovered during tear off can extend the schedule further.
Factors That Influence Your Roof Tarp Lifespan and Replacement Schedule

The lifespan of a temporary roof tarp depends primarily on tarp quality, local weather conditions, and how well it was installed. Thin blue polyethylene tarps, the kind sold at most hardware stores, begin degrading under direct sunlight in just weeks. Practical outdoor life for these tarps is often 2 to 6 weeks in direct sun before UV exposure starts causing brittleness, tears, and reduced water resistance.
Heavy duty woven or UV treated tarps fare better and can last 2 to 6 months in moderate conditions, but they’re still temporary and aren’t designed to serve as a permanent roofing membrane. Even a properly installed, high quality tarp in mild conditions may approach the 90 day outer limit but shouldn’t be relied upon beyond that in exposed, windy, or UV intense locations.
| Tarp Type | Typical Lifespan Estimate | Environmental Sensitivity |
|---|---|---|
| Thin blue polyethylene (standard hardware store) | 2 to 6 weeks | High; rapid UV degradation, tears in wind |
| Heavy duty woven polyethylene | 6 to 12 weeks | Moderate; better wind resistance, moderate UV tolerance |
| UV treated reinforced tarp | 2 to 6 months | Lower; designed for extended outdoor use, but still temporary |
| Shrink wrap or specialty membrane | 3 to 9 months (interim solution only) | Varies; some specialty systems tolerate longer exposure |
Direct sunlight, high winds, repeated heavy rain or snow, thermal cycling, poor fastening methods like staples that tear out, and ponding water on the tarp surface all accelerate failure. Mold can begin growing within 24 to 72 hours after moisture intrusion starts, so any leak under a tarp becomes a biological and structural problem quickly.
Signs Your Roof Tarp Needs Immediate Replacement or Reinforcement

You should inspect your roof tarp every 7 to 14 days and after every major storm. During these inspections, look for visible signs that the tarp isn’t doing its job anymore. Catching failures early reduces the risk of interior water damage, mold growth, and compromised roof decking.
Signs that demand immediate tarp replacement or reinforcement:
- New tears or rips in the tarp fabric, especially along fastener lines or folds
- Excessive flapping in wind, which shows loose attachment points
- Visible exposed sheathing or underlayment where the tarp has pulled away
- Sagging or pooling water on the tarp surface, which adds weight and accelerates tearing
- Water intrusion inside the home, shown by new ceiling stains, drips, or damp insulation
- Visible mold or mildew growth on attic surfaces, underlayment, or interior ceilings
- Loose or missing fasteners, sandbags, or boards that were used to secure the tarp
If you notice any of these conditions, contact your roofing contractor immediately to schedule tarp reinforcement or replacement. Roof decking and framing can start to rot or delaminate over weeks to months when moisture is allowed to persist, increasing the scope and cost of the final repair. Delaying action also raises the risk that your insurer may reduce payout or deny the claim if mitigation isn’t timely and documented.
Emergency Roof Tarp Timeline: From Damage Occurrence to Permanent Repairs
The moment roof damage occurs, the clock starts on your emergency response and documentation timeline. Speed matters because water can travel along rafters and decking, soaking insulation and drywall in hours. Mold begins colonizing within 24 to 72 hours. The goal is to stop further damage immediately and then move toward permanent repairs as quickly as practical.
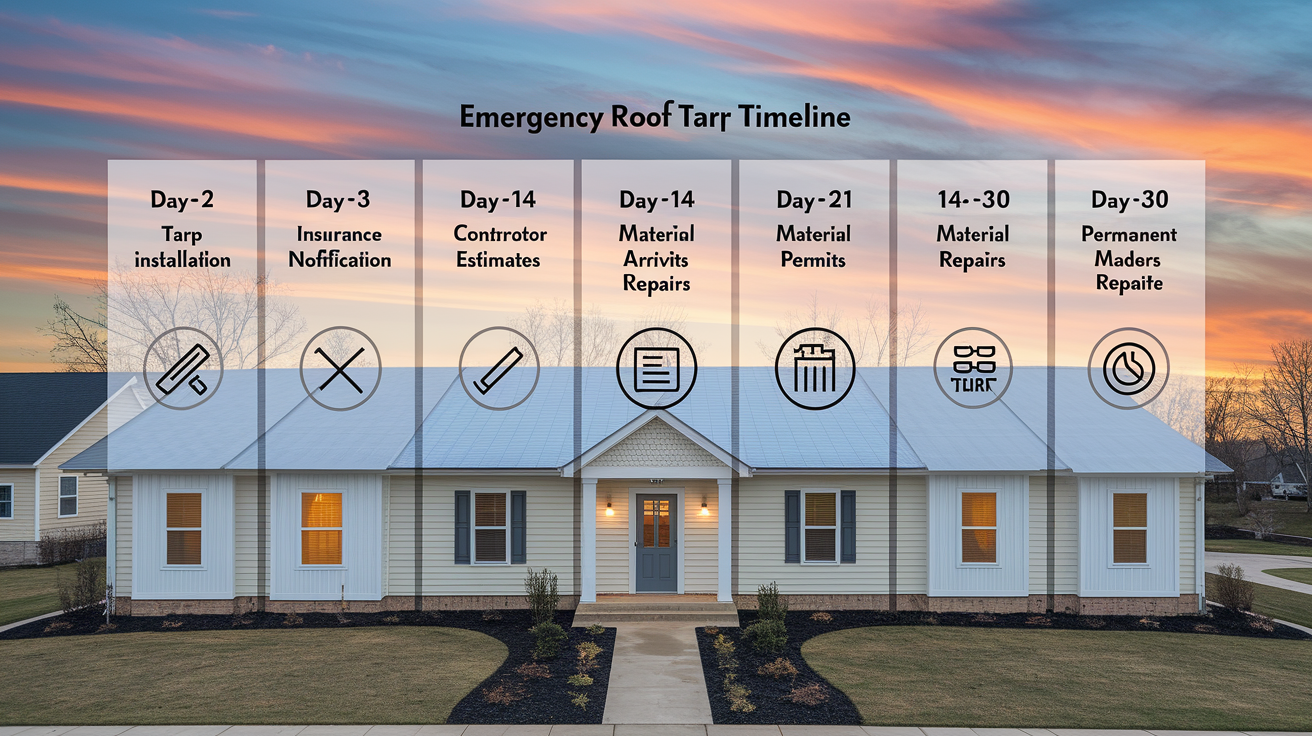
The emergency to permanent repair process follows this sequence:
-
Day 0 to 2: Tarp installation and immediate damage documentation. Install the tarp within 24 to 48 hours after damage is identified. Take date stamped photographs of the damage, the tarp in place, and any visible interior water intrusion. These photos are the foundation of your insurance claim.
-
Day 0 to 3: Notify your insurance carrier. Call your insurer within 24 to 72 hours of discovering the damage. Report the loss, provide initial photos, and ask when an adjuster will be assigned. Keep records of every call and email.
-
Day 3 to 14: Obtain contractor estimates and schedule adjuster inspection. Contact two to three licensed roofing contractors to inspect the damage and provide written estimates. Most contractors can respond within 7 to 14 days depending on local demand. Your insurance adjuster will typically schedule a visit within 1 to 2 weeks as well.
-
Day 7 to 21: Material selection, permit applications, and scheduling. Once you have estimates and the adjuster’s initial assessment, select your roofing material and submit permit applications if required by your jurisdiction. Permits commonly take 1 to 3 weeks to issue. Start this process early so it doesn’t delay the installation window.
-
Day 14 to 30: Contractor confirms start date and materials arrive. Depending on material lead times and contractor availability, your roofing crew will lock in a start date. Asphalt shingles are typically in stock; specialty materials like metal panels or tile may take weeks to arrive.
-
Day 30 to 90: Complete permanent repairs. The actual roof replacement typically takes 1 to 10 days once started, depending on roof size, material type, and weather. The total elapsed calendar time from tarping to completed repairs should ideally fall within 30 days and must not exceed 90 days without documented reason and insurer approval.
Contractor scheduling is often the largest variable in this timeline. During busy seasons or in high demand areas following widespread storm events, contractor wait times can extend from 2 weeks to 12 weeks. Communicating with your insurer about these delays and keeping written documentation of your efforts to schedule repairs helps protect your claim if the timeline stretches.
Insurance Timing Requirements That Affect Your Roof Tarp Replacement Timeline

Insurance carriers require you to take reasonable steps to stop damage immediately after a loss. Installing a tarp is considered essential mitigation. Failing to tarp promptly, or allowing a tarp to fail without replacement, can result in denial of secondary damage claims like interior mold or rot that developed after the initial loss.
Most insurance policies expect you to move from emergency mitigation to permanent repairs within 60 to 90 days. Some carriers allow up to 180 days if documented delays like permitting backlogs, material shortages, or contractor availability issues exist. Always check your policy’s specific language and communicate in writing with your adjuster if delays are unavoidable.
Your insurer will require clear documentation at every stage:
- Date stamped photos of the initial damage and tarp installation
- Receipts for emergency tarp work (typically $150 to $800)
- Contractor estimates with detailed scope and timeline (obtained within 7 to 14 days)
- Inspection notes and photos from every tarp inspection (every 7 to 14 days)
Keep copies of all communications with your insurer, adjuster, and contractors. If hidden damage is discovered during tear off, such as extensive decking rot or compromised rafters, document it immediately with photos and a written supplement to your contractor’s scope. Submit these to your adjuster promptly so the claim can be adjusted and repairs can proceed without financial holdups.
Coordination with your adjuster often takes 1 to 2 weeks from initial notice to inspection. Some adjusters approve emergency tarp costs on the spot; others require receipts and formal claim submission. If your carrier is slow to respond or assign an adjuster, send a written follow up every few days and keep a log of all attempts to reach them. This paper trail protects you if the timeline stretches and secondary damage occurs.
Scheduling Permanent Roof Repairs After Tarping

Once your tarp is in place and your insurance claim is filed, the next step is locking in a contractor and scheduling the permanent replacement. Contractor availability is the variable that most often extends the overall timeline from emergency tarping to completed repairs.
Expect contractor scheduling to range from 2 to 12 weeks depending on the season, local demand, and the scope of your project. Roofing contractors book out quickly after widespread storm events. In normal conditions, a reputable contractor can often start within 2 to 4 weeks. During peak busy seasons, that window can stretch to 8 to 12 weeks or longer.
Permits add another 1 to 3 weeks to the timeline in many jurisdictions. Some municipalities issue permits quickly; others have backlogs that push approvals out by weeks. Start your permit application as soon as you have a contractor estimate and insurer approval so this step doesn’t delay the installation window. Many contractors handle permit applications on your behalf as part of their service.
How Seasonal Demand Extends Repair Timelines
Roofing demand spikes after major storms, during dry weather windows in late spring and summer, and in the weeks before winter weather sets in. In these periods, contractor scheduling can expand from the typical 2 to 3 weeks to 6 to 12 weeks. Material lead times also increase during busy seasons, especially for specialty products like metal panels, tile, or slate.
If you’re tarping during a peak demand period, communicate with your contractor and insurer early. Document in writing that you’re actively pursuing permanent repairs and that contractor availability, not your inaction, is causing the delay. Most insurers will extend the repair window if you can show you made prompt, reasonable efforts to schedule the work.
Once the contractor arrives on site, the actual roof replacement typically takes 1 to 3 days for a standard asphalt shingle roof and up to 10 days for larger or more complex roofs using heavier materials. Weather delays during installation can add days to this window, but the contractor will typically reschedule quickly to finish the work.
Safety Considerations During Roof Tarp Replacement and Removal

Roof tarp installation, inspection, and removal all involve significant fall hazards. You should never attempt to install, adjust, or remove a tarp on a steep or high roof without proper safety equipment and experience. Professional roofing contractors use fall protection harnesses, proper ladders, and crew coordination to manage these risks.
Wind uplift is a major concern during tarp installation and while the tarp remains in place. Loose tarps flap violently in wind, tearing fasteners out and exposing the roof deck to water and further damage. Contractors secure tarps using boards nailed or screwed through the tarp into solid roof framing, sandbags on low slope roofs, or a combination of methods depending on roof pitch and weather conditions.
Key safety precautions during tarp work:
- Use of OSHA compliant fall protection when working above six feet
- Proper ladder setup with secure footing and three point contact
- Inspection of roof deck stability before walking on damaged areas
- Monitoring weather forecasts to avoid tarp work during high winds or storms
- Clearing debris and loose shingles before securing the tarp to prevent punctures
If your tarp begins flapping or showing signs of failure between contractor visits, don’t climb onto the roof yourself unless you have proper training and equipment. Contact your roofing contractor immediately to schedule emergency reinforcement. Many contractors offer 24 hour emergency response for tarp failures, especially if you’re an existing customer with a scheduled replacement.
Cost Timeline Comparison: Temporary Tarp vs. Full Roof Replacement
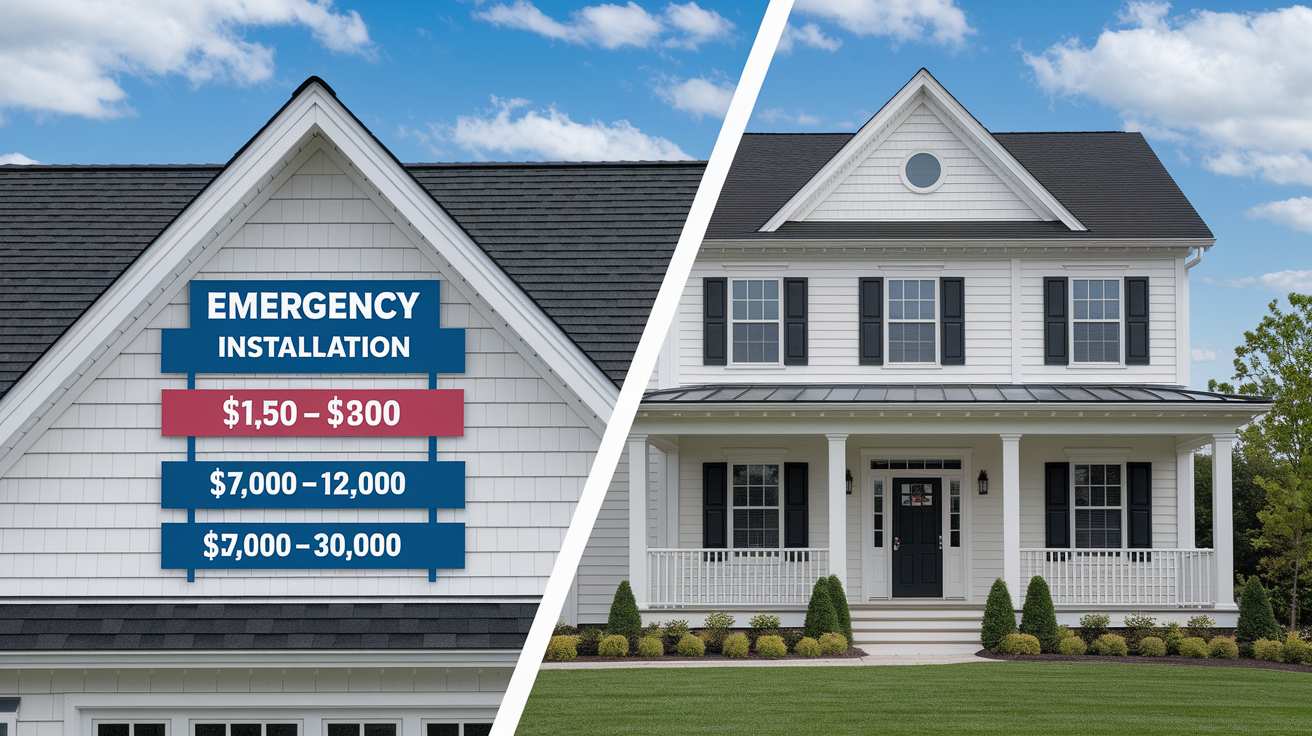
Emergency tarp installation typically costs between $150 and $800 depending on roof size, height, complexity, and local labor rates. Most homeowners pay around $300 to $600 for a typical emergency tarp job. This cost is almost always covered by insurance as part of immediate mitigation, but you should keep receipts and submit them with your claim.
Full roof replacement costs vary widely by size, material, and complexity. A typical asphalt shingle roof for a 1,500 to 2,000 square foot home commonly ranges from $7,000 to $12,000. Metal roofs or premium materials like tile or slate can range from $15,000 to $30,000 or more depending on the roof’s pitch, number of penetrations, and local labor costs.
| Expense Type | Typical Cost | How Timing Affects Cost |
|---|---|---|
| Emergency tarp installation | $150 to $800 | Prompt installation prevents secondary damage; delays increase interior repair costs |
| Full roof replacement (asphalt) | $7,000 to $12,000 | Extended tarp duration increases risk of hidden decking rot, raising final replacement cost by 10 to 30% |
| Full roof replacement (metal/premium) | $15,000 to $30,000+ | Long delays can compromise structural framing; additional repairs add thousands to final bill |
Extended tarp use increases the risk of mold growth, decking rot, and interior water damage. Mold remediation can add $1,500 to $5,000 or more to your total repair bill depending on the scope of contamination. Replacing rotted roof decking adds labor and material costs, commonly $2 to $4 per square foot of affected area. If water intrudes into walls or ceilings, drywall replacement, insulation removal, and electrical repairs can add thousands more.
The financial case for moving to permanent repairs quickly is clear. A $500 emergency tarp that remains in place for 90 days without reinforcement or replacement can easily lead to $3,000 to $10,000 in additional interior and structural repairs. Scheduling permanent repairs within 30 days minimizes these risks and keeps your total claim cost lower.
Long Term Alternatives When Roof Tarp Replacement Timelines Are Extended
In some situations, documented delays like permitting backlogs, contractor shortages following widespread storm events, or material supply chain issues can push the repair timeline beyond 90 days. When this happens, you and your contractor may consider intermediate protective measures that offer better durability and weather resistance than standard tarps.
Shrink wrap roofing systems, for example, provide a tighter seal and better UV resistance than standard tarps and can last 3 to 9 months in some conditions. Synthetic underlayment coverings, though not designed for long term weather exposure, offer better water and UV resistance than polyethylene tarps. Temporary membrane systems using self adhering materials can bridge longer timelines but still require eventual removal and full roof replacement.
Building codes in many jurisdictions enforce a 25 percent damage rule: if more than 25 percent of your roof area is damaged, local code may require full replacement rather than repairs. This can complicate temporary covering strategies because the scope of work is already determined and delaying only increases secondary damage risk. Always check with your local building department before planning extended temporary coverings.
Alternatives to standard tarps when timelines extend:
- Shrink wrap roofing systems with heat sealed seams
- Heavy duty synthetic underlayment secured with cap nails
- Self adhering membrane patches over damaged sections
- Temporary metal panel coverings for large exposed areas
If you’re facing an extended timeline due to documented, unavoidable delays, communicate with your insurer in writing and ask for approval to extend the temporary covering period. Keep records of all efforts to schedule contractors, obtain materials, and secure permits. This documentation protects your claim and demonstrates that you took reasonable steps to move toward permanent repairs as quickly as practical conditions allowed.
Final Words
You acted fast: tarped the roof, documented damage, and started the call chain, contacting inspector, contractor, and adjuster.
We covered the safe windows, aiming for permanent repair in 30 days and no later than 90 without approval, what wears tarps down, signs a cover is failing, and how insurers and seasons affect scheduling.
Plan inspections every 7-14 days, get estimates in 7-14 days, and push for repair within the recommended roof tarp replacement timeline.
Stay steady. Quick action now keeps costs lower and your home dry.
FAQ
Q: What is the 25% rule in roofing?
A: The 25% rule in roofing means insurers or building codes often require a full roof replacement when damage covers 25% or more of the roof, guiding repair versus replacement decisions.
Q: How long should a roof tarp last?
A: A roof tarp should last long enough for permanent repairs, typically 30–90 days; heavy-duty UV-treated tarps may last several months, but UV, wind, and pooled water can cause failure in weeks.
Q: How often should I replace my roof underlayment?
A: You should replace roof underlayment when you reroof or if it’s wet or damaged; underlayment isn’t meant to stay exposed and can deteriorate in weeks, so replace during permanent repairs.
Q: What is the average cost to tarp a roof?
A: The average cost to tarp a roof runs about $150–$800, depending on roof size, pitch, access, materials, and emergency response; insurers often cover emergency tarping as mitigation.