

Most homeowners don’t realize wet insulation stops working the second water hits it, yet they wait weeks trying to decide if replacement’s really necessary. By then, mold’s already growing and your energy bills are climbing while moisture spreads to structural wood you can’t even see. Whether you need immediate removal or can attempt drying comes down to three factors: insulation type, how soaked it got, and how fast you caught it. Get this call wrong and you’ll either waste money replacing material that could’ve been saved, or keep damaged insulation that’s actively making your family sick while rotting out your home’s framing.
When Wet Insulation Must Be Replaced and When It Can Be Saved

Whether wet insulation needs replacement comes down to three things: what it’s made of, how soaked it got, and how fast you caught it. These work together to tell you if drying might work or if you’re looking at immediate removal. Get this wrong and you’ll waste time trying to save something that’s already done for, or throw out material that could’ve been salvaged.
Fiberglass batts don’t soak up much water since they’re spun glass, not sponge material. Catch them early when they’re just damp and you can sometimes dry them with fans and dehumidifiers in a few days. You need to jump on it immediately though, with strong airflow hitting the material from multiple angles. Closed-cell spray foam actually repels water, making it the easiest to save if moisture reaches it. But here’s the catch: water can still get trapped between the foam and your structural wood, rotting it out while the insulation itself looks perfectly fine.
Cellulose loose-fill always gets replaced when wet. Always. It’s pulverized paper that acts exactly like you’d expect paper to act around water. Once it’s saturated, it stays damp for weeks or months and resists every practical drying method you throw at it. Even if the surface feels dry, moisture’s still trapped deep inside. Heavily soaked fiberglass batts are the same deal because they get so dense that water can’t evaporate completely. Any insulation that’s compressed, dark-stained, growing mold, or smells musty has permanently lost what made it work and should come out regardless of what it’s made from.
You’ve got 48 hours after finding a leak to stop the damage and start drying before mold takes over. After that window closes, even stuff that could theoretically dry should usually get replaced because mold spores have already moved in. Compressed insulation loses those air pockets that actually provide the thermal resistance, so it won’t insulate right even if you dry it completely. Wait too long and what could’ve been a targeted drying project turns into full removal with added mold remediation costs.
Identifying Water-Damaged Insulation in Your Home

Early detection keeps water damage from spreading to your structure and protects your family from health problems that develop when moisture sits there doing its thing. The longer saturated insulation stays put, the more damage spreads to surrounding wood, drywall, and everything else nearby.
Look for these six signs:
- Fiberglass turning gray or clumping instead of staying white and fluffy, cellulose darkening and feeling mushy or packed down instead of loose
- Strong musty smells in attics, crawl spaces, or near walls even when there’s no visible water
- Ceiling stains, wall discoloration, or paint bubbling showing moisture traveling through materials
- Condensation forming on windows, pipes, or structural surfaces where insulation’s installed
- Insulation that feels heavy when you touch it or sags noticeably from where it normally sits
- Black, green, or brown mold spots on insulation surfaces or surrounding materials
Check attics first since roof leaks make this the most common damage spot. Then inspect crawl spaces under first floors, wall cavities near plumbing runs, and areas under flooring where pipes pass through. Moisture meters catch hidden saturation that you can’t see, while thermal imaging cameras show temperature differences indicating trapped water. Both tools help pros assess damage more accurately than just looking at the surface.
Water doesn’t always damage insulation right below a leak. It runs along rafters, joists, and other framing before soaking into insulation twenty feet away from the actual entry point. That’s why you need to check areas that seem totally unrelated to visible water damage. A roof leak near the chimney might saturate insulation way over at the eaves where water traveled along a rafter before finally dripping down.
Common Causes of Insulation Water Damage
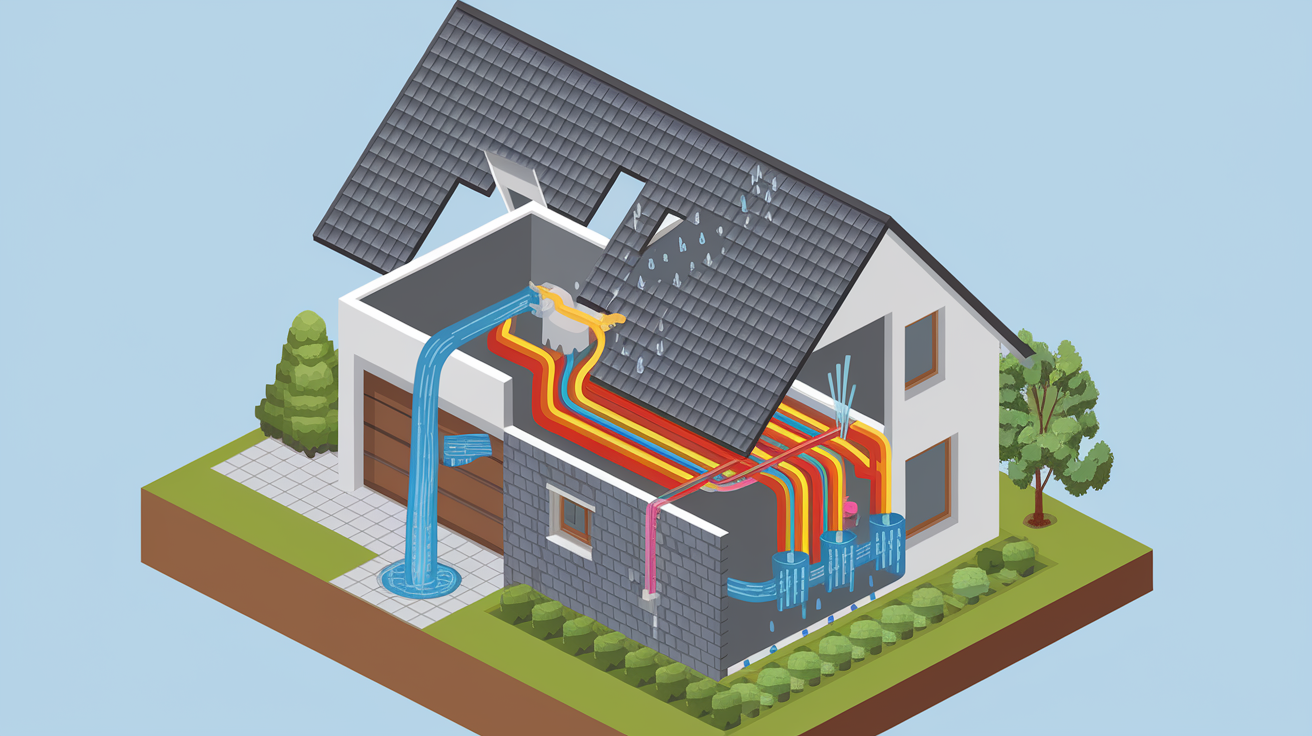
External water intrusion causes most insulation damage in homes. Roof leaks from damaged shingles, deteriorated flashing around chimneys and vents, or worn pipe boots let rain into attic spaces. Ice dams form along roof edges in cold climates when escaping heat melts snow that refreezes at the eaves, creating barriers forcing water under shingles. Storm damage can lift roofing materials or drive rain sideways through vents that normally shed water fine. Blown-in snow enters through ridge caps and soffit vents during high winds, then melts when temperatures rise.
Internal moisture sources hit insulation even when no external water enters. Burst pipes dump hundreds of gallons into wall cavities and ceiling spaces within minutes. Plumbing failures at connection points, worn supply lines, or leaking drain pipes slowly saturate surrounding insulation over days or weeks. HVAC systems generate condensation that drips into ductwork insulation or ceiling spaces when drain lines clog or disconnect. Humid air from bathrooms and kitchens rises into attics through gaps in ceiling penetrations, light fixtures, and attic hatches.
Poor ventilation creates condensation problems that look similar to leaks but have no water source. Warm indoor air escapes into attics during cold months and hits cooler roof deck surfaces, forming water droplets that drip onto insulation below. This happens most in homes with inadequate soffit and ridge venting or blocked airflow paths. Water travels along structural members before soaking insulation, which explains why damage shows up far from the actual problem. A small roof leak near the peak can saturate insulation at the eaves after water runs down a rafter for fifteen feet.
Health and Energy Risks from Saturated Insulation

Water replaces the trapped air in insulation that provides thermal resistance, eliminating what makes the material work. This R-value drop forces heating and cooling systems to run longer trying to maintain comfortable temperatures. The result shows up immediately in higher utility bills, sometimes increasing monthly costs by 20 to 30 percent in heavily affected areas. Water also conducts temperature naturally, actively pulling warm air outside during winter and hot air inside during summer.
Mold and mildew grow on wet insulation within 24 to 48 hours, releasing spores into your home’s air supply. These spores circulate through HVAC systems and spread to other rooms, affecting air quality throughout the house. Family members develop respiratory problems, allergy symptoms, and breathing difficulties even in rooms far from the damaged area. Some mold types produce mycotoxins creating serious health risks with extended exposure. The musty smell that develops means active mold growth and poor air quality.
Moisture damages more than just insulation. It encourages wood rot in rafters, joists, and structural framing supporting your home. Rot weakens these members over time, creating safety hazards and expensive structural repairs. Carpenter ants and termites get attracted to damp wood, bringing pest problems on top of moisture damage. Bacterial contamination can develop in standing water or severely saturated materials, particularly in crawl spaces and basements where ventilation’s limited.
Beyond costs and health risks, wet insulation makes your home uncomfortable. Rooms feel drafty because damaged insulation can’t block air infiltration. Temperature regulation fails, leaving some areas too hot while others stay cold no matter how much you adjust the thermostat. Humidity levels rise as wet materials release moisture into indoor air, making spaces feel clammy and unpleasant even when the temperature seems reasonable.
Complete Removal and Replacement Process

Safe and effective insulation replacement follows a systematic approach protecting workers and preventing contamination spread while ensuring new materials perform correctly. The process differs based on whether drying gets attempted first or immediate replacement is necessary.
- Safety preparation starts before anyone enters the affected area by gathering protective equipment including heavy-duty gloves, N95 respirators or better masks, and eye protection to shield against insulation fibers and mold spores
- Assessment and containment involves isolating damaged areas with plastic sheeting sealed at edges to prevent spores and contaminated dust from spreading to clean spaces during removal work
- Material evaluation determines if drying makes sense by checking the insulation type, saturation extent, presence of any visible mold or musty odor, and how much time passed since water exposure occurred
- Drying attempts for salvageable materials work only for slightly damp fiberglass batts caught within 48 hours using multiple fans positioned for cross-ventilation, commercial dehumidifiers, and open windows when outdoor humidity’s low, with moisture meters confirming complete drying before stopping
- Remove unsalvageable insulation by carefully pulling material free from joists, studs, or surfaces and immediately bagging it in heavy contractor bags to prevent spore dispersal as the material gets disturbed
- Dispose properly by checking local hazardous waste disposal regulations since many jurisdictions classify moldy or contaminated insulation as special waste requiring specific handling procedures
- Dry structural elements thoroughly means checking hidden moisture pockets behind vapor barriers, inside wall cavities, and within wood framing using moisture meters, not visual inspection, before installing new material
- Install replacement insulation matched to the location’s requirements because attic insulation, wall cavity applications, and crawl space needs call for different materials, installation methods, and R-values to meet local building codes
| Insulation Type | Drying Potential | Typical Timeline | Recommended Approach |
|---|---|---|---|
| Fiberglass batts – slightly damp | Possible if caught early | 3-5 days with fans and dehumidifiers | Attempt drying with moisture meter verification |
| Blown-in fiberglass – minimal saturation | Sometimes salvageable | 7-10 days with continuous airflow | Professional assessment recommended |
| Cellulose loose-fill – any wetness | Not salvageable | N/A – replacement required | Remove immediately and replace |
| Spray foam – contaminated | Check surrounding materials | Variable based on hidden moisture | Inspect for trapped water behind foam |
When drying gets attempted, fan placement creates the biggest impact on success. Position fans to blow across the wet insulation surface rather than directly at it, which prevents material disturbance while maximizing evaporation. Place dehumidifiers in the center of the affected space with doors and windows closed after initial ventilation. Run equipment continuously for days, not hours, and check progress with moisture meters rather than assuming the material’s dry. Professional moisture meters provide accurate readings at different depths within the insulation, while visual inspection and touch only reveal surface conditions.
Installation timeframes range from a single day for small attic sections to a week or more for whole-house projects involving wall cavities. Access challenges in tight crawl spaces, between floor joists, or within finished wall cavities slow installation and may require opening drywall or removing exterior siding. Dust control during removal protects living spaces using plastic barriers, negative air pressure when possible, and immediate bagging of contaminated materials. Site cleanup includes vacuuming work areas with HEPA-filtered equipment, wiping surfaces with damp cloths to capture remaining dust, and removing all plastic sheeting carefully to avoid spreading trapped particles. Consult professionals when projects involve mold remediation, confined space access, or uncertainty about proper installation methods, since improper work wastes money and fails to restore proper thermal performance.
Wet Insulation in Wall Cavities and Confined Spaces

Wall cavity insulation presents unique challenges because the enclosed space prevents air circulation needed for natural drying. Unlike attic insulation you can access directly, wall insulation sits trapped between studs with only the interior drywall and exterior sheathing allowing moisture to escape. Standard fans and dehumidifiers positioned in the room can’t reach the wet material inside. Visual inspection’s impossible without opening walls, making it difficult to assess damage extent or verify that materials are actually dry after treatment.
Specialized drying equipment injects warm, dry air directly into wall cavities through small holes drilled near the base of affected walls. Professional restoration teams use this injection drying approach along with wall cavity monitoring systems tracking moisture levels inside the space over time. The process requires technical expertise to determine injection point locations, set appropriate air volume and temperature, and verify complete drying without damaging electrical wiring or other systems running through the walls. Attempting DIY solutions on wall cavity insulation typically fails because homeowners lack the equipment to dry enclosed spaces effectively.
Vapor barriers inside wall cavities complicate moisture problems further. Water gets trapped between the barrier and the insulation or between the barrier and the drywall, creating pockets that resist drying. The barrier that normally protects insulation from interior humidity works against you when exterior water enters through siding or roof leaks. Prolonged hidden moisture causes structural damage to wall studs, creates ideal conditions for mold growth on hidden surfaces, and may affect electrical systems before problems become visible on interior walls. When wall cavity insulation gets wet, professional intervention becomes necessary rather than optional because the risks of incomplete drying and hidden damage outweigh any potential cost savings from DIY attempts.
Replacement Costs and Budget Planning

Insulation replacement costs vary significantly based on project scope, material choices, and site conditions affecting labor requirements and installation difficulty.
Cost factors include:
- Square footage of affected areas drives base material and labor costs, with typical ranges from several hundred square feet in localized damage to thousands of square feet for whole-house projects
- Insulation material type selected determines price per square foot, from economical fiberglass batts at lower cost to premium closed-cell spray foam at three to four times the price
- Labor expenses for removal and installation reflect skill requirements and project complexity, with straightforward attic work costing less per hour than confined wall cavity projects
- Disposal fees for contaminated materials add to base costs, particularly when local regulations classify moldy insulation as special waste requiring specific handling
- Access difficulty increases labor time and total cost when projects involve tight crawl spaces, finished wall removal and restoration, or areas requiring scaffolding
- Mold remediation requirements add significant expense when contamination’s present, sometimes doubling the total project cost compared to simple water-damaged insulation replacement
Written estimates from licensed professionals protect you by clearly defining scope, materials, timeline, and total costs before work begins. Request estimates from three contractors to compare pricing and approaches. Look for detailed breakdowns listing material quantities and types, labor hours by project phase, disposal costs as separate line items, and completion timelines with start and end dates. Ask what happens if additional damage gets discovered during removal, how change orders get handled, and whether the estimate includes final cleanup and restoration of access points.
Financing options help homeowners manage emergency repair costs that appear without warning in household budgets. Many restoration companies offer payment plans for larger projects, while home equity lines of credit provide flexible funding at reasonable interest rates. Some utility companies and state energy offices run rebate programs for insulation upgrades that improve energy efficiency, offsetting a portion of replacement costs. The energy savings from properly installed insulation help recover the upfront investment through lower monthly heating and cooling bills, typically showing measurable reduction within the first billing cycle after completion.
Insurance Coverage and Claims for Water-Damaged Insulation

Insurance policies typically cover wet insulation damage when water intrusion happens suddenly from burst pipes, storm damage, or appliance failures homeowners couldn’t prevent through normal maintenance. These sudden water events clearly fall within covered perils under most standard homeowners policies. Gradual damage from poor maintenance, ongoing roof deterioration, or repeated minor leaks usually isn’t covered because insurance expects homeowners to maintain their property and address problems before they cause major damage.
Documentation requirements for successful claims start immediately after discovering water damage. Take photos of wet insulation, water sources, affected areas, and any visible damage to surrounding materials before touching anything. Moisture readings from professionals establish saturation levels objectively rather than relying on subjective descriptions. Written estimates from licensed restoration contractors detail repair scope, costs, and timeline in the format insurance adjusters expect. Create a timeline documenting when you discovered the problem, what immediate steps you took to stop water flow, and when you contacted restoration professionals. This timeline proves you acted promptly to prevent further damage.
Emergency mitigation obligations require homeowners to stop active water damage and prevent additional problems while waiting for insurance approval. Tarp damaged roofs, turn off water supplies to broken pipes, and remove standing water promptly. Insurance policies require reasonable efforts to minimize loss, and failure to take these basic steps can reduce claim payments or result in denial. Document mitigation costs separately though since emergency stabilization’s often covered even when the underlying cause might not be. Delays between discovering damage and beginning mitigation work give insurance companies reason to question claim legitimacy or reduce payments for damage that developed during the delay period.
Working with insurance adjusters means providing access for their inspection, answering questions about how damage occurred and when you discovered it, and sharing all documentation you’ve collected. Professional restoration companies experienced with insurance work understand adjuster expectations and provide documentation in formats that streamline the claims process. Their estimates include technical details about drying methods, disposal requirements, and code-compliant installation that support claim approval. Similar to Fire and Smoke Damage Restoration, water damage claims require thorough documentation showing proper disposal methods and installation meeting current building codes to satisfy both insurance requirements and local regulations.
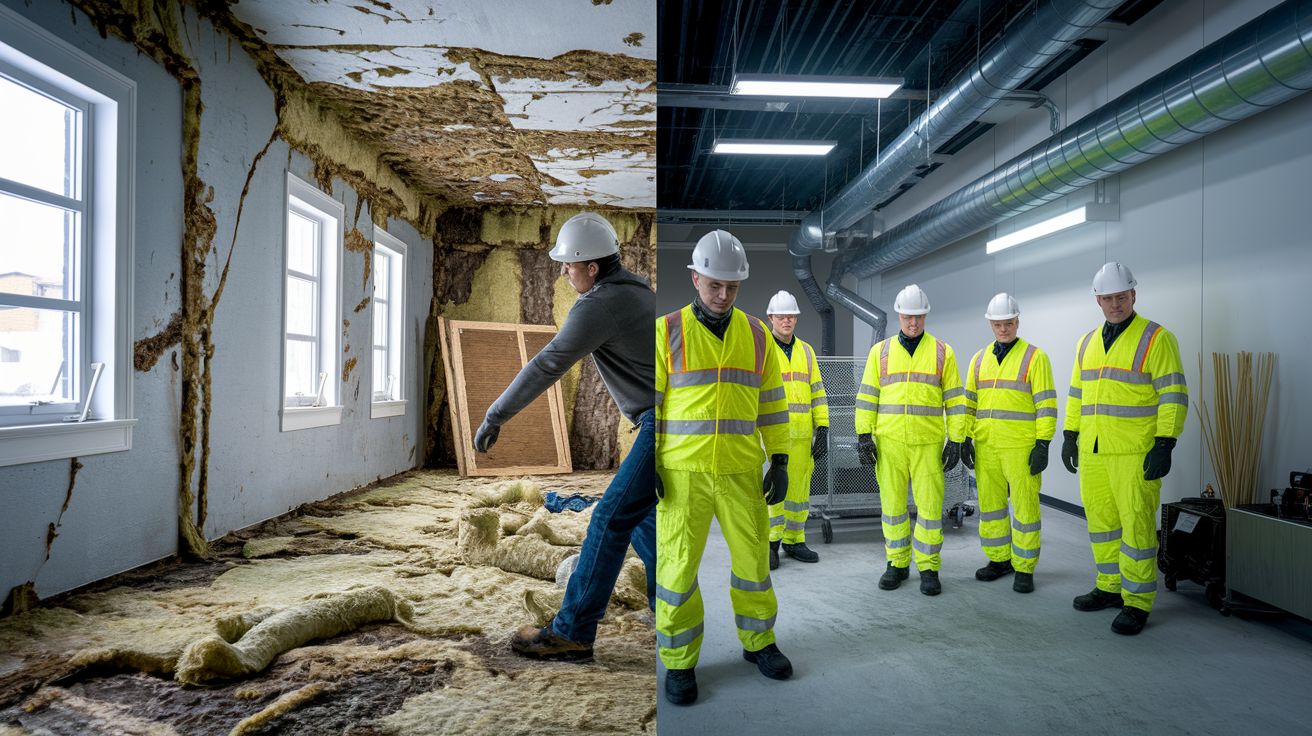
DIY Risks Versus Professional Insulation Services
Some small insulation projects suit DIY handling when specific conditions get met. Accessible attic areas with minimal saturation caught within hours, fiberglass material without any mold present, and homeowners who already own proper safety equipment including respirators and protective clothing can sometimes handle limited projects. Small sections of slightly damp fiberglass batts in easily reached areas represent the upper limit of reasonable DIY scope. Even then, moisture meters to verify complete drying and proper disposal of contaminated materials present challenges for homeowners.
Improper DIY handling creates serious risks that often cost more to fix than hiring professionals initially. Mold exposure without proper respiratory protection causes health problems ranging from allergic reactions to serious respiratory illnesses, particularly dangerous for anyone with asthma or compromised immune systems. Incomplete drying leaves hidden moisture causing wood rot, persistent mold growth, and continued indoor air quality problems that only become apparent months later. Code violations from incorrect installation or improper material selection for specific applications can reduce your home’s value, cause problems during future home sales, and void manufacturer warranties on insulation products. Some insurance policies reduce or deny coverage for water damage repairs when homeowners attempt DIY remediation instead of hiring licensed professionals.
Professional restoration services bring specialized equipment homeowners can’t practically own for one-time use. Industrial dehumidifiers remove moisture far more effectively than consumer models. Thermal imaging cameras and deep-reading moisture meters detect hidden saturation behind surfaces and deep within materials. Wall cavity drying systems inject treated air directly into enclosed spaces. Mold remediation expertise includes containment methods, proper removal techniques, antimicrobial treatments, and verification testing ensuring complete remediation. Professionals understand building code requirements for insulation R-values, vapor barrier placement, ventilation clearances, and fire-resistance standards that vary by location and application.
Contractor selection criteria protect you from unlicensed operators and ensure quality work. Verify active licenses for both general contracting and specialized restoration work required in your state. Confirm liability insurance and workers compensation coverage protect you from responsibility if workers get injured on your property. Request written estimates with detailed scope descriptions rather than vague verbal quotes. Ask for references from recent similar projects and actually call them to ask about work quality, timeline accuracy, and how the contractor handled unexpected issues. Check experience specifically with your insulation type and damage situation since comprehensive professional approaches to wet insulation replacement require familiarity with multiple trades, material handling, and coordinated sequences preventing problems during restoration.
Preventing Future Insulation Water Damage

Prevention costs far less than repeated insulation replacement and protects your home from the structural damage and health risks that develop when moisture problems go unaddressed or keep recurring.
Eight effective prevention measures include:
- Regular roof inspections twice yearly checking for damaged or missing shingles, deteriorated flashing around chimneys and vents, worn pipe boots, and loose or damaged roofing materials that could allow water entry
- Gutter cleaning and maintenance ensuring downspouts direct water at least five feet from foundation walls, fixing sagging sections that pool water, and repairing leaks at seams before they overflow
- Siding inspection for holes, gaps, and damage where water could penetrate behind exterior cladding, with particular attention to areas around windows, doors, and utility penetrations
- Basement and foundation sealing that closes cracks in concrete walls and floors, addresses gaps where pipes enter the building, and applies appropriate waterproofing to below-grade surfaces
- Proper attic ventilation installation providing continuous soffit intake and ridge exhaust to prevent warm air accumulation and condensation on cold roof surfaces
- Vapor barrier integrity checks ensuring barriers remain continuous without tears, gaps, or improper installation allowing moisture migration into insulation layers
- HVAC condensation line monitoring with regular checks that drain lines flow freely, condensate pumps work correctly, and drip pans don’t overflow during high-use periods
- Seasonal preparation for ice dams including attic insulation upgrades, air sealing to reduce heat loss through ceilings, and heat cable installation on roof edges in cold climates
Seasonal timing matters for prevention work. Fall roof inspections before winter weather catch problems before storms test weak points. Spring checks after snow melt identify damage from ice and verify that winter didn’t create new leaks. Summer humidity control in attics and crawl spaces prevents condensation problems before they saturate insulation during cooling season. Always address root causes before replacing insulation since new material will fail just as quickly if the moisture source remains active. Flood-prone areas benefit from reinforced prevention including elevated electrical systems keeping critical equipment above potential water levels and permanent flood barriers at entry points keeping water outside during overflow events.
Selecting Moisture-Resistant Insulation for Replacement
When replacing water-damaged insulation, consider upgrading to materials that resist future moisture problems while meeting or exceeding your home’s energy efficiency requirements for your climate zone.
Closed-Cell Spray Foam Benefits
Closed-cell spray foam provides superior moisture resistance compared to traditional insulation materials because its dense structure doesn’t absorb water like fibrous products. The material adds structural integrity to walls and roof assemblies by bonding to framing members and sheathing surfaces. It creates an air barrier in addition to thermal resistance, stopping moisture-laden air from entering wall cavities where condensation can form. The higher upfront cost compared to fiberglass or cellulose pays off in flood-prone areas, high-humidity climates, and locations where past water damage indicates ongoing moisture risk. Properly installed closed-cell foam can get wet from exterior sources without losing performance once it dries.
Foam Board and Rigid Insulation
Foam board and rigid insulation panels work particularly well for basements and crawl spaces where moisture contact’s more likely than in above-grade walls or attics. These products install directly against foundation walls using mechanical fasteners or adhesive, creating a continuous moisture-resistant barrier. The rigid structure resists compression from minor water exposure and maintains R-value even in damp conditions. Foam board also resists mold growth better than organic materials like cellulose. Applications in foundation walls, beneath slab edges, and as exterior continuous insulation provide consistent thermal performance in environments where moisture’s present.
Fiberglass with Enhanced Vapor Barriers
Fiberglass batts with properly installed vapor barriers remain cost-effective for standard moisture conditions when upgraded from basic kraft-faced products. Install separate polyethylene vapor barriers on the warm-in-winter side of wall and ceiling assemblies in cold climates, or use unfaced batts with separate smart vapor retarders that adjust permeability based on seasonal humidity changes. Proper vapor barrier installation protects traditional fiberglass from moisture migration while costing significantly less than spray foam options. This approach suits homes with normal moisture conditions rather than high-risk locations but requires careful installation attention to seal all penetrations and maintain continuous barrier coverage.
Mold Assessment and Remediation Requirements
Wet insulation grows mold and mildew within 24 to 48 hours of saturation in most conditions, with some materials like cellulose showing growth even faster. This rapid timeline means any delay in addressing water damage creates mold problems on top of moisture issues. Once mold colonies establish, they continuously release spores into indoor air affecting your home’s air quality and creating respiratory problems for occupants. Mold growth doesn’t stop at the insulation itself but spreads to surrounding wood framing, drywall, and other building materials.
Visual inspection for mold looks for discoloration patterns on insulation surfaces including black, green, brown, or gray spots or patches that differ from the material’s normal color. Check surrounding wood for dark staining or fuzzy surface growth. Musty odors indicate active mold growth even when visual inspection doesn’t reveal obvious colonies because mold releases volatile organic compounds creating the characteristic smell. Surface growth on insulation visible without tools represents advanced colonization that’s been active for days or weeks already.
Professional mold testing becomes necessary when damage extent’s unclear, when sensitive occupants report health symptoms but no visible mold appears, or when contamination might have spread through HVAC systems to other areas. Testing identifies specific mold species and spore concentrations, informing remediation scope and methods. Remediation protocols include containment barriers with negative air pressure to prevent spore spread, removal of all contaminated materials, HEPA vacuuming of surfaces, and antimicrobial treatments on structural materials that remain in place. Professional mold remediation protects workers with proper respirators and protective equipment while preventing contamination spread to unaffected areas. Health risks from DIY mold handling include respiratory illness, allergic reactions, and chemical exposure from improper cleaning product use.
Any insulation showing visible mold growth, heavy musty odors, or dark staining should never be reused regardless of the material type or how well it appears to dry. Mold colonies penetrate deep into fibrous materials where they can’t be effectively cleaned or killed. Even dead mold spores cause allergic reactions and health problems when disturbed and released into indoor air. The only safe approach to moldy insulation is complete removal and disposal followed by surface treatment of surrounding materials before new insulation installation.
Timeline Expectations for Complete Insulation Replacement
Project timelines vary significantly based on damage extent, whether mold remediation’s required, access limitations at the site, and how quickly structural drying can be verified before new insulation installation.
| Project Phase | Typical Duration | Variables Affecting Timeline |
|---|---|---|
| Emergency response and assessment | 24-48 hours from initial contact | Contractor availability, access to affected areas, initial damage extent |
| Drying phase | 3-10 days depending on materials | Humidity levels, ventilation quality, hidden moisture pockets, material type |
| Removal and disposal | 1-3 days for most residential projects | Square footage affected, access difficulty, containment requirements |
| Installation of replacement insulation | 1-5 days depending on scope | Material type selected, total area, wall cavity versus attic work |
| Final inspection and testing | 1 day plus waiting for appointments | Local building department schedules, code compliance verification needs |
Several factors extend timelines beyond these typical ranges. Mold remediation adds 3 to 7 days for containment setup, removal, treatment, and verification testing before new insulation can be installed. Building permit approvals in some jurisdictions require 1 to 2 weeks of waiting before work can legally begin on extensive projects. Material availability affects schedules when specialty products or large quantities aren’t in local stock. Access limitations in tight crawl spaces or areas requiring scaffolding slow installation work significantly. Weather delays prevent roof repair completion needed before replacing attic insulation underneath the leak source.
Never rush the drying phase despite urgency to get your home back to normal. Incomplete drying leads to mold growth on new insulation and surrounding materials within weeks of installation, forcing you to repeat the entire process. Professional moisture meter readings verify complete drying throughout affected materials rather than just at surfaces. This verification step prevents future problems even though it extends the project timeline by several days compared to visual assessment alone.
Final Words
Wet insulation creates real problems, from mold growth within 48 hours to energy bills that jump without warning. The choice between drying and wet insulation replacement depends on material type, saturation level, and how fast you act.
Fiberglass batts might dry if you catch them early and run the right equipment. Cellulose won’t. Spray foam hides trouble behind it.
Stop the water first. Inspect thoroughly. Replace what’s soaked or contaminated. Your home gets back to safe, dry, and comfortable faster when you don’t guess at hidden moisture.
FAQ
Do I need to replace insulation if it gets wet?
Wet insulation needs replacement depending on three factors: the insulation material type, how saturated it became, and how quickly you respond. Cellulose insulation always requires replacement because it absorbs water like a sponge and breaks down quickly. Fiberglass batts can sometimes be dried with fans and dehumidifiers if only slightly damp and caught within 48 hours, but heavily saturated fiberglass must be replaced. Any insulation showing mold, compression, or contamination loses effectiveness permanently and cannot be saved.
Will mold grow on wet insulation?
Mold will grow on wet insulation within 24 to 48 hours of saturation, affecting indoor air quality and causing respiratory problems. Cellulose insulation grows mold even faster, sometimes within just a few days, because its pulverized paper construction retains moisture. Once mold appears as discoloration or creates musty smells, the insulation must be replaced immediately. Professional mold remediation becomes necessary because DIY handling exposes you to health hazards without proper respiratory protection.
What does wet insulation look like?
Wet insulation looks different depending on the material type, with fiberglass appearing gray and clumped instead of white and fluffy. Cellulose insulation darkens in color, feels mushy and compacted, and develops noticeable musty odors. Fiberglass batts get heavy, sag, flatten, and show water marks or mildew on kraft paper backing. Additional visual signs include ceiling stains above the insulation and condensation on nearby surfaces.
Does insulation lose R-value when wet?
Insulation loses R-value when wet because water replaces the trapped air that provides thermal resistance, forcing your HVAC system to work harder. Water acts as a natural temperature conductor, transferring warm air outside your home and eliminating the insulation’s effectiveness. Even after drying, compressed or damaged insulation never regains its original R-value. Higher energy bills and uncomfortable temperatures result until you replace the saturated material.